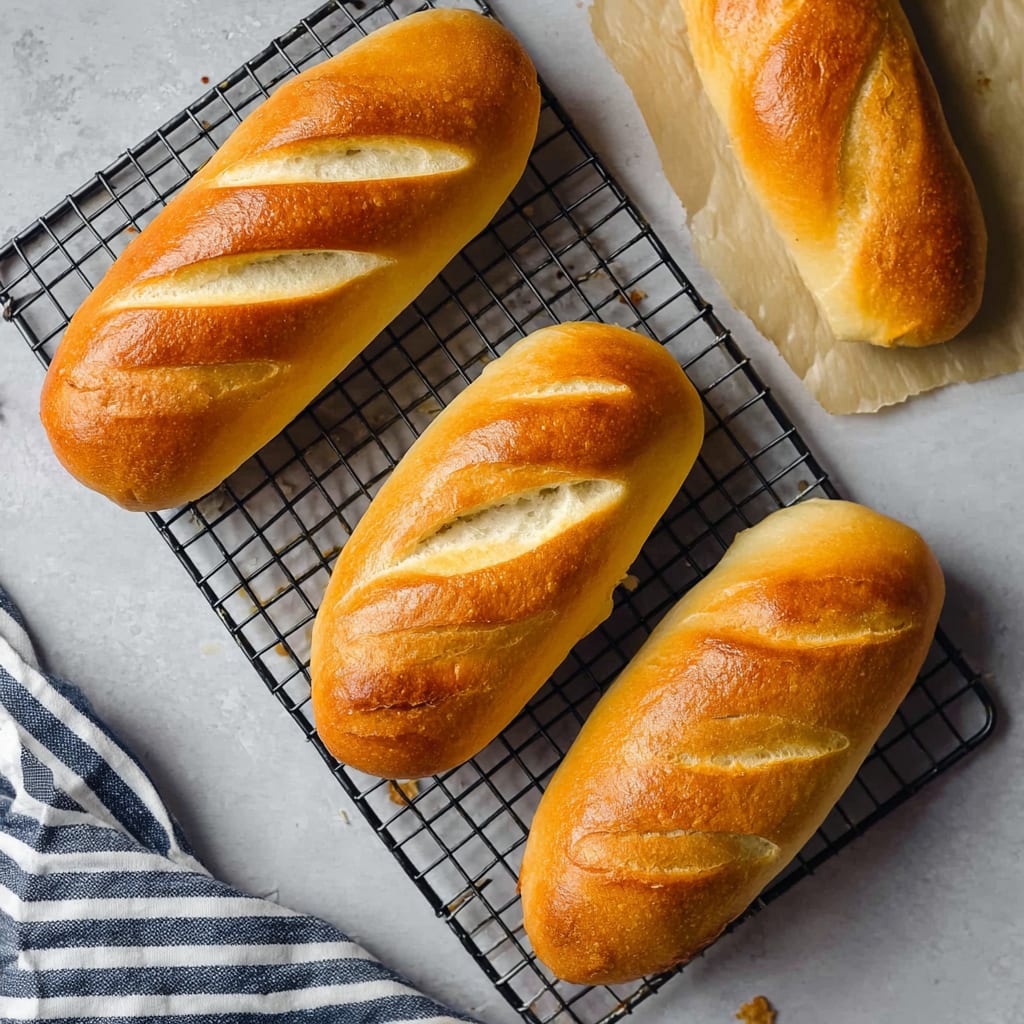
Imagine biting into a handmade sub roll with a perfectly crisp golden crust that gives way to a pillowy, tender interior. These handmade sub rolls deliver that satisfying texture contrast while filling your kitchen with the irresistible aroma of freshly baked bread. Unlike store-bought alternatives, these homemade rolls bring an artisanal quality to your sandwiches that simply can’t be matched by commercial varieties. You’ll learn how to create bakery-quality sub rolls from scratch with simple ingredients and techniques that ensure perfect results every time, elevating your sandwich game to new heights.
Why You’ll Love This Recipe
These handmade sub rolls will transform ordinary sandwiches into extraordinary meals. The exterior develops a beautiful golden crust with just the right amount of chew, while the interior crumb stays soft and fluffy – perfect for soaking up sauces and oils from your favorite fillings without becoming soggy. The enriched dough, with butter and eggs, creates a richness that plain rolls simply can’t match.
What makes these homemade submarine rolls truly special is their versatility. They’re sturdy enough to hold hearty fillings like meatballs and sauce, yet delicate enough to complement lighter sandwich options. The recipe is straightforward, requiring no special equipment beyond a stand mixer, and the hands-on time is minimal compared to the impressive results.
The subtle sweetness and buttery flavor of these freshly baked sub rolls will have your family requesting them for everything from school lunches to dinner accompaniments. Once you’ve mastered these homemade rolls, you’ll find yourself reaching for this recipe whenever you want to elevate a simple sandwich into something truly memorable.
Ingredients List for the Handmade Sub Rolls
These carefully selected ingredients work together to create the perfect texture and flavor balance in your handmade sub rolls. The combination of bread flour for structure and eggs and butter for richness results in rolls that are both sturdy and tender.
- 1 Cup Whole Milk ((245g) 110-115℉)
- 1 Tablespoon + 2 Teaspoons Sugar ((30g))
- 2 ½ Teaspoons Active Dry Yeast ((11g) One Packet)
- 3 ¼ Cups Bread Flour ((450g))
- 2 Teaspoons Fine Sea Salt ((12g))
- 2 Eggs (Beaten)
- 3 Tablespoons Unsalted Butter ((41g) Cold, Cubed)
- 1 Egg White (Beaten – For Egg Wash)
- 1 Tablespoon Water (For Egg Wash)
Pro Tips
When making handmade sub rolls, temperature control is crucial for success. Your milk should be warm (110-115°F) – hot enough to activate the yeast but not so hot that it kills it. Use a kitchen thermometer for precision, as this temperature range ensures proper yeast activation and subsequent rise.
Don’t rush the kneading process. The full 8-10 minutes of kneading after adding the butter is essential for developing the gluten structure that gives these rolls their perfect texture. You’ll know the dough is ready when it passes the “windowpane test” – a small piece of dough can be stretched thin enough to see light through without tearing.
For professional-looking sub rolls, the scoring technique matters significantly. Use a very sharp blade and make quick, confident cuts about ¼-inch deep. These scores allow for controlled expansion during baking, preventing random splits while creating that classic artisan appearance. The egg wash might seem like a small detail, but it’s what gives these homemade submarine rolls their gorgeous golden sheen.

Instructions
Step 1: In a medium sized bowl, add the warm milk, sugar, and yeast. Let bloom for 5 to 10-minutes until frothy.
Step 2: As the yeast mixture blooms, combine the bread flour and salt in the bowl of a stand mixer.
Step 3: Add the yeast mixture and beaten eggs to the flour and salt. Knead on low speed for 3 to 5-minutes until a shaggy dough forms, scraping down the sides of the bowl with a spatula as needed.
Step 4: Add in the cold, cubed butter, and knead for an additional 8-10 minutes until butter is fully incorporated and the dough is smooth. (The dough ball should weigh approximately 880g at this point).
Step 5: Turn the dough out onto a lightly floured work surface, and roll into a tight ball.
Step 6: Lightly grease a large bowl, turning the dough ball to coat and cover. Cover and let rest for 1-hour, or until doubled in size.
Step 7: Turn the dough out onto a lightly floured work surface, and punch the dough down. Divide into six equal pieces (approximately 140g each) and roll into individual dough balls.
Step 8: Using a rolling pin, roll each dough ball into a rectangle that is approximately 9 inches wide by 5 inches tall. The dough should be between ¼ to ½-inch thick. Starting with the long side, tightly roll the dough into a log shape. Pinch the end seams together until they are smooth. Place seam side down on a baking sheet lined with parchment paper.
Step 9: Cover the rolls with a damp kitchen cloth, or a second baking sheet, and let rise for an additional 30 minutes.
Step 10: While the dough is proofing, preheat the oven to 400°F.
Step 11: Mix the egg white and water in a small bowl and gently brush over the rolls.
Step 12: Using a lame, razor blade, or sharp kitchen knife, score the dough ¼ deep in three spots.
Step 13: Bake for 15 minutes until golden brown, or they register 195 – 200°F internally on an instant-read thermometer. (Add 1 – 3 minutes if needed). Remove from oven and transfer to a wire rack. Allow them to cool completely before slicing.
Variations
For whole wheat handmade sub rolls, substitute 1 cup of the bread flour with whole wheat flour. This creates a heartier roll with a nuttier flavor profile that pairs beautifully with turkey and avocado fillings. The texture will be slightly denser, but the nutritional benefits make this a popular adaptation.
Herb-infused sub rolls add an aromatic dimension to your sandwiches. Add 2 tablespoons of finely chopped fresh herbs like rosemary, thyme, or basil to the dry ingredients before mixing. For an Italian-inspired variation, mix in 1 tablespoon of garlic powder and 2 teaspoons of dried Italian herbs to the flour mixture.
For those needing dairy-free options, substitute the whole milk with unsweetened almond milk or oat milk warmed to the same temperature, and replace the butter with the same amount of a plant-based butter alternative. These substitutions maintain the soft texture while accommodating dietary restrictions without sacrificing the quality of your homemade rolls.
Storage and Serving
These handmade sub rolls stay fresh at room temperature in an airtight container for up to 3 days. For longer storage, freeze completely cooled rolls in freezer bags for up to 3 months. Thaw at room temperature and refresh in a 350°F oven for 5 minutes before serving for that just-baked texture and aroma.
These versatile rolls shine as vessels for classic Italian submarine sandwiches filled with salami, ham, provolone, and dressed with olive oil and vinegar. The structure holds up beautifully to hot fillings too – try them with warm meatballs and marinara or a Philly cheesesteak filling.
For a simpler presentation, slice these homemade submarine rolls horizontally, brush with garlic butter, and toast lightly for the perfect accompaniment to pasta dishes or soups. Their subtle sweetness also makes them excellent for breakfast sandwiches filled with eggs and cheese, proving their versatility from morning to evening meals.
FAQs
Why didn’t my dough rise properly?
The most common culprits are yeast that’s too old or milk that’s too hot. Ensure your yeast is fresh and that your milk temperature is between 110-115°F – hot enough to activate the yeast without killing it.
Can I make these rolls without a stand mixer?
Absolutely! You can mix by hand using a wooden spoon and then knead on a floured surface for about 10-12 minutes until smooth and elastic. The process requires more physical effort but yields equally delicious handmade sub rolls.
Why are my rolls dense instead of light and fluffy?
This typically happens when the dough is under-proofed or over-floured. Make sure you’re allowing adequate time for both rises and measuring your flour carefully, preferably by weight.
Can I prepare the dough ahead of time?
Yes! After the first rise, punch down the dough, cover tightly, and refrigerate overnight. The next day, let it come to room temperature for about 30 minutes before shaping your rolls.
How do I know when my rolls are fully baked?
The most reliable method is using an instant-read thermometer – the internal temperature should reach 195-200°F. If you don’t have a thermometer, properly baked handmade sub rolls should sound hollow when tapped on the bottom and have a golden brown color.

Handmade Sub Rolls
- Prep Time: 15 mins
- Cook Time: 30 mins
- Total Time: 45 mins
- Yield: 4 people 1x
- Category: Appetizer
- Method: Cooking
- Cuisine: American
Description
Discover the secret to delicious Handmade Sub Rolls with this easy recipe! Try it today.
Ingredients
- 1 Cup Whole Milk ((245g) 110-115℉)
- 1 Tablespoon + 2 Teaspoons Sugar (30g)
- 2 ½ Teaspoons Active Dry Yeast ( (11g) One Packet)
- 3 ¼ Cups Bread Flour ((450g))
- 2 Teaspoons Fine Sea Salt ((12g))
- 2 Eggs (Beaten)
- 3 Tablespoons Unsalted Butter ((41g) Cold, Cubed)
- 1 Egg White (Beaten – For Egg Wash)
- 1 Tablespoon Water (For Egg Wash)
Instructions
- Step 1: In a medium sized bowl, add the warm milk, sugar, and yeast. Let bloom for 5 to 10-minutes until frothy.
- Step 2: As the yeast mixture blooms, combine the bread flour and salt in the bowl of a stand mixer.
- Step 3: Add the yeast mixture and beaten eggs to the flour and salt. Knead on low speed for 3 to 5-minutes until a shaggy dough forms, scraping down the sides of the bowl with a spatula as needed.
- Step 4: Add in the cold, cubed butter, and knead for an additional 8-10 minutes until butter is fully incorporated and the dough is smooth. (The dough ball should weigh approximately 880g at this point).
- Step 5: Turn the dough out onto a lightly floured work surface, and roll into a tight ball.
- Step 6: Lightly grease a large bowl, turning the dough ball to coat and cover. Cover and let rest for 1-hour, or until doubled in size.
- Step 7: Turn the dough out onto a lightly floured work surface, and punch the dough down. Divide into six equal pieces (approximately 140g each) and roll into individual dough balls.
- Step 8: Using a rolling pin, roll each dough ball into a rectangle that is approximately 9 inches wide by 5inches tall. The dough should be between ¼ to ½-inch thick. Starting with the long side, tightly roll the dough into a log shape. Pinch the end seams together until they are smooth. Place seam side down on a baking sheet lined with parchment paper.
- Step 9: Cover the rolls with a damp kitchen cloth, or a second baking sheet, and let rise for an additional 30 minutes.
- Step 10: While the dough is proofing, preheat the oven to 400°F.
- Step 11: Mix the egg white and water in a small bowl and gently brush over the rolls.
- Step 12: Using a lame, razor blade, or sharp kitchen knife, score the dough ¼ deep in three spots.
- Step 13: Bake for 15 minutes until golden brown, or they register 195 – 200°F internally on an instant-read thermometer. (Add 1 – 3 minutes if needed). Remove from oven and transfer to a wire rack. Allow them to cool completely before slicing.
Notes
Try This Recipe and Leave a comment Below, your opinion matters to me!
Nutrition
- Serving Size: 4 serving
- Calories: 400
- Sugar: 5g
- Sodium: 400mg
- Fat: 10g
- Saturated Fat: 3g
- Unsaturated Fat: 7g
- Trans Fat: 0g
- Carbohydrates: 40g
- Fiber: 5g
- Protein: 15g
- Cholesterol: 50mg