
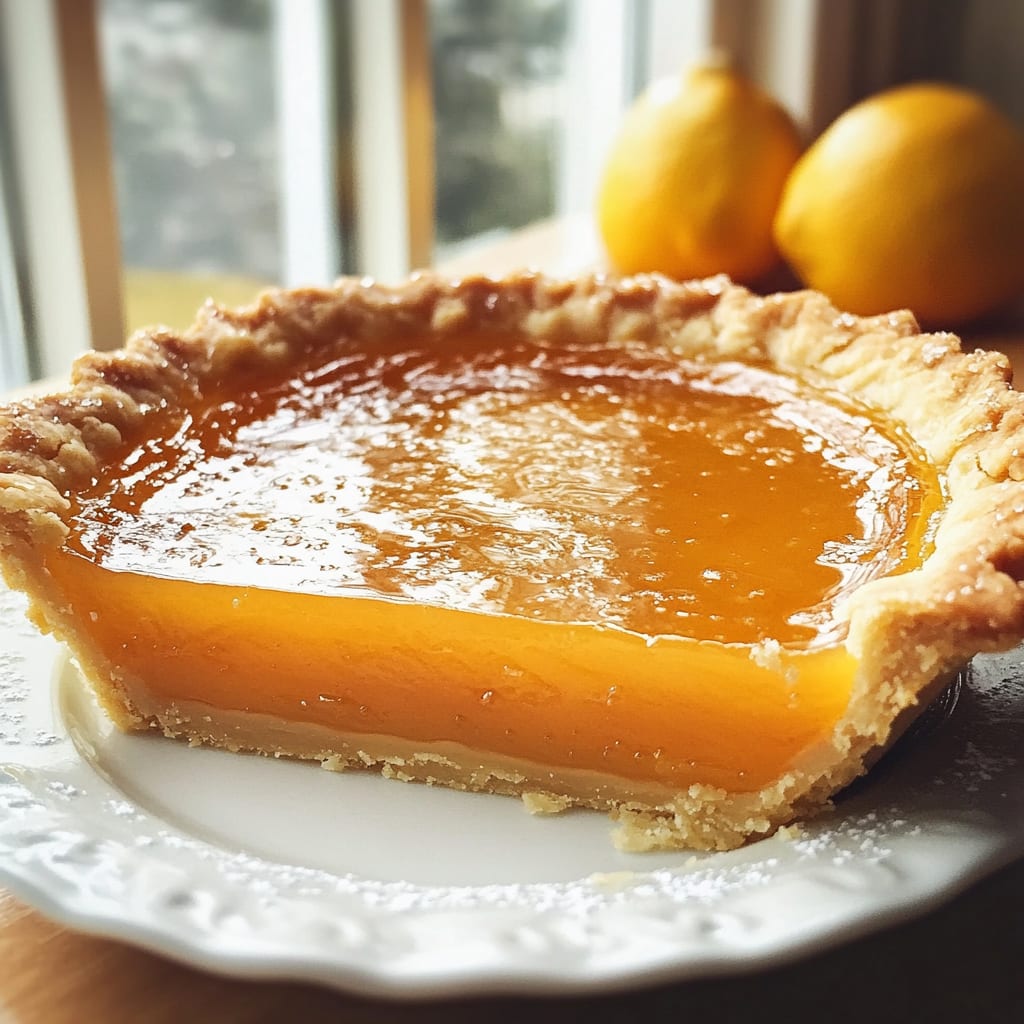
Imagine the first bite of a perfectly balanced Salted Honey Pie – that moment when buttery crust meets silky, amber-hued filling, crowned with delicate flakes of sea salt that dance on your tongue. This show-stopping dessert transforms simple honey into a caramelized custard with notes of vanilla and a whisper of salt that elevates every spoonful. The contrast between sweet and salty creates a dessert experience that’s both nostalgic and sophisticated. You’ll learn how to create this stunning Salted Honey Pie with its perfect texture, impressive presentation, and surprisingly straightforward preparation.
Why You’ll Love This Recipe
This Salted Honey Pie recipe will quickly become a favorite in your dessert arsenal for so many reasons. The contrast between the flaky, buttery crust and the smooth, custard-like honey filling creates a textural symphony that’s utterly satisfying. Each bite delivers a perfect balance of sweetness from the caramelized honey that’s immediately followed by that delightful hint of salt – creating a flavor profile that’s both complex and comforting.
What makes this honey salt pie particularly special is how it transforms humble ingredients into something extraordinary. The honey doesn’t just sweeten; it infuses the entire pie with complex floral notes and a gorgeous amber color that will make your guests think you spent hours perfecting it. Yet the recipe itself is surprisingly straightforward, requiring minimal active time and simple techniques.
The dessert also possesses remarkable versatility, pairing beautifully with after-dinner coffee, afternoon tea, or as the crowning glory of a special occasion meal. Plus, it can be made a day ahead, allowing the flavors to develop even further overnight – perfect for entertaining without last-minute stress.
Ingredients
For the Pie Crust:
- 1¼ cups (156g) all-purpose flour
- 1 tablespoon granulated sugar
- ½ teaspoon salt
- ½ cup (113g) cold unsalted butter, cubed
- 3-4 tablespoons ice water
For the Filling:
- ¾ cup (255g) high-quality honey (local wildflower or clover honey works beautifully)
- ½ cup (100g) granulated sugar
- ½ cup (115g) unsalted butter
- 2 teaspoons vanilla extract
- ¾ teaspoon salt
- 3 large eggs, at room temperature
- ½ cup (120ml) heavy cream
- 2 tablespoons all-purpose flour
- 1 tablespoon white vinegar
- 1-2 teaspoons flaky sea salt (like Maldon) for topping
The quality of honey is paramount in this Salted Honey Pie – choose a local, unfiltered variety with a flavor profile you enjoy, as it forms the foundation of the filling. The flaky sea salt isn’t just a garnish but an essential component that creates the signature sweet-salty contrast that makes this pie exceptional.
Pro Tips
Achieve the Perfect Crust
For a truly exceptional Salted Honey Pie, start with a properly chilled crust. After making your dough, refrigerate it for at least 2 hours, preferably overnight. This extended chill time allows the gluten to relax and the butter to resolidify, resulting in that coveted flaky texture. When blind baking, line the crust with parchment and fill with pie weights or dried beans, baking at 375°F (190°C) for 15 minutes before removing the weights and baking for another 5-7 minutes until just golden.
Master the Honey Filling Consistency
The secret to a silky-smooth honey filling lies in temperature control. Heat your honey-butter mixture just until the butter melts completely and the mixture is warm, not hot. If it’s too hot when you add the eggs, they’ll scramble and ruin your filling’s texture. After adding eggs, strain the mixture through a fine-mesh sieve to eliminate any potential lumps or bits of cooked egg, ensuring that perfect custard-like consistency.
Perfect the Salt Balance
When finishing your Salted Honey Pie with flaky sea salt, timing is crucial. Add the salt approximately 15 minutes after removing the pie from the oven. This allows the surface to set slightly but remain tacky enough for the salt to adhere without immediately dissolving. Use a light hand – you want occasional pops of saltiness, not an overwhelmingly salty experience. Taste your honey before baking and adjust the salt in the filling accordingly, as some honey varieties naturally contain more mineral notes than others.
Instructions
Step 1: Prepare the Pie Crust
In a large bowl, whisk together flour, sugar, and salt. Add the cold cubed butter and work it into the flour mixture using a pastry cutter or your fingertips until the mixture resembles coarse sand with some pea-sized pieces of butter remaining. This varied butter size creates those desirable flaky layers in your Salted Honey Pie crust. Drizzle in ice water one tablespoon at a time, gently tossing with a fork until the dough just holds together when squeezed. Shape the dough into a disk, wrap in plastic, and refrigerate for at least 2 hours.
Step 2: Roll and Blind Bake the Crust
Preheat your oven to 375°F (190°C). Roll the chilled dough on a floured surface into a 12-inch circle. Carefully transfer to a 9-inch pie dish, trim excess leaving a 1-inch overhang, then fold and crimp the edges. Prick the bottom with a fork, line with parchment paper, and fill with pie weights. Blind bake for 15 minutes, remove weights and parchment, then bake for an additional 5-7 minutes until just golden. Cool completely. Reduce oven temperature to 350°F (175°C).
Step 3: Prepare the Honey Filling
In a medium saucepan over medium heat, combine honey, sugar, and butter. Stir constantly until the butter is melted and mixture is smooth but not boiling. Remove from heat and whisk in vanilla extract and salt. Let the mixture cool for 5-10 minutes – this prevents the eggs from cooking when added. In a separate bowl, whisk the eggs until well-beaten, then slowly stream in the warm honey mixture while continuously whisking.
Step 4: Finish and Bake
Add heavy cream, flour, and vinegar to your filling mixture, whisking until completely smooth. For an extra-silky Salted Honey Pie, strain the filling through a fine-mesh sieve into the pre-baked crust. This removes any potential lumps. Bake at 350°F (175°C) for 45-55 minutes until the center is set but still has a slight wobble – it will continue setting as it cools. The top should be a deep amber color. Cool completely on a wire rack for at least 4 hours, preferably overnight.
Step 5: Finish with Salt and Serve
When the Salted Honey Pie is completely cool, sprinkle the top with flaky sea salt. The contrast between the sweet, caramelized honey filling and the subtle crunch of sea salt creates the signature flavor experience that makes this pie so memorable. Slice and serve with a dollop of lightly whipped cream if desired.
Variations
Brown Butter Salted Honey Pie
Take your Salted Honey Pie to new heights by browning the butter before adding it to the honey mixture. Simply melt the butter in a saucepan over medium heat and continue cooking, swirling occasionally, until it turns golden brown and smells nutty. This simple modification adds a remarkable depth of flavor with notes of toasted hazelnut and caramel that beautifully complement the honey. Allow the brown butter to cool slightly before incorporating it into the filling mixture.
Citrus-Infused Honey Pie
For a brighter, more complex version, add the zest of one lemon or orange to your Salted Honey Pie filling. The citrus notes cut through the sweetness while enhancing the floral qualities of the honey. For an even more pronounced citrus flavor, add 1-2 tablespoons of fresh juice along with the zest. This variation pairs exceptionally well with a dollop of lightly whipped cream infused with a touch of the same citrus zest.
Gluten-Free Adaptation
Make this Salted Honey Pie accessible to everyone by substituting the all-purpose flour with a quality gluten-free 1:1 baking flour in both the crust and filling. For the crust, you may need to add an additional tablespoon of ice water as gluten-free flours tend to absorb more liquid. The result is equally delicious with the same stunning presentation and crowd-pleasing flavor profile.
Storage and Serving
This Salted Honey Pie can be stored at room temperature for up to 2 days, loosely covered with foil or a cake dome. For longer storage, refrigerate for up to 5 days, though the flaky salt may begin to dissolve into the filling. Allow refrigerated pie to come to room temperature for about 30 minutes before serving for the best texture and flavor experience.
When serving your Salted Honey Pie, consider these complementary pairings:
For a classic presentation, serve slices with lightly whipped cream that’s barely sweetened – the neutral creaminess beautifully balances the sweet-salty filling. A sprinkle of additional flaky salt on the whipped cream creates a delightful visual and textural contrast.
For a more indulgent experience, pair with a small scoop of vanilla bean ice cream and a drizzle of warm, slightly bitter caramel sauce, which accentuates the caramelized notes in the honey.
This pie also pairs wonderfully with after-dinner drinks – try serving alongside a glass of bourbon, aged rum, or a dessert wine like Sauternes that echoes the honey’s amber sweetness.
FAQs
Why did my filling not set properly?
The most common reason for a runny Salted Honey Pie is underbaking. The pie should be baked until the edges are set but the center still has a slight wobble – it will continue to set as it cools. Another possibility is that your oven temperature might be off. An oven thermometer can help ensure accuracy. Finally, make sure you’re using the correct amount of eggs, which provide the structure needed for proper setting.
Can I use a different type of honey?
Absolutely! Different honey varieties will create subtle variations in your Salted Honey Pie. Lighter honeys like clover or acacia will yield a milder flavor, while buckwheat or chestnut honey will produce a more robust, almost molasses-like quality. Orange blossom honey adds delicate citrus notes. Just be aware that stronger-flavored honeys may require adjusting the salt to maintain balance.
Why add vinegar to the filling?
The small amount of vinegar in the Salted Honey Pie filling helps balance the sweetness without making the pie taste vinegary. It adds complexity and brightness that enhances the honey flavor, much like adding a squeeze of lemon to a dish. The vinegar also helps prevent crystallization of the sugar and honey during baking.
Can I make this pie in advance?
This is an excellent make-ahead dessert. In fact, many bakers find that the Salted Honey Pie tastes better the day after baking, as the flavors have time to meld and develop. Make it up to two days in advance and store at room temperature, adding the flaky salt just before serving for the best presentation.
Why did my crust shrink during blind baking?
Crust shrinkage typically happens when the dough is overworked or not rested long enough. Make sure to handle the dough minimally and allow it to rest in the refrigerator for at least 2 hours before rolling. Also, don’t stretch the dough when fitting it into the pie plate – gently lift and place it instead.
Conclusion
This Salted Honey Pie is comfort food at its finest — a perfect balance of sweet, salty, creamy, and buttery that creates a truly unforgettable dessert experience. It’s the kind of dish that transforms an ordinary meal into a special occasion, yet remains simple enough to make whenever the craving strikes. The magic lies in how it elevates humble honey into something extraordinary, proving that sometimes the most impressive desserts come from the simplest ingredients. Whether served at a holiday gathering or as the sweet finale to a dinner party, this pie promises to collect compliments and requests for the recipe with every slice served.
Print
Salted Honey Pie
- Prep Time: 30 minutes
- Cook Time: 1 hour
- Total Time: 1 hour 30 minutes
- Yield: 8 servings 1x
- Category: Dessert
- Method: Baking
- Cuisine: Americaine
Description
Indulge in a decadent Salted Honey Pie – golden honey, buttery crust, and a touch of sea salt. A crowd-pleasing treat that’s comforting and quick to make.
Ingredients
- 1¼ cups (156g) all-purpose flour
- 1 tablespoon granulated sugar
- ½ teaspoon salt
- ½ cup (113g) cold unsalted butter, cubed
- 3–4 tablespoons ice water
- ¾ cup (255g) high-quality honey (local wildflower or clover honey works beautifully)
- ½ cup (100g) granulated sugar
- ½ cup (115g) unsalted butter
- 2 teaspoons vanilla extract
- ¾ teaspoon salt
- 3 large eggs, at room temperature
- ½ cup (120ml) heavy cream
- 2 tablespoons all-purpose flour
- 1 tablespoon white vinegar
- 1–2 teaspoons flaky sea salt (like Maldon) for topping
Instructions
- Step 1: Prepare the Pie Crust In a large bowl, whisk together flour, sugar, and salt. Add the cold cubed butter and work it into the flour mixture using a pastry cutter or your fingertips until the mixture resembles coarse sand with some pea-sized pieces of butter remaining. Drizzle in ice water one tablespoon at a time, gently tossing with a fork until the dough just holds together when squeezed. Shape the dough into a disk, wrap in plastic, and refrigerate for at least 2 hours.
- Step 2: Roll and Blind Bake the Crust Preheat your oven to 375°F (190°C). Roll the chilled dough on a floured surface into a 12-inch circle. Carefully transfer to a 9-inch pie dish, trim excess leaving a 1-inch overhang, then fold and crimp the edges. Prick the bottom with a fork, line with parchment paper, and fill with pie weights. Blind bake for 15 minutes, remove weights and parchment, then bake for an additional 5-7 minutes until just golden. Cool completely. Reduce oven temperature to 350°F (175°C).
- Step 3: Prepare the Honey Filling In a medium saucepan over medium heat, combine honey, sugar, and butter. Stir constantly until the butter is melted and mixture is smooth but not boiling. Remove from heat and whisk in vanilla extract and salt. Let the mixture cool for 5-10 minutes – this prevents the eggs from cooking when added. In a separate bowl, whisk the eggs until well-beaten, then slowly stream in the warm honey mixture while continuously whisking.
- Step 4: Finish and Bake Add heavy cream, flour, and vinegar to your filling mixture, whisking until completely smooth. For an extra-silky Salted Honey Pie, strain the filling through a fine-mesh sieve into the pre-baked crust. This removes any potential lumps. Bake at 350°F (175°C) for 45-55 minutes until the center is set but still has a slight wobble – it will continue setting as it cools. The top should be a deep amber color. Cool completely on a wire rack for at least 4 hours, preferably overnight.
- Step 5: Finish with Salt and Serve When the Salted Honey Pie is completely cool, sprinkle the top with flaky sea salt. The contrast between the sweet, caramelized honey filling and the subtle crunch of sea salt creates the signature flavor experience that makes this pie so memorable. Slice and serve with a dollop of lightly whipped cream if desired.
Notes
Fresh ingredients will always yield the best flavor results.
Nutrition
- Serving Size: 1 slice (1/8 of pie)
- Calories: 420 calories
- Sugar: 26g
- Sodium: 340mg
- Fat: 24g
- Saturated Fat: 15g
- Unsaturated Fat: 8g
- Trans Fat: 0g
- Carbohydrates: 49g
- Fiber: 1g
- Protein: 5g
- Cholesterol: 135mg


