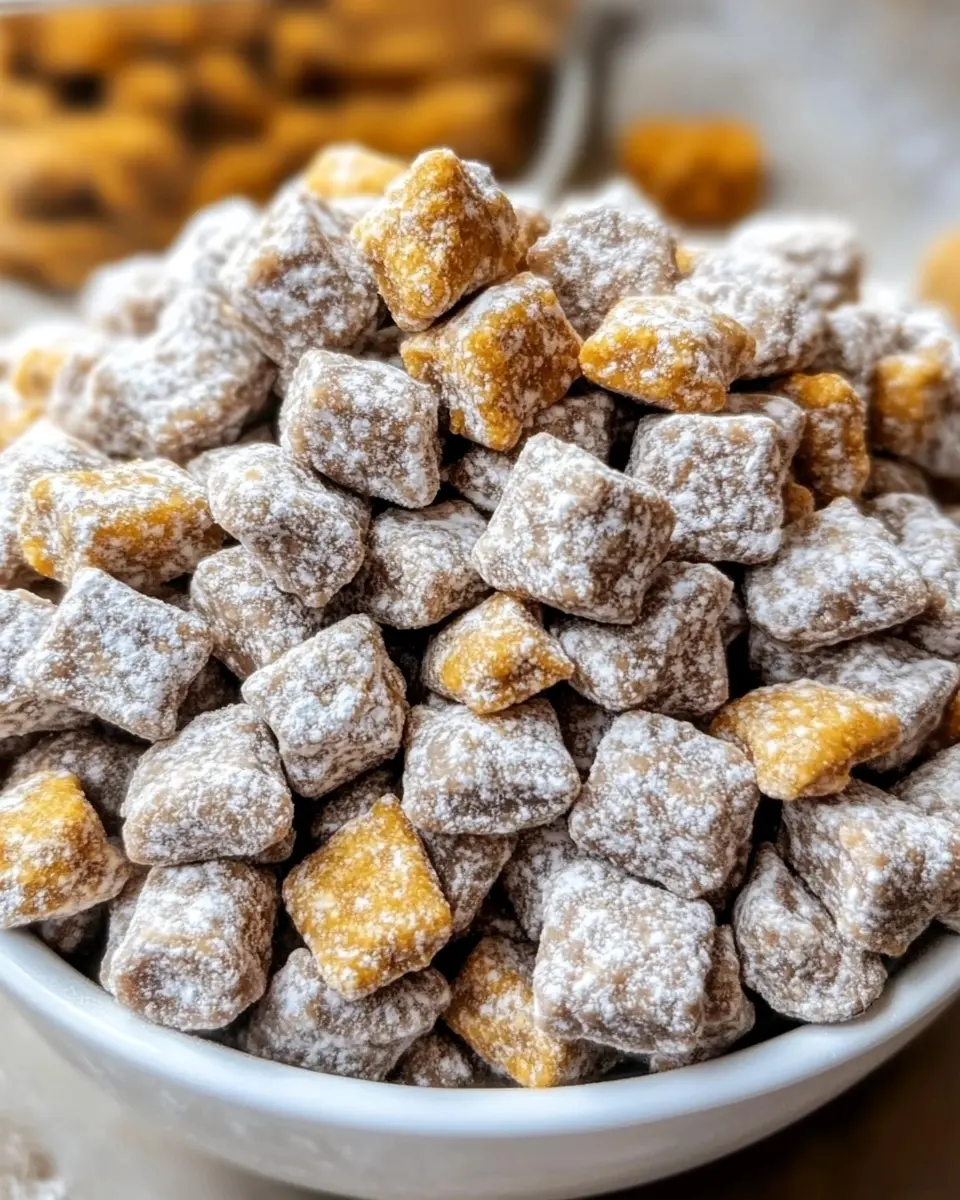
Crunchy, sweet, and utterly addictive, Butterfinger Puppy Chow transforms ordinary Chex cereal into an irresistible snack that perfectly captures the peanut-buttery, chocolatey goodness of the classic candy bar. This no-bake treat strikes the perfect balance between the familiar comfort of traditional puppy chow and the distinctive, crispy Butterfinger flavor that millions adore. The moment you open a container of this homemade snack mix, you’ll be drawn in by its sweet aroma and tempted by its candy-coated appearance. You’ll learn how to create this crowd-pleasing treat with simple ingredients in just minutes, making it perfect for parties, gift-giving, or satisfying your own sweet tooth cravings.
Why You’ll Love This Recipe
This Butterfinger Puppy Chow recipe will quickly become your go-to treat for every occasion. Unlike store-bought snack mixes, this homemade version delivers a freshness and flavor intensity that simply can’t be matched. The contrasting textures create a sensory delight – the light, airy crunch of the Chex cereal coated with smooth, melted chocolate and peanut butter, all enveloped in a sweet powdered sugar coating that gives way to bits of crushed Butterfinger for that signature crispy texture.
What makes this Butterfinger-inspired snack mix truly special is how easily it comes together. With just a handful of ingredients and no baking required, you can whip up a batch in under 20 minutes. It’s perfect for last-minute gatherings, movie nights, or packaging as a thoughtful homemade gift. The versatility of this sweet Butterfinger Chex mix makes it ideal for customizing to your preferences while still maintaining that unmistakable candy bar flavor everyone loves.
Ingredients
To make this irresistible Butterfinger Puppy Chow, gather these simple ingredients:
- 9 cups (270g) Chex cereal (rice or corn variety)
- 1 cup (175g) milk chocolate chips
- ½ cup (130g) creamy peanut butter
- ¼ cup (57g) butter
- 1 teaspoon vanilla extract
- 1½ cups (180g) powdered sugar
- 2 cups (12-14 fun-size bars) Butterfinger candy bars, crushed
The Chex cereal provides the perfect base with its light, crispy texture that holds up well to coating. For the best Butterfinger flavor, use high-quality creamy peanut butter rather than natural varieties that can separate. The milk chocolate chips complement the candy’s flavor profile better than semi-sweet or dark chocolate alternatives. Crushing the Butterfinger bars into various sizes – some powder, some small chunks – creates texture variation throughout the mix.
Pro Tips
Perfect Coating Technique
For evenly coated cereal pieces, work in batches rather than dumping all ingredients together at once. Pour the chocolate-peanut butter mixture over the cereal in a large bowl, then gently fold with a spatula using a lifting motion rather than stirring, which can break the cereal. This careful folding ensures each piece gets covered without becoming soggy or crushed.
Butterfingers Made Easy
To achieve the perfect Butterfinger consistency, place the candy bars in a sealed plastic bag and use a rolling pin to crush them. Aim for a variety of textures from fine powder to small chunks – this creates that authentic Butterfinger texture experience with every handful. The powder will incorporate into the coating while the chunks provide bursts of concentrated flavor.
Cooling Matters
Allow the coated cereal to cool for 3-5 minutes before adding the powdered sugar. This prevents the sugar from melting into the coating and ensures that distinctively dry, sweet exterior that makes Butterfinger Puppy Chow so addictive. After shaking with powdered sugar, spread the mix on parchment paper to cool completely – this additional step prevents clumping and keeps the mix perfectly crispy.
Instructions
Step 1: Prepare Your Workspace
Before diving in, set up your kitchen for efficiency. Measure out all ingredients and line a large baking sheet with parchment paper. Place your Chex cereal in a very large mixing bowl, ensuring there’s plenty of room for tossing. The key to perfect Butterfinger Puppy Chow is having everything ready before you start melting ingredients.
Step 2: Create the Coating
In a medium microwave-safe bowl, combine chocolate chips, peanut butter, and butter. Microwave in 30-second intervals, stirring between each, until completely melted and smooth – typically 1-1½ minutes total. Be careful not to overheat! Once melted, stir in the vanilla extract, creating a glossy, aromatic coating that will perfectly capture the Butterfinger essence.
Step 3: Coat the Cereal
Pour the warm chocolate-peanut butter mixture over the Chex cereal. Using a flexible spatula, gently fold the mixture until all pieces are evenly coated. Take your time with this step – rushing can break the cereal. The goal is a thin, even layer of the chocolate-peanut butter mixture on each piece of cereal.
Step 4: Add Powdered Sugar
Transfer half of the chocolate-coated cereal to a large ziplock bag. Add half the powdered sugar, seal the bag (removing excess air), and shake gently until cereal is evenly coated. Repeat with the remaining cereal and powdered sugar. This batching method ensures every piece gets that perfect sweet coating without clumping together.
Step 5: Mix in Butterfingers
Spread the sugar-coated mix onto the prepared baking sheet. While still slightly warm, sprinkle the crushed Butterfingers over the mixture and gently toss to incorporate. The residual warmth will help the candy pieces adhere slightly to the cereal, creating that unmistakable Butterfinger crunch in every bite of your Butterfinger Puppy Chow.
Step 6: Cool and Store
Allow the mixture to cool completely on the baking sheet for about 30 minutes, occasionally breaking up any larger clumps with your fingers. Once cooled, transfer to an airtight container. Your homemade Butterfinger Puppy Chow is now ready to enjoy – if you can resist snacking on it immediately!
Variations
White Chocolate Butterfinger Puppy Chow
For a striking visual twist and complementary flavor profile, substitute white chocolate chips for the milk chocolate. The creamy vanilla notes of white chocolate pair surprisingly well with the Butterfinger pieces, creating a lighter version that’s especially appealing during spring and summer gatherings. The contrast between the white coating and the orange Butterfinger pieces creates a visually stunning snack mix.
Dark Chocolate Peanut Butter Butterfinger Mix
For a more sophisticated flavor profile, try using dark chocolate chips instead of milk chocolate. The slight bitterness of dark chocolate creates a wonderful counterpoint to the sweet Butterfingers and powdered sugar coating. Add an extra tablespoon of peanut butter to maintain the rich, creamy texture that makes Butterfinger Puppy Chow so irresistible.
Halloween Butterfinger Treat
Transform this Butterfinger Puppy Chow into a festive Halloween snack by incorporating orange and black candy melts along with the chocolate chips. Add some candy corn and Halloween sprinkles during the final mixing stage for a themed treat that’s perfect for October gatherings and trick-or-treat night snacking.
Storage and Serving
Store your Butterfinger Puppy Chow in an airtight container at room temperature for up to 1 week. For maximum freshness, place a paper towel at the bottom of the container to absorb any excess moisture that might make the mix lose its crispness. If you live in a particularly humid environment, consider adding a small silica gel packet (the kind found in new shoes) to maintain that perfect crunch.
For an impressive presentation at parties, serve this sweet snack mix in a large glass bowl or Mason jar tied with a ribbon. For individual servings, portion the puppy chow into small paper cups or clear cellophane bags tied with colorful ribbon – perfect for party favors or bake sales. For a delightful dessert option, use Butterfinger Puppy Chow as a topping for ice cream sundaes or layer it with vanilla pudding and whipped cream in parfait glasses for an easy but impressive dessert.
FAQs
Can I use crunchy peanut butter instead of creamy?
While creamy peanut butter creates the most authentic Butterfinger texture, crunchy peanut butter can work if that’s what you have on hand. The additional peanut pieces will add extra crunch but may slightly alter the classic Butterfinger flavor profile of the Butterfinger Puppy Chow.
How do I prevent my puppy chow from getting soggy?
The key is properly cooling the cereal between steps. After coating with the chocolate-peanut butter mixture, allow it to cool slightly before adding powdered sugar. Then, spread the finished mix in a single layer to cool completely before storing. Always store in an airtight container with a moisture absorber if you live in a humid climate.
Can I freeze Butterfinger Puppy Chow?
Yes! Butterfinger Puppy Chow freezes remarkably well. Store in a freezer-safe container for up to 3 months. When ready to enjoy, let it thaw at room temperature for about 15-20 minutes before serving. The texture remains nearly perfect after freezing.
What’s the best Chex cereal to use?
Rice Chex generally works best for puppy chow recipes because of its lighter texture and neutral flavor. However, Corn Chex can add a slight sweetness that complements the Butterfinger flavor. Avoid wheat varieties as they can become soggy more quickly.
Can I make this recipe nut-free?
Unfortunately, traditional Butterfinger Puppy Chow relies on peanut butter for its signature flavor. While sun butter (sunflower seed butter) could technically be substituted, the flavor would be significantly different and would no longer capture the true Butterfinger experience.
Conclusion
This Butterfinger Puppy Chow is comfort food at its finest — a nostalgic treat that transforms everyday cereal into something magical with the beloved flavors of one of America’s favorite candy bars. It’s the kind of snack that bridges generations, delighting both children and adults with its perfect balance of sweetness, crunch, and that unmistakable Butterfinger taste. Whether you’re making it for a special occasion, gifting it to friends, or simply treating yourself to a well-deserved indulgence, this recipe delivers joy in every handful. The best part? Its simplicity means you’re never more than 20 minutes away from this irresistible treat whenever the craving strikes.
Print
Butterfinger Puppy Chow
Description
Butterfinger Puppy Chow: A no-bake treat combining Chex cereal with peanut butter, chocolate, and crushed Butterfinger candy for a crunchy
Ingredients
- 9 cups (270g) Chex cereal (rice or corn variety)
- 1 cup (175g) milk chocolate chips
- ½ cup (130g) creamy peanut butter
- ¼ cup (57g) butter
- 1 teaspoon vanilla extract
- 1½ cups (180g) powdered sugar
- 2 cups (12–14 fun-size bars) Butterfinger candy bars, crushed
Instructions
- Prepare your workspace by measuring all ingredients and lining a large baking sheet with parchment paper. Place Chex cereal in a very large mixing bowl.
- In a medium microwave-safe bowl, combine chocolate chips, peanut butter, and butter. Microwave in 30-second intervals, stirring between each, until completely melted and smooth (about 1-1½ minutes total). Stir in vanilla extract.
- Pour the chocolate-peanut butter mixture over the Chex cereal. Using a flexible spatula, gently fold until all pieces are evenly coated.
- Transfer half of the chocolate-coated cereal to a large ziplock bag. Add half the powdered sugar, seal the bag (removing excess air), and shake gently until cereal is evenly coated. Repeat with remaining cereal and powdered sugar.
- Spread the sugar-coated mix onto the prepared baking sheet. While still slightly warm, sprinkle the crushed Butterfingers over the mixture and gently toss to incorporate.
- Allow the mixture to cool completely on the baking sheet for about 30 minutes, occasionally breaking up any larger clumps. Once cooled, transfer to an airtight container.


