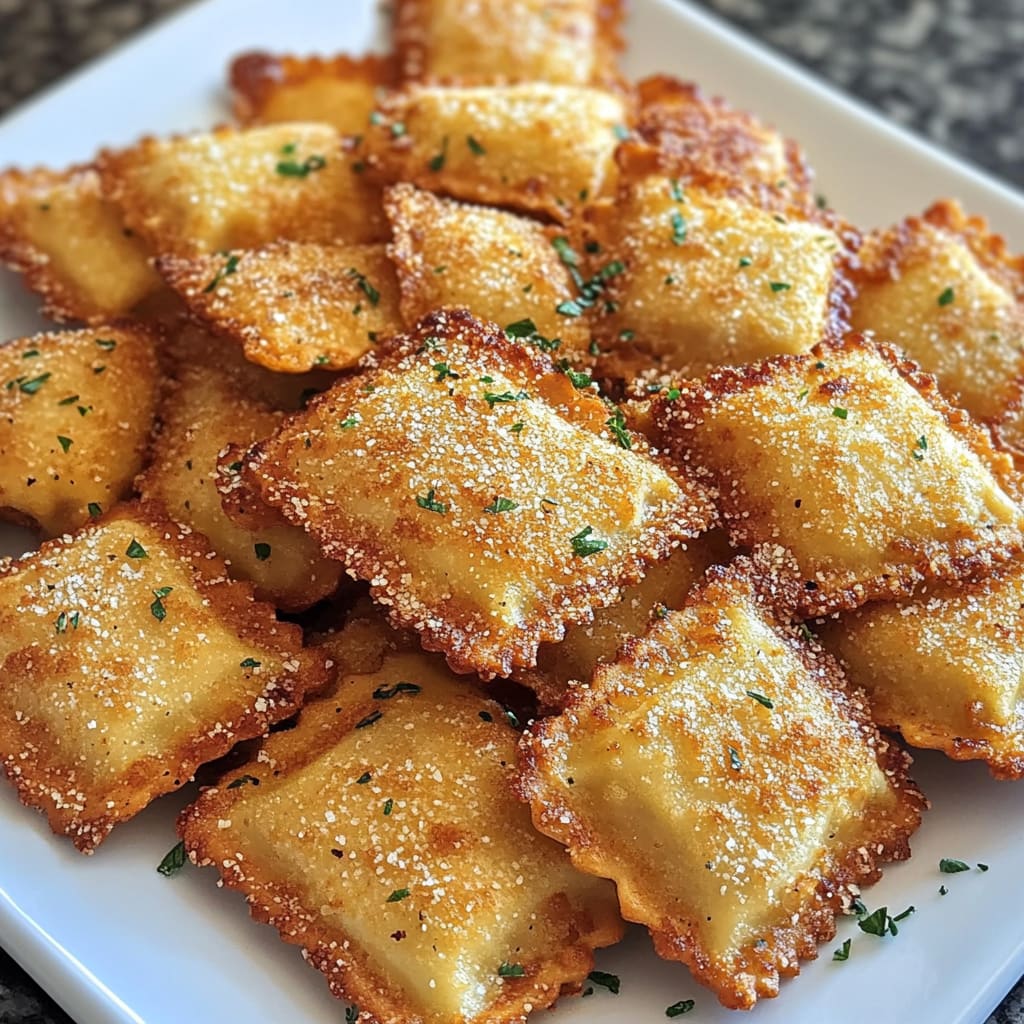
Crispy on the outside, tender and cheesy on the inside – Toasted Ravioli in Air Fryer or Oven delivers that irresistible crunch that transforms ordinary pasta into an extraordinary appetizer. Originally from St. Louis, this delightful dish has become a nationwide favorite that brings restaurant-quality flavor right to your home kitchen. The beauty of these golden-brown ravioli bites is that they’re surprisingly simple to make, whether you prefer the quick convenience of an air fryer or the traditional approach of oven baking. You’ll learn exactly how to achieve that perfect crisp coating while keeping the filling moist and flavorful, plus versatile ways to serve this crowd-pleasing dish.
Why You’ll Love This Recipe
Toasted Ravioli in Air Fryer or Oven offers the perfect balance of convenience and gourmet appeal that makes it ideal for any occasion. The contrast between the crunchy, seasoned breadcrumb coating and the soft, cheesy filling creates an irresistible texture experience that keeps everyone reaching for more. Unlike deep-fried versions that can be heavy and oil-laden, this healthier preparation method uses minimal oil while still achieving that satisfying crunch.
What truly sets this recipe apart is its versatility – you can use store-bought ravioli for a quick appetizer on busy weeknights or homemade ravioli for special gatherings. The air fryer version is ready in just minutes, making it perfect for impromptu entertaining, while the oven method allows you to prepare larger batches for bigger crowds. Plus, the customizable seasoning blend lets you tailor the flavor profile to complement any meal, from Italian-inspired dinners to game day spreads.
Ingredients
For perfect Toasted Ravioli in Air Fryer or Oven, you’ll need:
- 1 package (9-10 oz/255-285g) refrigerated cheese ravioli (about 18-20 pieces)
- 2 large eggs, beaten
- 1 tablespoon (15ml) water
- 1½ cups (180g) Italian seasoned breadcrumbs
- ½ cup (45g) grated Parmesan cheese
- 1 teaspoon (5g) garlic powder
- 1 teaspoon (5g) dried oregano
- ½ teaspoon (2.5g) salt
- ¼ teaspoon (1g) black pepper
- Olive oil cooking spray
- ½ cup (120ml) marinara sauce, warmed for serving
- 2 tablespoons (8g) fresh chopped parsley for garnish
The refrigerated ravioli works best for this recipe as they hold their shape better than frozen varieties. Look for cheese-filled ravioli for the classic experience, though meat-filled options also work beautifully. Quality breadcrumbs with Italian seasoning provide the perfect coating base, while the Parmesan cheese adds a salty, umami depth that elevates the entire dish.
Pro Tips
Use Cold Ravioli: Keep your ravioli refrigerated until right before breading. Cold ravioli hold their shape better during the cooking process and are less likely to break open. If you’re using frozen ravioli, thaw them in the refrigerator rather than at room temperature to maintain structural integrity.
Perfect the Breading Technique: For an even, thick coating that adheres properly, establish a systematic breading station. Dip each ravioli in egg wash, let excess drip off, then thoroughly coat in breadcrumbs, pressing gently to adhere. The key is using one hand for the wet ingredients and one for the dry to prevent clumping. For an extra-crispy result, double-dip the ravioli – first in egg, then breadcrumbs, then briefly back in egg and breadcrumbs again.
Proper Spacing is Critical: Whether using an air fryer or oven, arrange the breaded ravioli in a single layer with space between each piece. Overcrowding leads to steaming rather than toasting, resulting in soggy rather than crispy ravioli. If necessary, cook in batches rather than cramming them together – the superior texture is worth the extra few minutes of cooking time.
Step-by-Step Instructions
Step 1: Prepare Your Breading Station
First, set up your assembly line for efficiency. In one shallow bowl, whisk together the eggs and water until well combined. In a second bowl, mix the breadcrumbs, grated Parmesan, garlic powder, dried oregano, salt, and pepper until evenly distributed. The egg mixture will help the seasoned coating adhere to the ravioli, creating that perfect crispy exterior.
Step 2: Coat The Ravioli
Take each piece of cold ravioli and dip it thoroughly in the egg mixture, ensuring it’s completely coated. Allow any excess egg to drip off before transferring to the breadcrumb mixture. Gently press the breadcrumbs onto both sides of the ravioli to create an even coating. Place the breaded ravioli on a clean plate or baking sheet, continuing until all pieces are coated.
Step 3: Air Fryer Method
If using an air fryer, preheat it to 350°F (175°C) for 3 minutes. Lightly spray the air fryer basket with olive oil cooking spray. Arrange a single layer of breaded ravioli in the basket, making sure they don’t touch. Spray the tops lightly with olive oil for extra crispiness. Cook for 4 minutes, then flip each piece, spray again lightly, and cook for another 3-4 minutes until golden brown and crispy.
Step 4: Oven Method
For the oven method, preheat to 400°F (200°C). Line a baking sheet with parchment paper and arrange the breaded ravioli in a single layer. Spray or drizzle lightly with olive oil. Bake for 10 minutes, then carefully flip each piece and bake for another 7-8 minutes until both sides are golden brown and the coating is crisp to the touch.
Step 5: Serve
Transfer your Toasted Ravioli in Air Fryer or Oven to a serving platter while still hot. Sprinkle with additional Parmesan cheese and chopped fresh parsley for a burst of color and flavor. Serve immediately alongside warmed marinara sauce for dipping. The contrast between the crispy, savory ravioli and the tangy, warm sauce creates the perfect bite every time.
Variations
Meat Lover’s Toasted Ravioli: Start with beef or sausage-filled ravioli instead of cheese varieties. Enhance the breadcrumb mixture with 1 teaspoon of smoked paprika and ½ teaspoon of crushed red pepper flakes for a spicy kick. After cooking, serve with a robust meat sauce instead of traditional marinara for an extra hearty appetizer that satisfies serious appetites.
Herb-Crusted Gourmet Version: Elevate your toasted ravioli with an herb-forward approach by adding 2 tablespoons of finely chopped fresh herbs (rosemary, thyme, and basil) to your breadcrumb mixture. Use four-cheese ravioli as your base, and after air frying or baking, drizzle with a balsamic glaze reduction and serve with a creamy pesto dipping sauce instead of marinara for an upscale twist on the classic.
Gluten-Free Option: Make this recipe accessible for those with dietary restrictions by using gluten-free ravioli (available in many specialty stores) and substituting the traditional breadcrumbs with a mixture of ground rice cereal, almond flour, and gluten-free Italian seasoning. The cooking technique remains the same, but you’ll need to watch the cooking time carefully as gluten-free products may brown more quickly in both the air fryer and oven.
Storage and Serving
Toasted Ravioli in Air Fryer or Oven is best enjoyed immediately after cooking when they’re at peak crispiness, but they can be stored properly for later enjoyment. If you have leftovers, allow them to cool completely before transferring to an airtight container lined with paper towels to absorb excess moisture. Refrigerate for up to 3 days. To reheat, place them in a preheated air fryer at 350°F (175°C) for 2-3 minutes or in a 375°F (190°C) oven for 5-7 minutes until crispy again.
For serving, create an impressive appetizer spread by arranging the toasted ravioli around a central bowl of warm marinara sauce, garnished with fresh basil leaves and a sprinkle of grated Parmesan. For a complete meal, pair with a fresh arugula salad dressed with lemon vinaigrette to balance the richness. These also make excellent toppers for creamy tomato soup, adding texture and substance to transform a simple soup into a satisfying dinner. For parties, consider setting up a dipping station with various sauces like pesto, alfredo, or spicy arrabiata alongside the traditional marinara.
FAQs
Can I make toasted ravioli ahead of time?
Yes, you can bread the ravioli up to 24 hours in advance. Store them in a single layer on a parchment-lined baking sheet, covered with plastic wrap in the refrigerator. Cook them directly from the refrigerator when you’re ready to serve.
Why did my ravioli burst open during cooking?
This typically happens if the ravioli are cooked at too high a temperature or for too long. Make sure to use refrigerated (not frozen) ravioli and keep a close eye on cooking times. The air fryer method generally has less risk of bursting than the oven method.
Can I use homemade ravioli for this recipe?
Absolutely! Homemade ravioli work beautifully, but they need to be very well-sealed and chilled before breading and cooking to maintain their integrity during the cooking process.
Is it possible to freeze breaded ravioli before cooking?
Yes, arrange the breaded uncooked ravioli on a baking sheet and freeze until solid, then transfer to a freezer bag. Cook directly from frozen, adding 2-3 minutes to the cooking time for both air fryer and oven methods.
What’s the best way to make these dairy-free?
Use dairy-free ravioli (several brands now make vegan options) and substitute the Parmesan in the breadcrumb mixture with nutritional yeast for a similar umami flavor. The egg wash can be replaced with unsweetened plant milk mixed with 1 tablespoon of cornstarch.
Conclusion
This Toasted Ravioli in Air Fryer or Oven is comfort food at its finest — crispy, cheesy, and satisfyingly substantial without being complicated to prepare. It’s the kind of dish that bridges the gap between everyday snacking and special occasion appetizers, versatile enough to please both picky eaters and gourmands. Whether you’re feeding a hungry family on a weeknight or impressing guests at your next gathering, these golden-brown morsels deliver restaurant-quality results with minimal effort. The combination of that perfect crunch giving way to a tender, flavorful filling creates an irresistible bite that will have everyone asking for your secret.
Print
Toasted Ravioli in Air Fryer or Oven
- Prep Time: 20 minutes
- Cook Time: 15 minutes
- Total Time: 35 minutes
- Yield: 4 servings 1x
- Category: Appetizer
- Method: Air fryer or Oven
- Cuisine: Americaine
Description
Crispy Toasted Ravioli made in the Air Fryer or Oven. Quick, easy, crowd-pleasing appetizer with delicious pasta and gooey cheese.
Ingredients
- 1 package (9-10 oz/255-285g) refrigerated cheese ravioli (about 18–20 pieces)
- 2 large eggs, beaten
- 1 tablespoon (15ml) water
- 1½ cups (180g) Italian seasoned breadcrumbs
- ½ cup (45g) grated Parmesan cheese
- 1 teaspoon (5g) garlic powder
- 1 teaspoon (5g) dried oregano
- ½ teaspoon (2.5g) salt
- ¼ teaspoon (1g) black pepper
- Olive oil cooking spray
- ½ cup (120ml) marinara sauce, warmed for serving
- 2 tablespoons (8g) fresh chopped parsley for garnish
Instructions
- Step 1: Prepare Your Breading Station First, set up your assembly line for efficiency. In one shallow bowl, whisk together the eggs and water until well combined. In a second bowl, mix the breadcrumbs, grated Parmesan, garlic powder, dried oregano, salt, and pepper until evenly distributed. The egg mixture will help the seasoned coating adhere to the ravioli, creating that perfect crispy exterior.
- Step 2: Coat The Ravioli Take each piece of cold ravioli and dip it thoroughly in the egg mixture, ensuring it’s completely coated. Allow any excess egg to drip off before transferring to the breadcrumb mixture. Gently press the breadcrumbs onto both sides of the ravioli to create an even coating. Place the breaded ravioli on a clean plate or baking sheet, continuing until all pieces are coated.
- Step 3: Air Fryer Method If using an air fryer, preheat it to 350°F (175°C) for 3 minutes. Lightly spray the air fryer basket with olive oil cooking spray. Arrange a single layer of breaded ravioli in the basket, making sure they don’t touch. Spray the tops lightly with olive oil for extra crispiness. Cook for 4 minutes, then flip each piece, spray again lightly, and cook for another 3-4 minutes until golden brown and crispy.
- Step 4: Oven Method For the oven method, preheat to 400°F (200°C). Line a baking sheet with parchment paper and arrange the breaded ravioli in a single layer. Spray or drizzle lightly with olive oil. Bake for 10 minutes, then carefully flip each piece and bake for another 7-8 minutes until both sides are golden brown and the coating is crisp to the touch.
- Step 5: Serve Transfer your Toasted Ravioli in Air Fryer or Oven to a serving platter while still hot. Sprinkle with additional Parmesan cheese and chopped fresh parsley for a burst of color and flavor. Serve immediately alongside warmed marinara sauce for dipping. The contrast between the crispy, savory ravioli and the tangy, warm sauce creates the perfect bite every time.
Notes
Fresh ingredients will always yield the best flavor results.
Nutrition
- Serving Size: 4-5 pieces
- Calories: 320 calories per serving
- Sugar: 2 grams
- Sodium: 780 mg
- Fat: 15 grams
- Saturated Fat: 5 grams
- Unsaturated Fat: 9 grams
- Trans Fat: 0 grams
- Carbohydrates: 35 grams
- Fiber: 2 grams
- Protein: 12 grams
- Cholesterol: 85 mg