
Creamy, sweet, with a perfect hint of salt—Salted Caramel Ice Cream is a dessert that transcends ordinary frozen treats. Each spoonful delivers waves of rich caramel flavor balanced by delicate salt crystals that dance on your tongue. This sophisticated yet comforting dessert has earned its place among ice cream royalty for good reason. Whether you’re an experienced home ice cream maker or trying your hand at frozen desserts for the first time, this recipe delivers professional results with surprisingly little effort. You’ll learn how to create the perfect caramel base, incorporate it into a silky custard, and achieve that luxurious texture that rivals any premium store-bought version.
Why You’ll Love This Recipe
This Salted Caramel Ice Cream recipe strikes the perfect balance between simplicity and gourmet results. The deep amber caramel notes create an incredible depth of flavor that store-bought versions simply can’t match. What makes this recipe truly special is the textural contrast—velvety smooth cream against occasional pockets of soft caramel ribbons, all punctuated by delicate salt flakes that amplify the flavor experience.
Even if you’ve been disappointed by homemade ice cream before, this recipe’s careful ratios ensure a scoopable, non-icy texture that remains creamy even after days in the freezer. The ingredients are straightforward pantry staples, making this an accessible luxury you can create whenever the craving strikes. Best of all, while the process requires some patience, each step is simple enough for even novice cooks to master on the first attempt.
Unlike many caramel desserts that can be overwhelmingly sweet, this Salted Caramel Ice Cream offers sophisticated flavor complexity that appeals to adult palates while still delighting younger ice cream enthusiasts.
Ingredients
For the perfect batch of Salted Caramel Ice Cream, you’ll need:
- 1 cup (200g) granulated sugar
- 3 tablespoons (45ml) water
- ¾ teaspoon flaky sea salt (like Maldon), plus extra for serving
- 2 cups (480ml) heavy cream, divided
- 1 cup (240ml) whole milk
- 5 large egg yolks
- ½ teaspoon pure vanilla extract
- ¼ teaspoon fine sea salt
The heavy cream forms the rich base of this luxurious dessert, so choose a high-quality option with at least 36% fat content for optimal texture. The flaky sea salt is crucial—it provides those distinctive salt bursts that make salted caramel homemade ice cream so addictive. Don’t substitute table salt, as it dissolves completely and won’t give you the same flavor experience. Fresh egg yolks create the custard base that ensures a creamy, not icy, final product.
Pro Tips
Mastering the Caramel Base: The most critical step in creating exceptional Salted Caramel Ice Cream is properly caramelizing the sugar. For perfect results, use a heavy-bottomed pan and resist the urge to stir once the sugar begins to melt. Instead, gently swirl the pan to ensure even caramelization. Take the caramel to a deep amber color (think a penny’s hue) but remove from heat immediately before it burns—there’s only seconds between perfect and ruined caramel.
Temperature Control is Crucial: When adding cream to hot caramel, the mixture will bubble vigorously. Pour slowly while whisking constantly to prevent the caramel from seizing. For the custard step, use a digital thermometer to ensure you reach exactly 170°F (77°C)—this perfectly cooks the egg yolks without scrambling them.
Proper Chilling Makes Perfect Texture: After cooking your custard base, strain it through a fine-mesh sieve to remove any potential egg bits, then chill thoroughly for at least 6 hours (preferably overnight). This aging process allows the proteins and fat to fully hydrate, resulting in significantly smoother salted caramel ice cream with better scoopability and mouthfeel than rushed batches.
Instructions
Step 1: Prepare Your Equipment
Before beginning, place your ice cream storage container in the freezer to chill. Fill a large bowl with ice water for cooling the custard later. Have all ingredients measured and ready, as the caramel-making process moves quickly and requires immediate attention.
Step 2: Create the Caramel Base
Combine sugar and water in a heavy-bottomed medium saucepan over medium heat. Allow the mixture to cook undisturbed until it begins to bubble around the edges. Resist stirring—instead, occasionally swirl the pan gently to ensure even cooking. Watch carefully as the sugar turns from clear to golden and finally to a deep amber color, about 8-10 minutes. Immediately remove from heat.
Step 3: Add Cream and Salt
Very carefully and slowly pour 1 cup of the heavy cream into the caramel—it will bubble vigorously! Whisk constantly until completely smooth. If any hardened bits form, return to low heat and stir until dissolved. Stir in the flaky sea salt until incorporated.
Step 4: Create the Custard Base
In a separate bowl, whisk the egg yolks until pale and slightly thickened. In the saucepan with the caramel cream mixture, add the remaining heavy cream and whole milk, then warm over medium-low heat. Gradually ladle about 1 cup of the warm caramel mixture into the egg yolks, whisking constantly to temper the eggs.
Step 5: Cook the Custard
Pour the egg mixture back into the saucepan with the remaining caramel mixture. Cook over medium-low heat, stirring constantly with a wooden spoon, until the mixture thickens enough to coat the back of the spoon and reaches 170°F (77°C) on an instant-read thermometer, about 5-7 minutes. Do not let it boil.
Step 6: Strain and Chill
Remove from heat and stir in the vanilla extract and fine sea salt. Strain the custard through a fine-mesh sieve into a clean bowl. Place this bowl in the prepared ice bath, stirring occasionally until cooled. Cover with plastic wrap, pressing it directly onto the surface to prevent skin formation, and refrigerate for at least 6 hours or overnight.
Step 7: Churn and Freeze
Pour the chilled custard into your ice cream maker and churn according to manufacturer’s instructions, usually 20-25 minutes or until it reaches a soft-serve consistency. In the last minute of churning, you can add any mix-ins if desired.
Step 8: Final Freeze
Transfer the Salted Caramel Ice Cream to your pre-chilled storage container, sprinkle with a few additional flakes of sea salt if desired, and cover with parchment paper pressed directly onto the surface before sealing. Freeze for at least 4 hours or until firm enough to scoop.
Variations
Salted Caramel Chocolate Chunk: For chocolate lovers, fold in 4 ounces of chopped dark chocolate during the final minute of churning. The slight bitterness of dark chocolate perfectly complements the sweet-salty profile of the Salted Caramel Ice Cream. For extra decadence, consider using chocolate-covered caramel chunks instead.
Dairy-Free Salted Caramel: Create a delicious dairy-free version by substituting full-fat coconut cream for the heavy cream and coconut milk for the whole milk. The natural sweetness of coconut beautifully complements caramel flavors. You’ll need to adjust the cooking temperature slightly (aim for 165°F instead of 170°F) and may need to add 1 tablespoon of cornstarch to achieve the same creamy texture.
Bourbon Salted Caramel: For an adults-only version, add 2 tablespoons of quality bourbon to the custard just before churning. The alcohol lowers the freezing point slightly, resulting in an even creamier texture, while the vanilla and caramel notes in bourbon enhance the flavor profile of the homemade salted caramel ice cream.
Storage and Serving
Store your Salted Caramel Ice Cream in an airtight container with a piece of parchment paper pressed directly onto the surface to prevent ice crystals from forming. When properly stored, it maintains optimal quality for up to 2 weeks in the freezer, though the texture is best within the first week.
For perfect scooping, remove from the freezer and let it sit at room temperature for 5-10 minutes before serving. This brief tempering period allows the ice cream to soften slightly, releasing more flavor and achieving that ideal creamy texture.
Serve this luxurious dessert in pre-chilled bowls to prevent premature melting. For an elegant presentation, garnish with a light sprinkle of flaky sea salt and a drizzle of warm caramel sauce. It pairs wonderfully with warm apple desserts like pie or crisp, creating a delightful temperature contrast. For an indulgent sundae, top with toasted chopped pecans and a dollop of fresh whipped cream.
FAQs
Why did my caramel crystallize and harden?
Crystallization usually happens when sugar crystals form on the sides of the pan. Prevent this by avoiding stirring after the sugar begins to melt and by brushing the sides of the pan with water using a pastry brush.
Can I make this without an ice cream maker?
Yes! Pour the chilled custard into a shallow freezer-safe container. Freeze for 45 minutes, then vigorously stir with a fork to break up ice crystals. Repeat this process every 30 minutes for about 3-4 hours until frozen.
Why is my ice cream too hard to scoop?
Homemade Salted Caramel Ice Cream can freeze harder than store-bought versions because it lacks commercial stabilizers. Adding 1-2 tablespoons of vodka or bourbon to the mixture before churning can help maintain scoopability without affecting flavor.
Can I use brown sugar instead of making caramel?
While you can substitute brown sugar for a quicker version, true caramelization creates complex flavor compounds that can’t be replicated. The extra effort of making real caramel delivers significantly better results.
How can I prevent ice crystals from forming during storage?
Store in a shallow container, use parchment paper pressed directly onto the surface, ensure your freezer maintains a constant temperature, and avoid frequent temperature fluctuations by keeping the container in the back of your freezer.
Conclusion
This Salted Caramel Ice Cream is comfort food at its finest — a perfect balance of sophisticated flavors wrapped in a nostalgically familiar package. The contrast between rich, buttery caramel and delicate salt flakes creates a sensory experience that’s impossible to resist. It’s the kind of dessert that transforms ordinary moments into special occasions and never fails to impress guests. Whether enjoyed alone on a quiet evening or shared at a gathering, this homemade treat reminds us why some flavor combinations become classics. Master this recipe, and you’ll never look at store-bought ice cream the same way again.
Print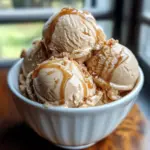
Salted Caramel Ice Cream
Description
Skip the grocery store freezer aisle – this Salted Caramel Ice Cream with perfectly balanced sweet-salty flavor will ruin you for store-bought forever.
Ingredients
- 1 cup (200g) granulated sugar
- 3 tablespoons (45ml) water
- ¾ teaspoon flaky sea salt (like Maldon), plus extra for serving
- 2 cups (480ml) heavy cream, divided
- 1 cup (240ml) whole milk
- 5 large egg yolks
- ½ teaspoon pure vanilla extract
- ¼ teaspoon fine sea salt
Instructions
- Place your storage container in the freezer. Prepare an ice bath.
- Combine sugar and water in a heavy saucepan over medium heat. Cook without stirring until it turns deep amber, about 8-10 minutes.
- Carefully pour in 1 cup heavy cream (mixture will bubble vigorously). Whisk until smooth, then stir in flaky sea salt.
- In a separate bowl, whisk egg yolks until pale. Add remaining cream and milk to caramel mixture and warm over medium-low heat.
- Gradually add 1 cup of warm caramel mixture to egg yolks, whisking constantly.
- Pour egg mixture back into saucepan. Cook, stirring constantly, until mixture reaches 170°F and coats the back of a spoon.
- Remove from heat, stir in vanilla and fine salt. Strain through a sieve into a clean bowl.
- Cool in ice bath, then cover with plastic wrap directly on surface and refrigerate 6 hours or overnight.
- Churn in ice cream maker according to manufacturer’s instructions until soft-serve consistency.
- Transfer to chilled container, sprinkle with additional salt if desired, and freeze at least 4 hours before serving.


