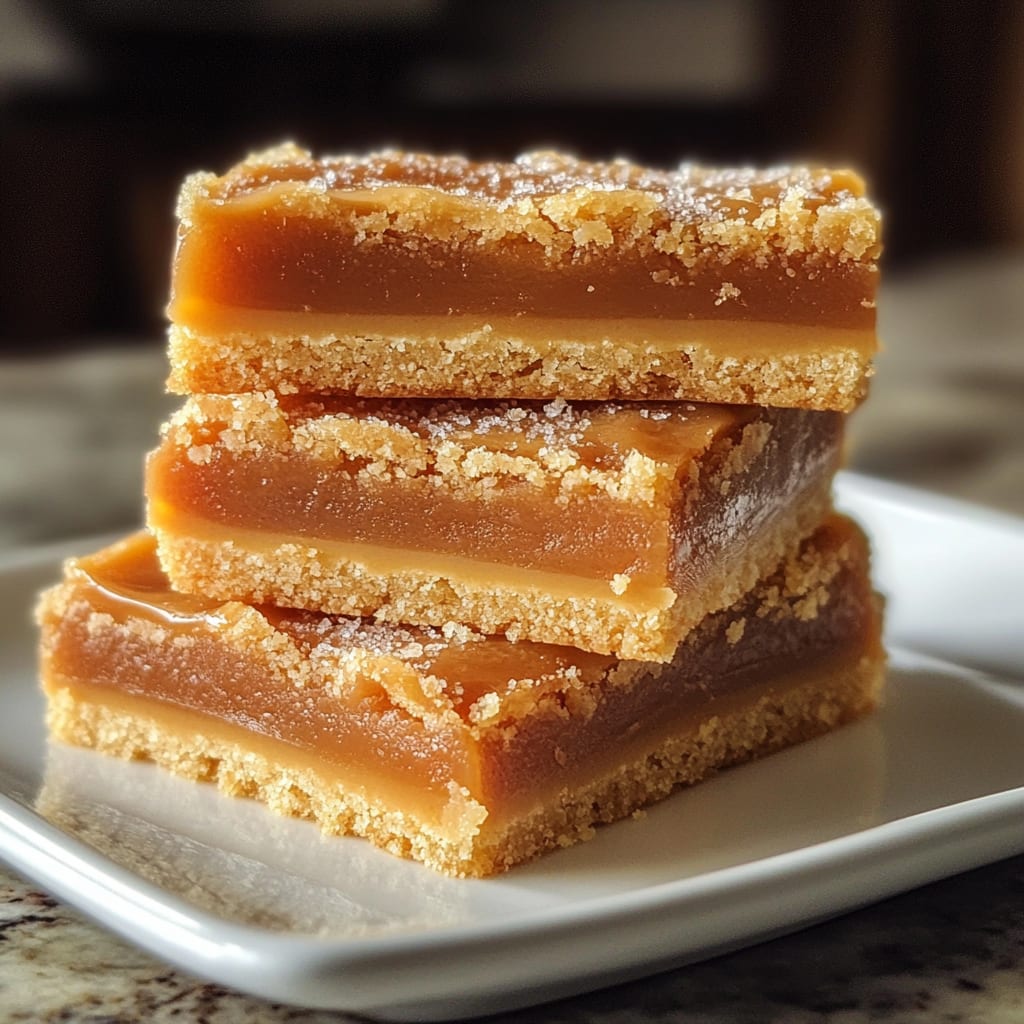
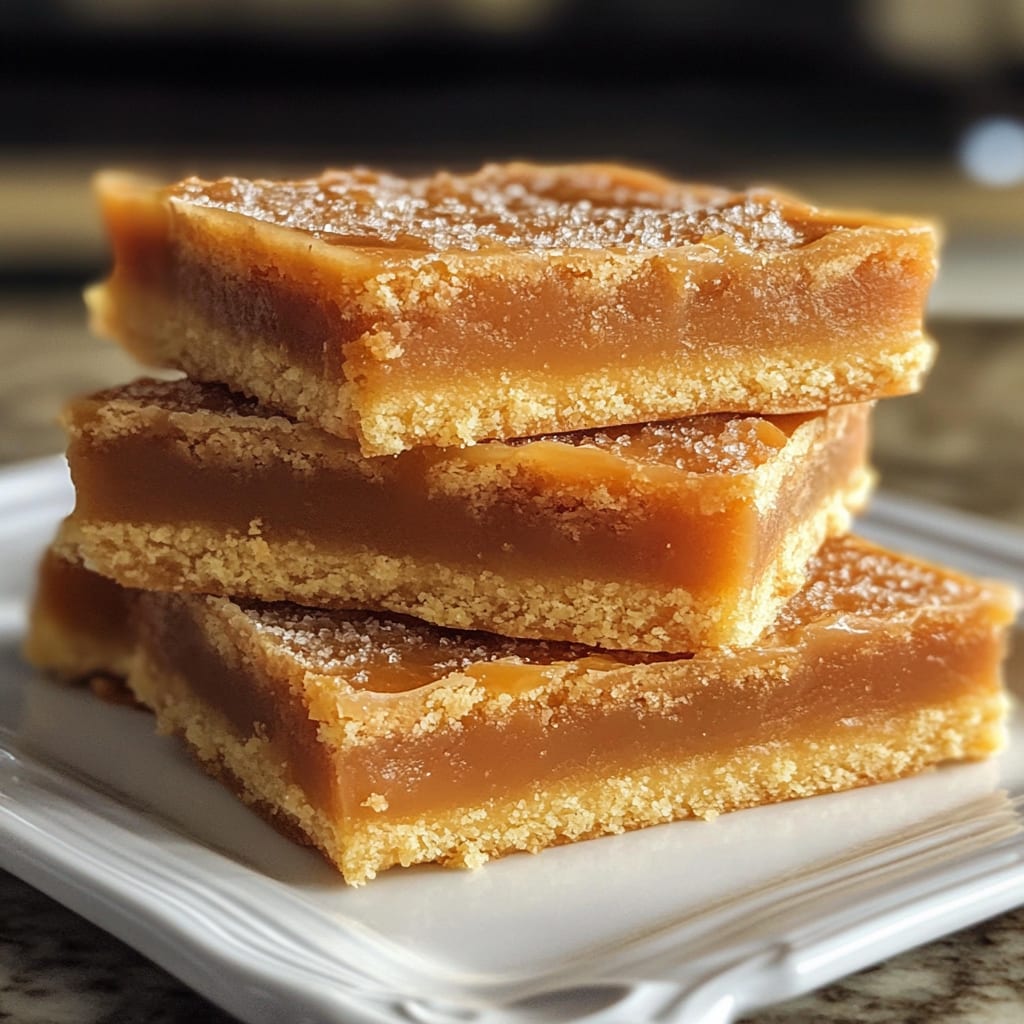
The buttery, crumbly texture of Salted Caramel Butter Bars creates an irresistible sensory experience that perfectly balances sweet and salty flavors in every bite. These decadent treats feature a shortbread-like crust and topping with a gooey salted caramel center that stretches into delicious ribbons when pulled apart. Salted Caramel Butter Bars have become a modern classic for good reason—they deliver maximum flavor with minimal effort. You’ll learn how to create bakery-quality caramel bars at home with foolproof techniques that ensure perfect results every time.
Why You’ll Love This Recipe
These Salted Caramel Butter Bars will quickly become your go-to dessert for both everyday treats and special occasions. The contrast between the buttery, tender shortbread and the smooth, flowing caramel creates a textural masterpiece that’s impossible to resist. Each bite offers the perfect balance—the subtle saltiness cuts through the sweetness, preventing the bars from becoming cloying.
What makes these caramel butter squares truly special is their versatility. They’re elegant enough for dinner parties yet simple enough for weeknight baking. The recipe requires just a handful of pantry staples, eliminating the need for a special shopping trip. Even better, the preparation is straightforward with no complicated techniques—just mix, layer, and bake.
Perhaps the most compelling reason to make these bars is their universal appeal. From kids to grandparents, everyone gravitates toward this perfect combination of butter, caramel, and salt. The bars maintain their freshness for days (though they rarely last that long!), making them perfect for make-ahead dessert planning.
Ingredients
For the Butter Base and Topping:
- 1 pound (454g) unsalted butter, room temperature
- 1 cup (200g) granulated sugar
- 1½ cups (180g) powdered sugar
- 1 tablespoon vanilla extract
- 4 cups (500g) all-purpose flour
- ½ teaspoon fine sea salt
For the Caramel Filling:
- 14 ounces (396g) soft caramel candies, unwrapped
- ⅓ cup (80ml) heavy cream
- ½-1 teaspoon flaky sea salt (like Maldon), plus more for topping
The quality of butter significantly impacts these Salted Caramel Butter Bars, so use the best you can afford. European-style butter with higher fat content creates an exceptionally tender texture. For the caramel filling, you can use store-bought caramel candies for convenience, or homemade caramel sauce for a more artisanal touch. The flaky sea salt is crucial—its larger crystals provide bursts of saltiness that perfectly balance the sweet caramel and buttery crust.
Pro Tips
Master the Butter Consistency: The foundation of perfect Salted Caramel Butter Bars is properly softened butter. It should yield to gentle pressure but still hold its shape—not melted or oily. If your butter is too cold, your dough will be crumbly and difficult to work with. Too warm, and your bars will spread and lose their distinct layers. Allow butter to sit at room temperature for 1-2 hours before beginning, or speed up the process by cutting it into small cubes.
Perfect the Crumb Texture: When mixing the shortbread base, stop mixing as soon as the dough comes together. Overmixing develops gluten, resulting in tough rather than tender bars. The dough should look somewhat crumbly but hold together when pressed. When reserving the portion for topping, create varied crumb sizes for the perfect texture contrast—some pea-sized, some smaller—rather than uniform pieces.
Caramel Layer Technique: The key to preventing a sticky mess is properly cooling layers. Press the first layer firmly and evenly using the bottom of a measuring cup, then chill for 15 minutes before adding caramel. For the caramel layer, heat candies and cream over low heat, stirring constantly to prevent scorching. Pour caramel while still hot but not bubbling, and immediately sprinkle with sea salt so it adheres before the surface sets.
Instructions
Step 1: Prepare the Pan and Oven
Preheat your oven to 325°F (165°C). Line a 9×13-inch baking pan with parchment paper, allowing excess to hang over the sides to create handles for easy removal later. Lightly spray the parchment with cooking spray. This preparation ensures your Salted Caramel Butter Bars will release cleanly without sticking.
Step 2: Make the Butter Base
In a large bowl, beat the room-temperature butter until smooth and creamy, about 1 minute. Add both granulated and powdered sugars, then beat on medium speed until light and fluffy, approximately 2-3 minutes. Don’t rush this step—proper aeration creates the perfect texture. Scrape down the sides of the bowl, add vanilla extract, and beat until incorporated. In a separate bowl, whisk together flour and fine sea salt, then gradually add to the butter mixture on low speed until just combined. The dough will be somewhat crumbly but should hold together when pressed.
Step 3: Form the Base Layer
Press approximately two-thirds of the dough into the prepared pan, creating an even layer about ¼-inch thick. Use the bottom of a measuring cup to create a smooth, firmly packed surface. This ensures your caramel doesn’t seep through to the bottom. Refrigerate the pan while preparing the caramel filling, and set aside the remaining dough for the topping.
Step 4: Prepare the Caramel Filling
In a medium saucepan over medium-low heat, combine the unwrapped caramels and heavy cream. Stir constantly until completely melted and smooth, about 5-7 minutes. Remove from heat and stir in ½ teaspoon of flaky sea salt. The salt will partially dissolve, distributing salty notes throughout your Salted Caramel Butter Bars.
Step 5: Assemble and Bake
Remove the chilled base from the refrigerator. Pour the hot caramel over the crust, spreading it evenly to the edges. Crumble the reserved dough over the caramel layer, allowing some caramel to peek through. Sprinkle additional flaky sea salt over the top. Bake for 25-30 minutes, until the topping is golden brown and the caramel is bubbling at the edges. The contrast between golden crumbs, amber caramel, and white salt crystals creates an irresistible visual appeal.
Step 6: Cool and Cut
Allow the Salted Caramel Butter Bars to cool completely in the pan, at least 2 hours or overnight for clean cuts. Once cooled, use the parchment handles to lift the entire slab from the pan. Cut into squares using a sharp knife, wiping the blade clean between cuts to prevent sticking. For extra-clean cuts, refrigerate for 30 minutes before cutting.
Variations
Chocolate Drizzle Caramel Bars: Elevate your Salted Caramel Butter Bars by adding a chocolate dimension. After the bars have completely cooled, drizzle with 4 ounces of melted semi-sweet chocolate. For a more substantial chocolate layer, spread melted chocolate directly over the caramel before adding the crumb topping, creating a chocolate-caramel fusion.
Nutty Caramel Butter Bars: Introduce texture and flavor complexity by incorporating ½ cup of finely chopped toasted pecans, almonds, or hazelnuts into the shortbread dough. For double the nutty goodness, sprinkle an additional ¼ cup of chopped nuts over the caramel layer before adding the crumb topping. The nuts add a wonderful crunch that contrasts beautifully with the soft caramel.
Gluten-Free Option: Create celiac-friendly Salted Caramel Butter Bars by substituting the all-purpose flour with a high-quality cup-for-cup gluten-free flour blend. Add ¼ teaspoon of xanthan gum if your blend doesn’t include it already to maintain the proper texture. The buttery, caramel-forward flavor profile remains largely unchanged, making this an excellent gluten-free dessert option that doesn’t taste like a compromise.
Storage and Serving
Store your Salted Caramel Butter Bars in an airtight container at room temperature for up to 3 days. For longer storage, refrigerate for up to a week, placing parchment paper between layers to prevent sticking. These bars also freeze beautifully—wrap individual portions in plastic wrap, then aluminum foil, and freeze for up to 3 months. Thaw at room temperature for about an hour before serving.
For an elevated dessert experience, warm individual Salted Caramel Butter Bars for 10-15 seconds in the microwave and serve with a scoop of vanilla bean ice cream. The contrast between warm, gooey caramel and cold ice cream creates a sensational temperature contrast.
These bars make an impressive addition to dessert platters. Cut them into smaller, bite-sized pieces and arrange on a serving board alongside fresh berries, chocolate truffles, and other small treats for a stunning visual presentation at parties or holiday gatherings.
FAQs
Can I use store-bought caramel sauce instead of melting caramels?
Yes, you can substitute 1½ cups of thick store-bought caramel sauce for the melted caramels and cream. Choose a high-quality, thick sauce as thinner varieties may soak into the crust. You may need to reduce the sauce slightly over low heat to achieve the proper consistency for your Salted Caramel Butter Bars.
Why did my shortbread dough turn out too crumbly?
If your dough is too crumbly to work with, it likely needs more moisture. Add 1-2 tablespoons of heavy cream, one at a time, until the dough just holds together when pressed. Avoid overworking the dough, as this develops gluten and makes the bars tough rather than tender.
How do I prevent the caramel from hardening too much after baking?
The addition of heavy cream to the caramels keeps the filling soft. If your caramel layer turns too hard after cooling, you likely overcooked the caramel mixture. Next time, heat the caramels and cream more gently and remove from heat immediately after melting.
Can I make these bars ahead of time for an event?
Absolutely! Salted Caramel Butter Bars actually improve after a day as the flavors meld together. Make them up to two days in advance, store at room temperature in an airtight container, and cut just before serving.
Why did my caramel seep through to the bottom of the pan?
This typically happens if the base layer isn’t packed firmly enough. Make sure to create a solid, well-compressed bottom crust and chill it before adding the caramel layer. Also, ensure your caramel isn’t too hot when poured over the crust.
Conclusion
These Salted Caramel Butter Bars are comfort food at its finest — buttery, gooey, perfectly balanced between sweet and salty, with a texture that manages to be both substantial and melt-in-your-mouth delicate. They’re the kind of dessert that creates moments of pure joy, whether shared at family gatherings, offered as a homemade gift, or enjoyed quietly with a cup of coffee. With their perfect balance of flavors and textures, these bars have a way of becoming not just a recipe in your collection, but a tradition that friends and family will request time and again.
Print
Salted Caramel Butter Bars
- Prep Time: 30 minutes
- Cook Time: 30 minutes
- Total Time: 1 hour
- Yield: 24 bars 1x
- Category: Dessert
- Method: Baking
- Cuisine: Americaine
Description
Salted Caramel Butter Bars – Indulgent caramel bars with a buttery crust, perfect for a quick and comforting crowd-pleasing treat.
Ingredients
- 1 pound (454g) unsalted butter, room temperature
- 1 cup (200g) granulated sugar
- 1½ cups (180g) powdered sugar
- 1 tablespoon vanilla extract
- 4 cups (500g) all-purpose flour
- ½ teaspoon fine sea salt
- 14 ounces (396g) soft caramel candies, unwrapped
- ⅓ cup (80ml) heavy cream
- ½–1 teaspoon flaky sea salt (like Maldon), plus more for topping
Instructions
- Step 1: Prepare the Pan and Oven Preheat your oven to 325°F (165°C). Line a 9×13-inch baking pan with parchment paper, allowing excess to hang over the sides to create handles for easy removal later. Lightly spray the parchment with cooking spray. This preparation ensures your Salted Caramel Butter Bars will release cleanly without sticking.
- Step 2: Make the Butter Base In a large bowl, beat the room-temperature butter until smooth and creamy, about 1 minute. Add both granulated and powdered sugars, then beat on medium speed until light and fluffy, approximately 2-3 minutes. Don’t rush this step—proper aeration creates the perfect texture. Scrape down the sides of the bowl, add vanilla extract, and beat until incorporated. In a separate bowl, whisk together flour and fine sea salt, then gradually add to the butter mixture on low speed until just combined. The dough will be somewhat crumbly but should hold together when pressed.
- Step 3: Form the Base Layer Press approximately two-thirds of the dough into the prepared pan, creating an even layer about ¼-inch thick. Use the bottom of a measuring cup to create a smooth, firmly packed surface. This ensures your caramel doesn’t seep through to the bottom. Refrigerate the pan while preparing the caramel filling, and set aside the remaining dough for the topping.
- Step 4: Prepare the Caramel Filling In a medium saucepan over medium-low heat, combine the unwrapped caramels and heavy cream. Stir constantly until completely melted and smooth, about 5-7 minutes. Remove from heat and stir in ½ teaspoon of flaky sea salt. The salt will partially dissolve, distributing salty notes throughout your Salted Caramel Butter Bars.
- Step 5: Assemble and Bake Remove the chilled base from the refrigerator. Pour the hot caramel over the crust, spreading it evenly to the edges. Crumble the reserved dough over the caramel layer, allowing some caramel to peek through. Sprinkle additional flaky sea salt over the top. Bake for 25-30 minutes, until the topping is golden brown and the caramel is bubbling at the edges. The contrast between golden crumbs, amber caramel, and white salt crystals creates an irresistible visual appeal.
- Step 6: Cool and Cut Allow the Salted Caramel Butter Bars to cool completely in the pan, at least 2 hours or overnight for clean cuts. Once cooled, use the parchment handles to lift the entire slab from the pan. Cut into squares using a sharp knife, wiping the blade clean between cuts to prevent sticking. For extra-clean cuts, refrigerate for 30 minutes before cutting.
Notes
Fresh ingredients will always yield the best flavor results.
Nutrition
- Serving Size: 1 bar
- Calories: 300
- Sugar: 20g
- Sodium: 200mg
- Fat: 18g
- Saturated Fat: 11g
- Unsaturated Fat: 6g
- Trans Fat: 0g
- Carbohydrates: 32g
- Fiber: 1g
- Protein: 2g
- Cholesterol: 45mg


