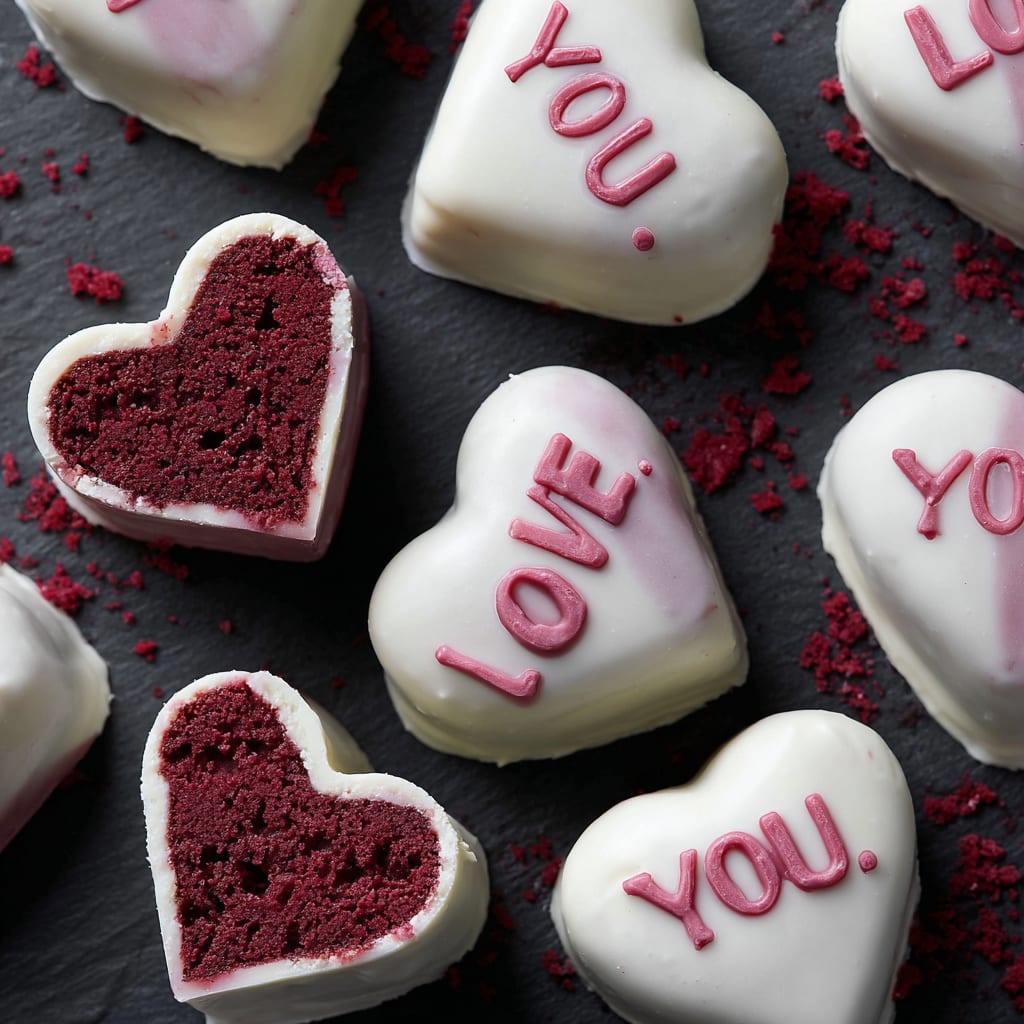
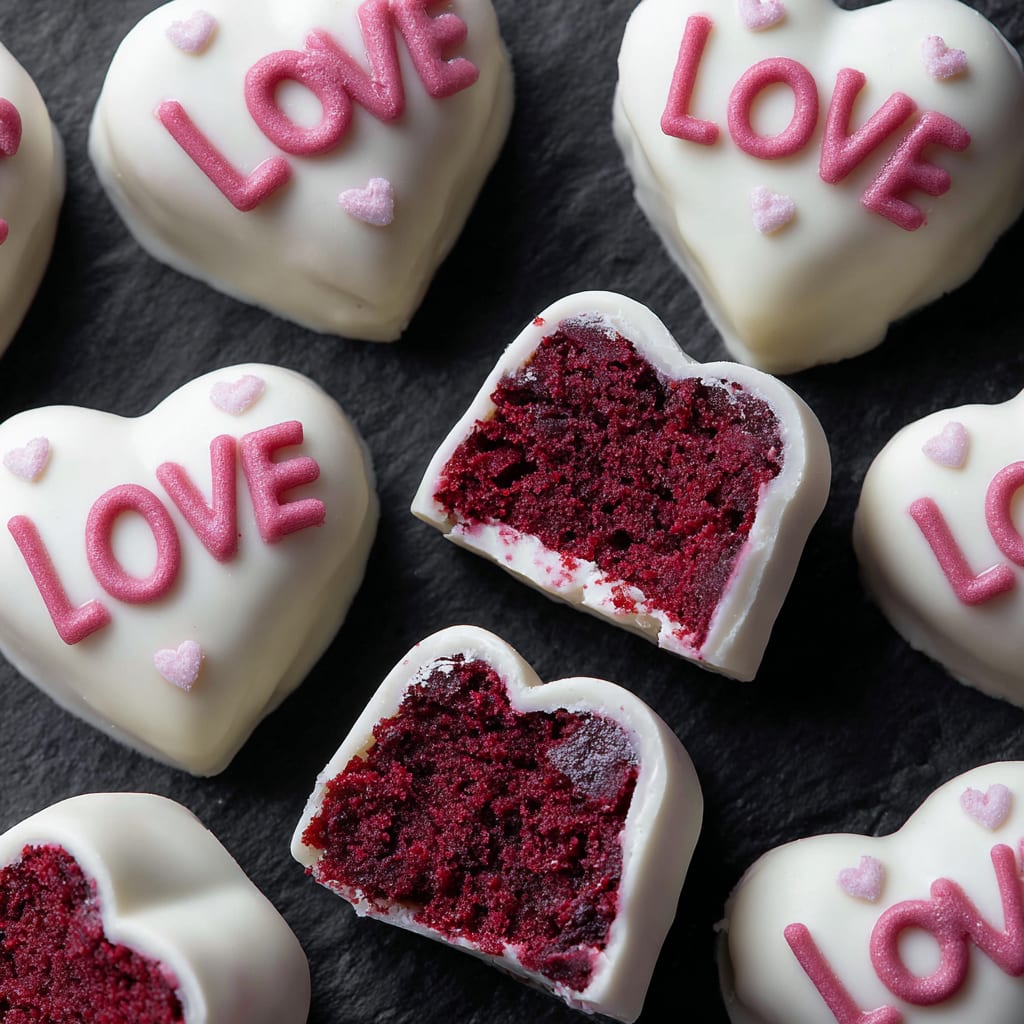
Velvety, vibrant, and deliciously romantic – these Red Velvet Cake Valentines Hearts are the perfect way to say “I love you” through the universal language of dessert. The striking crimson cake layers contrast beautifully with creamy white frosting, creating a visual masterpiece that tastes even better than it looks. The subtle cocoa notes and tangy cream cheese frosting create an irresistible flavor combination that has made red velvet a classic for generations. You’ll learn how to create these show-stopping heart-shaped treats that combine the beloved Red Velvet Cake flavor with a special Valentine’s Day presentation that will impress your loved ones.
Why You’ll Love This Recipe
These Red Velvet Cake Valentines Hearts strike the perfect balance between impressive and achievable. The cake itself has a tender, moist crumb that practically melts in your mouth, while the cream cheese frosting provides a luxurious tanginess that cuts through the sweetness. What makes this recipe truly special is the contrast between the deep red cake and the snow-white frosting – a feast for both the eyes and the palate.
Even if you’re not an experienced baker, this recipe breaks down the process into manageable steps. The heart shape adds that special Valentine’s touch without requiring professional decorating skills. Plus, the vibrant color is guaranteed to elicit gasps of delight when you present these sweet treats. These red velvet heart cakes work equally well as a romantic dessert for two or as charming individual servings for a Valentine’s Day gathering.
The subtle chocolate flavor paired with vanilla undertones creates a sophisticated taste profile that appeals to both chocolate lovers and those who prefer lighter flavors. It’s this versatility that has made Red Velvet Cake an enduring favorite for special occasions.
Ingredients
For the Red Velvet Cake:
- 2½ cups (315g) all-purpose flour
- 2 tablespoons (15g) unsweetened cocoa powder (natural, not Dutch-processed)
- 1 teaspoon baking soda
- 1 teaspoon salt
- 1½ cups (300g) granulated sugar
- 1 cup (240ml) buttermilk, room temperature
- 1 cup (226g) unsalted butter, softened
- 2 large eggs, room temperature
- 2 tablespoons (30ml) red food coloring (liquid) or 1 tablespoon gel coloring
- 1 teaspoon white vinegar
- 2 teaspoons vanilla extract
For the Cream Cheese Frosting:
- 16 oz (450g) cream cheese, softened
- ½ cup (113g) unsalted butter, softened
- 4 cups (480g) powdered sugar, sifted
- 2 teaspoons vanilla extract
- Pinch of salt
The quality of your cocoa powder matters significantly in this Valentine’s red velvet recipe – look for a natural cocoa powder rather than Dutch-processed for the best color and chemical reaction. Real buttermilk provides the perfect tanginess, though a homemade substitute of milk with vinegar can work in a pinch. For the most vibrant red color, gel food coloring delivers impressive results with less liquid added to the batter.
Pro Tips
Getting the Perfect Red Shade
The signature color of Red Velvet Cake Valentines Hearts requires a delicate balance. Mix the cocoa powder with the food coloring before adding to the batter to achieve the most vibrant red. If using liquid food coloring, you may need to adjust the amount based on the brand – start with less and add more as needed. Remember that the batter will look brighter than the finished cake, so aim for a deeply saturated color.
Achieving the Ideal Texture
For the signature velvet texture, proper mixing is crucial. Cream the butter and sugar until truly light and fluffy – at least 3-5 minutes. This incorporates air that helps the cake rise properly. When adding flour, mix just until combined. Overmixing activates the gluten, resulting in a tougher cake that loses that characteristic tender crumb that makes red velvet cake so special.
Frosting Perfection
For the smoothest cream cheese frosting, ensure both the butter and cream cheese are properly softened but not melted. Beat them separately before combining to prevent lumps, and sift your powdered sugar to avoid graininess. If you’ll be piping decorative elements, chill the frosting for 30 minutes first so it holds its shape. For a professional-looking finish, use a bench scraper or offset spatula dipped in hot water and dried to smooth the frosting.
Instructions
Step 1: Prepare Your Pans
Preheat your oven to 350°F (175°C). If using heart-shaped pans, grease them thoroughly with butter and dust with flour, tapping out any excess. Alternatively, line two 9-inch round cake pans with parchment paper and grease the sides. For individual heart cakes, use a silicone heart mold or a heart-shaped cookie cutter for cutting shapes after baking.
Step 2: Mix Dry Ingredients
In a medium bowl, whisk together the flour, cocoa powder, baking soda, and salt. This ensures even distribution of the leavening agents and prevents clumping of the cocoa powder. Set aside while you prepare the wet ingredients.
Step 3: Cream Butter and Sugar
In a large mixing bowl, beat the softened butter and granulated sugar with an electric mixer on medium-high speed until light and fluffy, about 4-5 minutes. Don’t rush this step – proper creaming incorporates air that helps create the tender crumb of your Red Velvet Cake Valentines Hearts.
Step 4: Add Eggs and Coloring
Add eggs one at a time, beating well after each addition. In a small bowl, mix the red food coloring with the cocoa powder to create a paste. Add this to the butter mixture along with the vanilla extract, and beat until fully incorporated and beautifully red.
Step 5: Alternate Dry Ingredients and Buttermilk
With the mixer on low, add one-third of the flour mixture, followed by half the buttermilk. Continue alternating, ending with the flour mixture, mixing just until combined after each addition. Finally, stir in the vinegar – it will react with the baking soda to give additional lift.
Step 6: Bake the Cakes
Pour the batter into your prepared pans, smoothing the tops with a spatula. Bake for 25-30 minutes for regular cake pans, or 15-20 minutes for smaller individual cakes, until a toothpick inserted in the center comes out clean or with a few moist crumbs.
Step 7: Cool Completely
Allow the cakes to cool in the pans for 10 minutes, then turn out onto wire racks to cool completely. If the cakes have domed tops, use a serrated knife to level them for easier stacking and frosting.
Step 8: Prepare Frosting
Beat the softened cream cheese and butter until smooth and fluffy. Gradually add the sifted powdered sugar, vanilla, and salt, beating on low speed until incorporated, then on medium-high until light and fluffy.
Step 9: Assemble and Frost
If making a layered heart cake, place one layer on a serving plate, spread a generous amount of frosting, then top with the second layer. Cover the entire cake with frosting. For individual hearts, cut cooled cake into heart shapes and frost the tops. For a festive touch, decorate with sprinkles, edible glitter, or piped frosting details.
Variations
Chocolate-Covered Strawberry Red Velvet Hearts
Transform these Red Velvet Cake Valentines Hearts by incorporating fresh strawberries into the filling. Slice strawberries thinly and arrange between cake layers with a thin spread of chocolate ganache before adding the cream cheese frosting. Top each heart with chocolate-dipped strawberry halves for an elegant finish that plays on the classic Valentine’s combination of chocolate and strawberries.
White Chocolate Red Velvet Hearts
Add 4 ounces of melted white chocolate to your cream cheese frosting for a decadent twist. The white chocolate adds richness and complements the subtle cocoa in the red velvet heart cakes beautifully. For an eye-catching finish, drizzle more melted white chocolate over the frosted hearts and add white chocolate curls as decoration.
Gluten-Free Red Velvet Hearts
Make this recipe accessible to everyone by substituting the all-purpose flour with a high-quality gluten-free 1:1 baking flour blend. Add ¼ teaspoon of xanthan gum if your blend doesn’t already include it to maintain the cake’s structure. The result is a tender Red Velvet Cake that everyone can enjoy without sacrificing texture or flavor.
Storage and Serving
These Red Velvet Cake Valentines Hearts can be stored at room temperature for up to 2 days if covered properly. For longer storage, refrigerate in an airtight container for up to 5 days – just bring to room temperature before serving for the best texture and flavor. You can also freeze unfrosted cake layers for up to 2 months, well-wrapped in plastic and foil.
For an elevated dessert experience, serve each red velvet heart with a dusting of cocoa powder and a fresh raspberry coulis. The tartness of the berries beautifully complements the sweetness of the cake. For a more decadent presentation, warm each serving slightly and pair with a scoop of high-quality vanilla bean ice cream that slowly melts into the cake.
Create a romantic dessert table by arranging various sizes of these Red Velvet Cake Valentines Hearts on tiered stands, surrounded by chocolate-dipped strawberries and scattered rose petals. This makes for not just a delicious dessert but also a stunning centerpiece worthy of your Valentine’s celebration.
FAQs
Can I make Red Velvet Cake Valentines Hearts without food coloring?
Yes! For a natural alternative, you can use 2 tablespoons of beet powder or reduced beet juice. The color won’t be as vibrant, but you’ll get a lovely reddish hue with no artificial ingredients.
Why did my Red Velvet Cake turn out brown instead of red?
This typically happens when using Dutch-processed cocoa, which is darker and more alkaline than natural cocoa powder. Always use natural cocoa powder for red velvet, and mix it with your food coloring before adding to the batter.
Can I make this recipe ahead of time?
Absolutely! You can bake the cake layers up to 3 days in advance and store them wrapped in plastic in the refrigerator. The frosting can be made 2 days ahead and stored in the refrigerator; just bring to room temperature and re-whip before using.
Why do Red Velvet Cakes contain vinegar?
The vinegar reacts with the baking soda and cocoa powder, which helps the cake rise and enhances the red color. It also adds a subtle tanginess that’s characteristic of traditional red velvet.
Can I use this recipe for cupcakes instead of cake?
Yes! This recipe yields approximately 24 cupcakes. Bake at the same temperature for 18-20 minutes. You can use a heart-shaped cutter to cut the cupcake tops into hearts, or use heart-shaped silicone liners for completely heart-shaped cupcakes.

Red Velvet Cake Valentines Hearts
- Prep Time: 25 minutes
- Cook Time: 30 minutes
- Total Time: 55 minutes
- Yield: 8 servings 1x
- Category: Dessert
- Method: Baking
- Cuisine: Americaine
Description
Red Velvet Cake Valentines Hearts with rich cocoa, creamy frosting, and perfect for! Festive, decadent, and sure to impress your loved ones.
Ingredients
- 2½ cups (315g) all-purpose flour
- 2 tablespoons (15g) unsweetened cocoa powder (natural, not Dutch-processed)
- 1 teaspoon baking soda
- 1 teaspoon salt
- 1½ cups (300g) granulated sugar
- 1 cup (240ml) buttermilk, room temperature
- 1 cup (226g) unsalted butter, softened
- 2 large eggs, room temperature
- 2 tablespoons (30ml) red food coloring (liquid) or 1 tablespoon gel coloring
- 1 teaspoon white vinegar
- 2 teaspoons vanilla extract
- 16 oz (450g) cream cheese, softened
- ½ cup (113g) unsalted butter, softened
- 4 cups (480g) powdered sugar, sifted
- 2 teaspoons vanilla extract
- Pinch of salt
Instructions
- Step 1: Prepare Your Pans Preheat your oven to 350°F (175°C). If using heart-shaped pans, grease them thoroughly with butter and dust with flour, tapping out any excess. Alternatively, line two 9-inch round cake pans with parchment paper and grease the sides. For individual heart cakes, use a silicone heart mold or a heart-shaped cookie cutter for cutting shapes after baking.
- Step 2: Mix Dry Ingredients In a medium bowl, whisk together the flour, cocoa powder, baking soda, and salt. This ensures even distribution of the leavening agents and prevents clumping of the cocoa powder. Set aside while you prepare the wet ingredients.
- Step 3: Cream Butter and Sugar In a large mixing bowl, beat the softened butter and granulated sugar with an electric mixer on medium-high speed until light and fluffy, about 4-5 minutes. Don’t rush this step – proper creaming incorporates air that helps create the tender crumb of your Red Velvet Cake Valentines Hearts.
- Step 4: Add Eggs and Coloring Add eggs one at a time, beating well after each addition. In a small bowl, mix the red food coloring with the cocoa powder to create a paste. Add this to the butter mixture along with the vanilla extract, and beat until fully incorporated and beautifully red.
- Step 5: Alternate Dry Ingredients and Buttermilk With the mixer on low, add one-third of the flour mixture, followed by half the buttermilk. Continue alternating, ending with the flour mixture, mixing just until combined after each addition. Finally, stir in the vinegar – it will react with the baking soda to give additional lift.
- Step 6: Bake the Cakes Pour the batter into your prepared pans, smoothing the tops with a spatula. Bake for 25-30 minutes for regular cake pans, or 15-20 minutes for smaller individual cakes, until a toothpick inserted in the center comes out clean or with a few moist crumbs.
- Step 7: Cool Completely Allow the cakes to cool in the pans for 10 minutes, then turn out onto wire racks to cool completely. If the cakes have domed tops, use a serrated knife to level them for easier stacking and frosting.
- Step 8: Prepare Frosting Beat the softened cream cheese and butter until smooth and fluffy. Gradually add the sifted powdered sugar, vanilla, and salt, beating on low speed until incorporated, then on medium-high until light and fluffy.
- Step 9: Assemble and Frost If making a layered heart cake, place one layer on a serving plate, spread a generous amount of frosting, then top with the second layer. Cover the entire cake with frosting. For individual hearts, cut cooled cake into heart shapes and frost the tops. For a festive touch, decorate with sprinkles, edible glitter, or piped frosting details.
Notes
Fresh ingredients will always yield the best flavor results.
Nutrition
- Serving Size: 1 heart cake
- Calories: 380
- Sugar: 35g
- Sodium: 290mg
- Fat: 18g
- Saturated Fat: 11g
- Unsaturated Fat: 6g
- Trans Fat: 0g
- Carbohydrates: 50g
- Fiber: 1g
- Protein: 4g
- Cholesterol: 85mg


