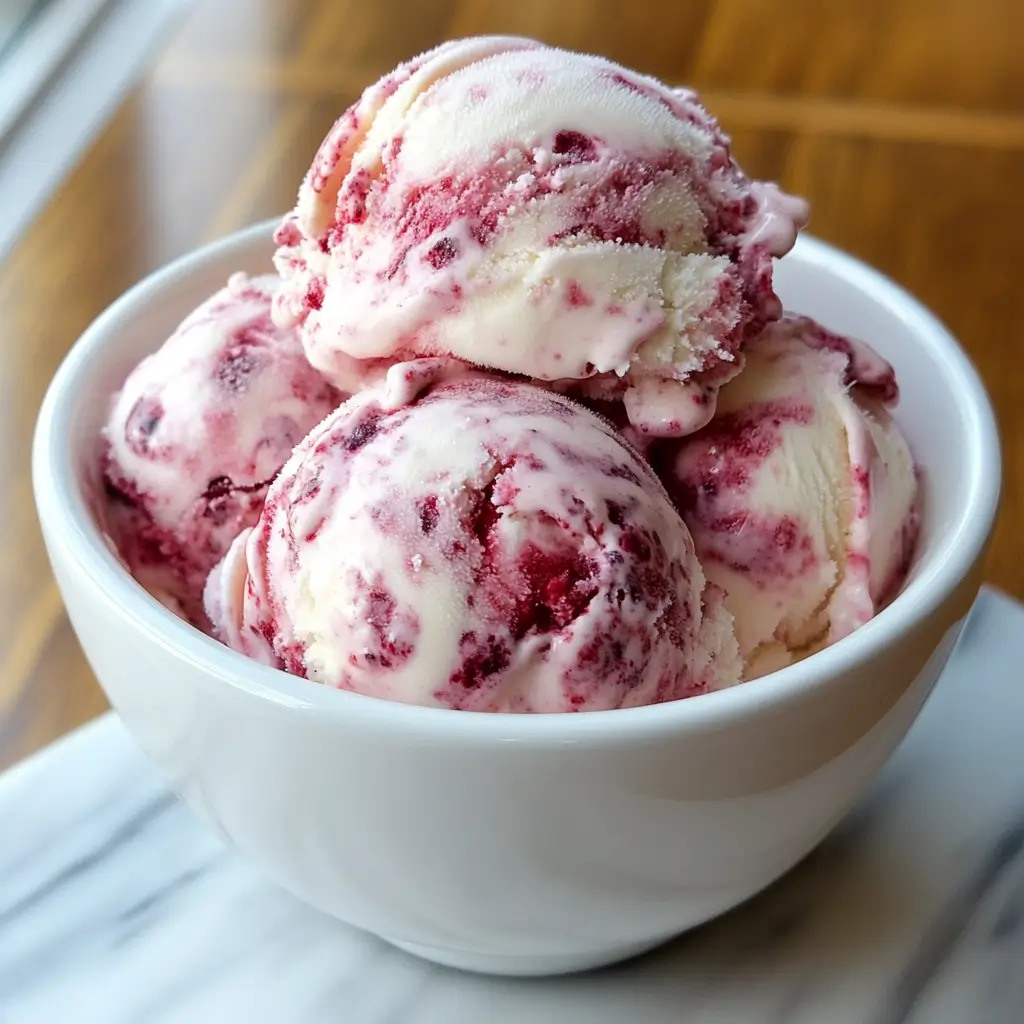
The first spoonful of creamy, cool Homemade Raspberry Swirl Ice Cream Recipe will transport you to dessert heaven with its velvety texture and vibrant berry ribbons dancing throughout. This delightful frozen treat balances the perfect combination of sweet cream and tart raspberry for a refreshing indulgence that store-bought varieties simply cannot match. Making your own Homemade Raspberry Swirl Ice Cream gives you complete control over ingredients while creating an impressive dessert that’s surprisingly simple to prepare. You’ll learn how to create the perfect ice cream base, swirl in fresh raspberry sauce, and achieve professional-quality results right in your own kitchen.
Why You’ll Love This Recipe
This Homemade Raspberry Swirl Ice Cream Recipe stands out for numerous reasons that will have you coming back for seconds (and thirds). The contrast between the smooth, vanilla-infused ice cream base and the tangy raspberry ripple creates a textural masterpiece that delights with every bite. Unlike commercial versions, this recipe uses real fruit and natural ingredients, resulting in authentic flavor without artificial additives.
The recipe is customizable to your sweetness preference, allowing you to adjust the sugar level to perfectly complement the natural tartness of fresh raspberries. Even novice ice cream makers will find success with this straightforward method that doesn’t require fancy equipment – though an ice cream maker does yield the creamiest results.
Perhaps most importantly, making this raspberry ice cream becomes a rewarding activity that fills your kitchen with delicious aromas and creates lasting memories, especially when made with family or friends. The gorgeous pink swirls make for an Instagram-worthy dessert that looks as good as it tastes.
Ingredients
For the Ice Cream Base:
- 2 cups (480ml) heavy cream
- 1 cup (240ml) whole milk
- ¾ cup (150g) granulated sugar
- ⅛ teaspoon fine sea salt
- 5 large egg yolks
- 2 teaspoons pure vanilla extract
For the Raspberry Swirl:
- 2 cups (250g) fresh or frozen raspberries
- ⅓ cup (67g) granulated sugar
- 1 tablespoon fresh lemon juice
- 1 tablespoon cornstarch
- 1 tablespoon cold water
The heavy cream provides richness and fat content crucial for creating that luxurious mouthfeel characteristic of premium ice cream. Fresh raspberries deliver the most vibrant flavor, but frozen work perfectly when fresh aren’t in season. The cornstarch in the raspberry swirl helps thicken the sauce to the ideal consistency for creating beautiful ribbons that won’t just disappear into the ice cream base.
Pro Tips
Use Quality Ingredients
The foundation of exceptional homemade raspberry ice cream lies in using the best ingredients possible. Opt for organic heavy cream and whole milk with high fat content for the creamiest texture. For the raspberry swirl, choose bright, ripe berries at peak season or high-quality frozen raspberries. This simple attention to ingredient quality elevates your final product dramatically.
Master the Custard Technique
The most critical step is properly tempering the egg yolks. When adding hot cream to the yolks, pour extremely slowly while whisking constantly to prevent scrambling. The custard is perfectly cooked when it coats the back of a wooden spoon and holds a clean line when you run your finger through it. Strain the mixture afterward to catch any small bits of cooked egg for ultra-smooth results.
Perfect the Swirl Method
For Instagram-worthy raspberry ribbons, ensure your ice cream base is partially frozen before adding the swirl. The raspberry sauce should be completely cooled and slightly thickened. Layer the partially frozen ice cream and raspberry sauce in alternating spoonfuls, then use a knife to create figure-eight patterns for distinct swirls rather than fully mixing, which would result in pink ice cream instead of beautiful swirls.
Instructions
Step 1: Prepare the Raspberry Swirl
Combine raspberries, sugar, and lemon juice in a medium saucepan over medium heat. Mash berries with a potato masher or fork as they cook. Bring the mixture to a simmer and cook for 5-7 minutes until berries break down. In a small bowl, whisk together cornstarch and cold water to create a slurry. Stir this into the simmering raspberry mixture and cook for 1-2 more minutes until thickened. Remove from heat, strain through a fine-mesh sieve to remove seeds (if desired), and refrigerate until completely cold.
Step 2: Create the Ice Cream Base
In a medium saucepan, combine heavy cream, milk, half the sugar, and salt. Heat over medium until steaming but not boiling. Meanwhile, in a large bowl, whisk egg yolks with remaining sugar until pale yellow and slightly thickened. Slowly pour about 1 cup of the hot cream mixture into the egg yolks, whisking constantly. This tempers the eggs to prevent scrambling. Now pour the egg mixture back into the saucepan with the remaining cream mixture.
Step 3: Cook the Custard
Cook the mixture over medium-low heat, stirring constantly with a wooden spoon, until it thickens enough to coat the back of the spoon and registers 170-175°F (77-79°C) on an instant-read thermometer. Don’t let it boil! Immediately remove from heat and pour through a fine-mesh strainer into a clean bowl. Stir in vanilla extract, then cover the surface directly with plastic wrap to prevent a skin from forming.
Step 4: Chill Thoroughly
Refrigerate the custard base for at least 4 hours or overnight until completely cold. This aging process allows the flavors to develop fully and improves the final texture of your homemade raspberry swirl ice cream.
Step 5: Churn the Ice Cream
Pour the chilled custard into your ice cream maker and churn according to manufacturer’s instructions, usually 20-25 minutes until it reaches soft-serve consistency. During the last minute of churning, you can add mix-ins like white chocolate chips if desired.
Step 6: Create the Swirl Effect
Transfer one-third of the churned ice cream to a freezer-safe container. Drizzle one-third of the raspberry sauce over the ice cream. Repeat with remaining ice cream and sauce, creating layers. Use a knife to gently swirl the mixture with a figure-eight motion, being careful not to overmix.
Step 7: Freeze Until Firm
Cover the container with a lid or plastic wrap and freeze for at least 4 hours or preferably overnight until firm. Let stand at room temperature for 5-10 minutes before serving to soften slightly for the perfect scoopable consistency.
Variations
White Chocolate Raspberry Swirl
For an indulgent twist on this raspberry swirl ice cream recipe, fold in 1/2 cup of finely chopped white chocolate or white chocolate chips just before creating the swirl. The creamy sweetness of white chocolate pairs beautifully with tart raspberries, creating a magical flavor combination reminiscent of fancy ice cream parlors. For extra decadence, drizzle melted white chocolate into the container during the layering process.
Mixed Berry Swirl
Expand your berry horizons by creating a mixed berry swirl instead. Replace half the raspberries with strawberries, blackberries, or blueberries for a more complex fruit flavor profile. This variation works wonderfully in summer when multiple berries are in season and brings different texture elements to each bite of your homemade ice cream creation.
Dairy-Free Coconut Raspberry Swirl
For those avoiding dairy, substitute the heavy cream and milk with full-fat coconut milk (2 cans) and reduce sugar slightly as coconut milk has natural sweetness. This variation adds a tropical note that complements the raspberry wonderfully, creating an exotic dessert perfect for summer gatherings. The coconut base produces an exceptionally creamy texture even without dairy.
Storage and Serving
Store your Homemade Raspberry Swirl Ice Cream in an airtight container in the freezer for up to two weeks for optimal freshness. For best texture, place a piece of parchment paper directly on the ice cream’s surface before sealing the container to prevent ice crystals from forming. If the ice cream becomes too hard, allow it to sit at room temperature for 5-10 minutes before scooping.
Serve this gorgeous dessert in chilled bowls to prevent premature melting. For an elegant presentation, garnish with fresh raspberries, mint leaves, and a light dusting of powdered sugar. This ice cream makes a stunning dessert when sandwiched between two homemade sugar cookies or butter cookies for special occasions.
For a decadent sundae experience, top your raspberry swirl ice cream with hot fudge sauce, toasted sliced almonds, and fresh whipped cream. It also pairs beautifully with chocolate cake, lemon pound cake, or simply enjoyed on its own to appreciate the perfect balance of cream and berries in each spoonful.
FAQs
Can I make this recipe without an ice cream maker?
Yes! Pour the chilled custard into a shallow freezer-safe container. Freeze for 45 minutes, then remove and whisk vigorously to break up ice crystals. Return to freezer and repeat this process every 30 minutes for about 3 hours. Add the raspberry swirl during the final mixing, then freeze until firm.
Why did my ice cream turn out icy?
Iciness usually results from either insufficient fat content or improper storage. Ensure you’re using full-fat dairy products and consider adding 1-2 tablespoons of vodka or rum to lower the freezing point. Always store in airtight containers and consume within two weeks.
Can I use other berries instead of raspberries?
Absolutely! Strawberries, blackberries, or blueberries work wonderfully. Adjust sugar amounts based on the natural sweetness of your chosen fruit. Strawberries typically need less sugar, while blackberries might require slightly more.
Why strain the raspberry mixture?
Straining removes the seeds for a smoother texture, but this step is optional. If you enjoy the textural element that seeds provide or want to save time, you can skip straining.
Can I make this recipe with artificial sweeteners?
Yes, but with adjustments. Artificial sweeteners don’t provide the same texture-enhancing properties as sugar. Consider using only half artificial sweetener and half sugar, or add 1-2 tablespoons of corn syrup to improve texture if using all artificial sweetener.
Conclusion
This Homemade Raspberry Swirl Ice Cream Recipe is a dessert lover’s dream come true — creamy, refreshing, and bursting with bright berry flavor in every spoonful. It’s the kind of recipe that transforms ordinary summer evenings into special occasions and makes you wonder why you ever bought store-bought ice cream. The beautiful contrast between smooth vanilla base and vibrant raspberry ribbons not only delights the palate but creates a stunning visual presentation worthy of celebration. Whether you’re making it for a special gathering or simply treating yourself, this recipe proves that homemade always tastes better and brings joy with every delicious bite.
Print
Homemade Raspberry Swirl Ice Cream Recipe
Description
Creamy homemade ice cream swirled with tangy raspberry ribbons. This dreamy summer treat beats anything from the store and will have everyone asking for seconds.
Ingredients
- 2 cups (480ml) heavy cream
- 1 cup (240ml) whole milk
- ¾ cup (150g) granulated sugar
- ⅛ teaspoon fine sea salt
- 5 large egg yolks
- 2 teaspoons pure vanilla extract
- 2 cups (250g) fresh or frozen raspberries
- ⅓ cup (67g) granulated sugar
- 1 tablespoon fresh lemon juice
- 1 tablespoon cornstarch
- 1 tablespoon cold water
Instructions
- Combine raspberries, ⅓ cup sugar, and lemon juice in a saucepan over medium heat. Mash berries as they cook. Simmer for 5-7 minutes.
- Whisk cornstarch and water together, then stir into raspberry mixture. Cook for 1-2 minutes until thickened. Strain if desired and refrigerate until cold.
- In a medium saucepan, combine cream, milk, half the remaining sugar, and salt. Heat until steaming but not boiling.
- Whisk egg yolks with remaining sugar in a large bowl. Slowly pour 1 cup hot cream mixture into yolks, whisking constantly.
- Pour egg mixture back into saucepan. Cook over medium-low heat, stirring constantly, until mixture thickens and registers 170-175°F.
- Remove from heat, strain into a clean bowl, and stir in vanilla. Cover surface with plastic wrap and refrigerate for at least 4 hours.
- Churn chilled custard in ice cream maker according to manufacturer’s instructions.
- Layer one-third of ice cream in a freezer container, drizzle with one-third of raspberry sauce. Repeat layers twice more.
- Use a knife to create swirls with a figure-eight motion. Don’t overmix.
- Cover and freeze for at least 4 hours until firm. Let stand at room temperature for 5-10 minutes before serving.


