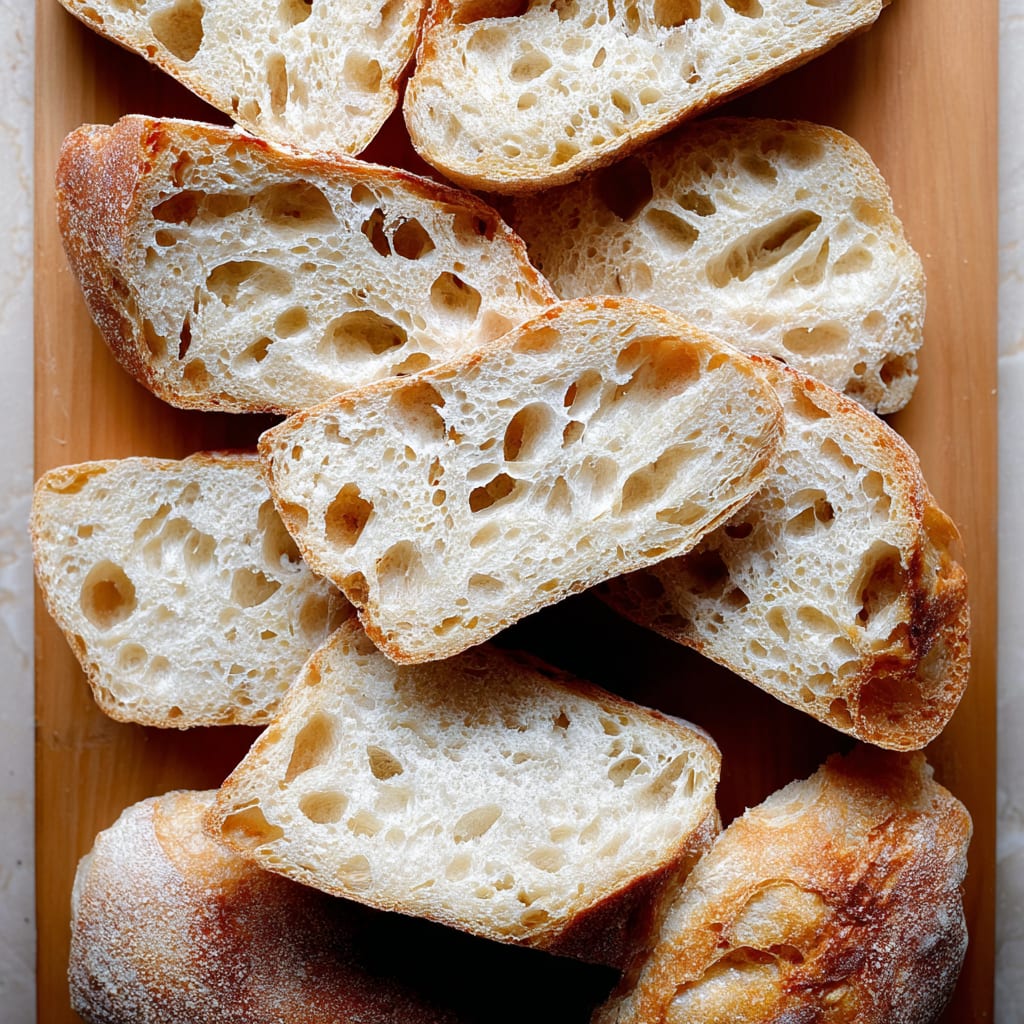
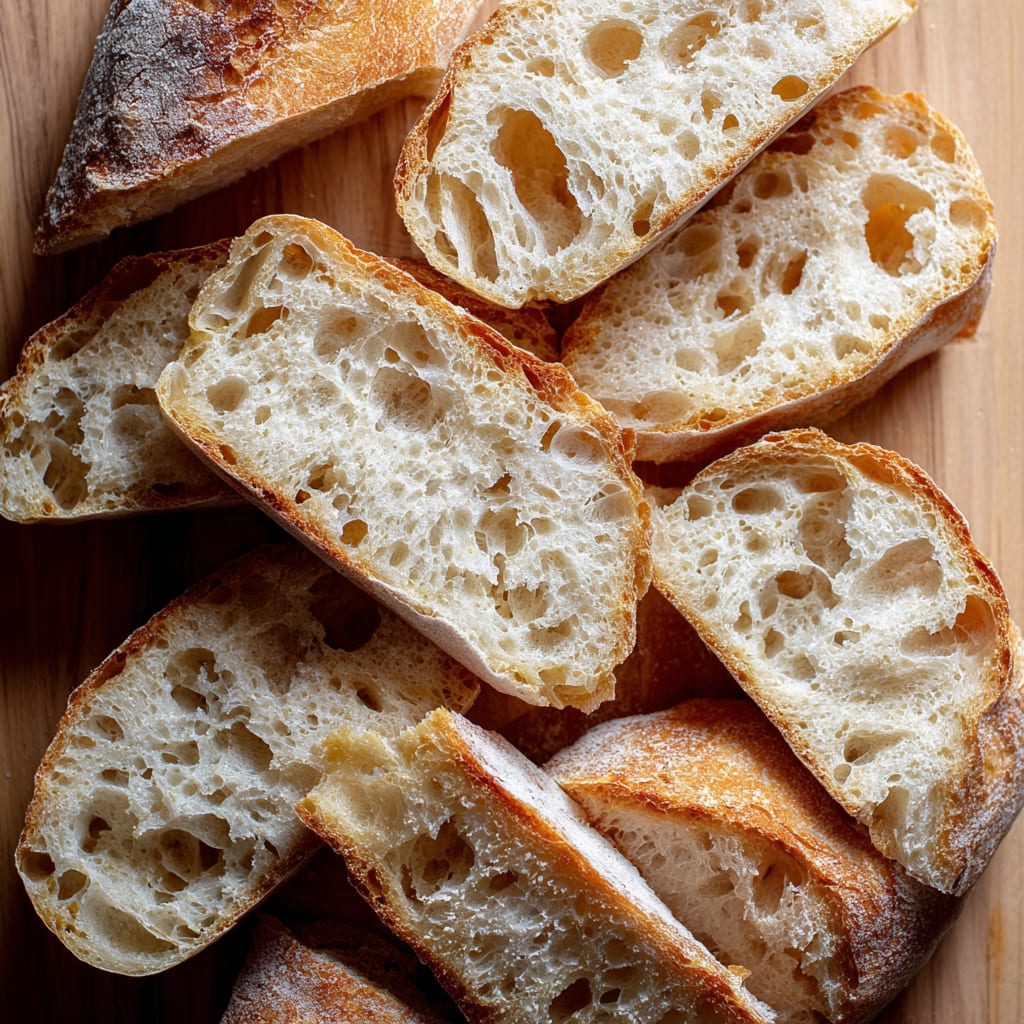
The irresistible aroma of freshly baked Homemade Ciabatta Bread wafting through your kitchen is an experience worth creating. This authentic Italian bread, with its crispy exterior and airy, chewy interior, transforms any meal from ordinary to extraordinary. Making Homemade Ciabatta Bread might seem intimidating at first, but this rustic loaf with its signature irregular holes and distinctive “slipper” shape is achievable in your own kitchen. You’ll learn how to create bakery-quality ciabatta using simple ingredients and time-tested techniques that develop those characteristic open crumbs and delightful textures that make this bread so beloved worldwide.
Why You’ll Love This Recipe
This Homemade Ciabatta Bread recipe delivers exceptional results that will make you wonder why you ever purchased store-bought versions. The contrast between the bread’s crackling crust and pillowy interior creates a sensory experience that’s hard to beat. Unlike many artisan bread recipes, this method doesn’t require special equipment—just your hands, a bowl, and some patience.
What makes this recipe special is the poolish pre-ferment that develops deep flavor complexity overnight. This traditional Italian technique ensures your bread has that authentic artisanal character with minimal hands-on effort. The dough’s high hydration creates those signature large, irregular holes that capture sauces and oils perfectly.
Whether you’re a beginner or experienced baker, this recipe’s straightforward approach makes creating impressive ciabatta loaves or rolls accessible to everyone. You’ll be amazed at how just flour, water, salt, and yeast transform into something so incredibly delicious.
Ingredients List for the Homemade Ciabatta Bread
The magic of ciabatta comes from very simple ingredients that transform dramatically through fermentation and proper technique. This recipe uses a traditional poolish starter to develop complex flavors and that signature open crumb structure.
- 50 grams (about 1/3 cup) all-purpose flour
- 2 grams (1/2 teaspoon) instant yeast, SAF is my preference
- 50 grams (about 1/4 cup) water, lukewarm or room temperature
- 360 grams (about 1.5 cups) water, lukewarm or room temperature
- 12 grams (about 2 teaspoons) salt, kosher or sea salt
- 450 grams (about 3.5 cups) bread flour, see notes above
Pro Tips
Mastering Homemade Ciabatta Bread comes down to understanding a few critical techniques that make all the difference:
First, don’t rush the fermentation process. The poolish needs those full 3-4 hours to develop properly, and the overnight refrigeration is essential for flavor development. This slow fermentation creates the complex, slightly tangy flavor that distinguishes great ciabatta from mediocre versions.
Second, embrace the wet dough. Ciabatta requires a high hydration level (approximately 80%), making it sticky and challenging to handle. Instead of adding more flour, which would ruin the bread’s open structure, use wet hands when handling the dough. This prevents sticking while maintaining the proper hydration level necessary for those beautiful air pockets.
Lastly, be gentle when shaping the final loaves. Rough handling will deflate the air bubbles you’ve worked so hard to develop. The classic “slipper” shape should happen naturally with minimal manipulation—just a gentle stretching of the dough before baking is all that’s needed.
Instructions
Step 1: Make the poolish: In a large bowl, whisk together the 50 grams flour and the 2 grams (1/2 teaspoon) instant yeast. Add 50 grams water and stir with a spatula until combined. Cover the bowl with a tea towel or cloth bowl cover and set aside for 3 to 4 hours or until the dough’s surface is dimpled with holes.
Step 2: Make the dough: To the bowl of the poolish, add the water. The sponge should release from the bowl and parts of it, if not all of it, will float. Add the salt and stir briefly. Add the flour, and stir until you have a wet, sticky dough ball — dough will be very sticky. Cover with a tea towel or cloth bowl cover and let sit for 30 minutes.
Step 3: Stretches and folds: With wet hands, grab one side of the dough, and pull up and to the center. Rotate the bowl a quarter turn, and repeat the grabbing and pulling. Do this until you’ve made a full circle. (Watch the video for more guidance. I employ a “slap-and-fold” technique, which is helpful when handling these wet doughs.) Cover the bowl. If time permits, repeat this process three more times at 30-minute intervals for a total of 4 sets of stretches and folds over the course of two hours. If you are short on time, know that doing just one or two sets of stretches and folds is totally fine.
Step 4: Let it rise: Transfer the dough to a straight-sided vessel, if you have one, or leave it in the bowl if you don’t. Cover the vessel with a towel and let rise until doubled in volume. Punch down (deflate) the dough — if your dough is still in the bowl, you can deflate it using wet hands right in the bowl; if your dough is in a straight-sided vessel, it may be easier to turn the dough out onto a work surface and ball it up using wet hands to prevent sticking. Return the dough to the vessel, cover it with an airtight lid, and transfer it to the refrigerator immediately for at least 12 hours. The dough can remain in the fridge for as long as 48 hours.
Step 5: Portion, shape, and proof: For Ciabatta Loaves: Turn the dough out onto a work surface. I prefer to do this step without flour, but absolutely sprinkle your surface lightly with flour as needed to make the dough manageable to work with. Using a bench scraper or your hands, shape the dough into a tight ball; then use the bench scraper to divide the dough in half. If you want perfectly even balls, each portion will way roughly 455 grams. Again, use the bench scraper or your hands to ball up each portion into a tight ball — see video for guidance. Sprinkle your countertop liberally with flour. Place the balls top-side (smooth side) down onto the flour. The seam-side will be on top now, and it may split open — this is fine. Sprinkle the top surface of the balls liberally with flour. Cover with a tea towel and let rest for 2.5 hours.
Step 6: For Ciabatta Rolls: Sprinkle a work surface with flour. Turn the dough out onto the work surface, sprinkle the dough with more flour, and pat it into a rectangle. Using a bench scraper, divide into 8 portions. Transfer each portion to a parchment-lined sheet pan, cover with a tea towel, and let stand for 2.5 hours.
Step 7: Preheat the oven: After the dough has proofed for 2 hours, heat the oven to 425ºF.
Step 8: Bake: For Ciabatta Loaves: When the dough has finished proofing, gently flip each ball over — I find a bench scraper to be helpful here. Then use both hands to stretch each ball out gently into a rectangular shaped “slipper”. Transfer to a parchment-lined sheet pan. Transfer the pan to the oven and bake for 20 – 25 minutes or until the loaves are golden all around.
Step 9: For Ciabatta Rolls: Remove the towel, transfer the pan to the oven, and bake for 20 – 25 minutes, or until the loaves are golden all around.
Step 10: Cool: Remove pan from oven. Transfer ciabatta rolls to a cooling rack. Let cool for 20 to 30 minutes before slicing.
Variations
The classic Homemade Ciabatta Bread recipe is delicious on its own, but several variations can expand your bread-making repertoire:
Herb-Infused Ciabatta: Add 2 tablespoons of chopped fresh rosemary and 1 tablespoon of dried thyme to the dough during the initial mixing stage. This aromatic Italian ciabatta version pairs beautifully with olive oil dipping stations and elevates everyday sandwiches.
Whole Wheat Ciabatta: Replace up to 30% (about 135 grams) of the bread flour with whole wheat flour for a nuttier, more nutritious loaf. This rustic ciabatta variation maintains the classic texture while adding fiber and a deeper flavor profile.
Olive and Garlic Ciabatta: Fold in 1/2 cup of pitted, chopped Kalamata olives and 2-3 minced garlic cloves during the final set of stretches and folds. This Mediterranean-inspired variation creates pockets of intense flavor throughout the bread.
Storage and Serving
Homemade Ciabatta Bread is best enjoyed the day it’s baked, when the contrast between crust and interior is at its peak. Store any leftover bread in a paper bag at room temperature for up to two days. For longer storage, slice the ciabatta completely, place in a freezer bag, and freeze for up to three months. Reheat frozen slices directly in a toaster or thaw and crisp in a 350°F oven for 5-7 minutes.
For serving, classic Italian ciabatta is perfect for bruschetta—simply slice, brush with olive oil, toast, then top with fresh tomatoes, basil, and mozzarella. Its sturdy structure makes it ideal for hearty sandwiches like paninis or Italian subs. For a simple appetizer, serve warm ciabatta slices with a plate of good olive oil sprinkled with flaky sea salt and fresh herbs.
Transform day-old ciabatta into panzanella salad by tossing cubed bread with tomatoes, cucumbers, red onion, and a tangy vinaigrette.
FAQs
Why is my ciabatta dough so sticky?
Traditional Homemade Ciabatta Bread requires high hydration (about 80% water to flour ratio) to achieve those signature large air pockets. This naturally creates a sticky dough. Instead of adding more flour, use wet hands when handling the dough to prevent sticking.
Can I skip the overnight refrigeration?
The cold fermentation is crucial for proper flavor development in authentic ciabatta bread. While you could technically bake it sooner, you’d miss the complex flavors that make ciabatta special.
Why didn’t my ciabatta get those large holes?
Large holes develop from proper fermentation and gentle handling. Ensure your dough is wet enough, perform all stretch-and-fold sets, and avoid deflating the dough during shaping.
Can I use all-purpose flour instead of bread flour?
While bread flour is preferred for its higher protein content that creates better structure, all-purpose flour can work. Your ciabatta may be slightly less chewy but will still have good flavor.
How do I know when my ciabatta is fully baked?
Properly baked ciabatta should be golden brown all over and sound hollow when tapped on the bottom. For absolute certainty, the internal temperature should reach 205°F-210°F when measured with an instant-read thermometer.

Homemade Ciabatta Bread
- Prep Time: 15 mins
- Cook Time: 30 mins
- Total Time: 45 mins
- Yield: 4 people 1x
- Category: Appetizer
- Method: Cooking
- Cuisine: American
Description
Discover how to make Homemade Ciabatta Bread naturally with this easy recipe. Perfect for bread lovers! Try it now.
Ingredients
- 50 grams (about 1/3 cup) all-purpose flour
- 2 grams (1/2 teaspoon) instant yeast, SAF is my preference
- 50 grams (about 1/4 cup) water, lukewarm or room temperature
- 360 grams (about 1.5 cups) water, lukewarm or room temperature
- 12 grams (about 2 teaspoons) salt, kosher or sea salt
- 450 grams (about 3.5 cups) bread flour, see notes above
Instructions
- Step 1: Make the poolish: In a large bowl, whisk together the 50 grams flour and the 2 grams (1/2 teaspoon) instant yeast. Add 50 grams water and stir with a spatula until combined. Cover the bowl with a tea towel or cloth bowl cover and set aside for 3 to 4 hours or until the dough’s surface is dimpled with holes.
- Step 2: Make the dough: To the bowl of the poolish, add the water. The sponge should release from the bowl and parts of it, if not all of it, will float. Add the salt and stir briefly. Add the flour, and stir until you have a wet, sticky dough ball — dough will be very sticky. Cover with a tea towel or cloth bowl cover and let sit for 30 minutes.
- Step 3: Stretches and folds : With wet hands, grab one side of the dough, and pull up and to the center. Rotate the bowl a quarter turn, and repeat the grabbing and pulling. Do this until you’ve made a full circle. (Watch the video for more guidance. I employ a “slap-and-fold” technique, which is helpful when handling these wet doughs.) Cover the bowl. If time permits, repeat this process three more times at 30-minute intervals for a total of 4 sets of stretches and folds over the course of two hours. If you are short on time, know that doing just one or two sets of stretches and folds is totally fine.
- Step 4: Let it rise: Transfer the dough to a straight-sided vessel, if you have one, or leave it in the bowl if you don’t. Cover the vessel with a towel and let rise until doubled in volume. Punch down (deflate) the dough — if your dough is still in the bowl, you can deflate it using wet hands right in the bowl; if your dough is in a straight-sided vessel, it may be easier to turn the dough out onto a work surface and ball it up using wet hands to prevent sticking. Return the dough to the vessel, cover it with an airtight lid, and transfer it to the refrigerator immediately for at least 12 hours. The dough can remain in the fridge for as long as 48 hours.
- Step 5: Portion, shape, and proof: For Ciabatta Loaves: Turn the dough out onto a work surface. I prefer to do this step without flour, but absolutely sprinkle your surface lightly with flour as needed to make the dough manageable to work with. Using a bench scraper or your hands, shape the dough into a tight ball; then use the bench scraper to divide the dough in half. If you want perfectly even balls, each portion will way roughly 455 grams. Again, use the bench scraper or your hands to ball up each portion into a tight ball — see video for guidance. Sprinkle your countertop liberally with flour. Place the balls top-side (smooth side) down onto the flour. The seam-side will be on top now, and it may split open — this is fine. Sprinkle the top surface of the balls liberally with flour. Cover with a tea towel and let rest for Step 2: 5 hours.
- Step 6: For Ciabatta Rolls: Sprinkle a work surface with flour. Turn the dough out onto the work surface, sprinkle the dough with more flour, and pat it into a rectangle. Using a bench scraper, divide into 8 portions. Transfer each portion to a parchment-lined sheet pan, cover with a tea towel, and let stand for Step 2: 5 hours.
- Step 7: Preheat the oven: After the dough has proofed for 2 hours, heat the oven to 425ºF .
- Step 8: Bake: For Ciabatta Loaves: When the dough has finished proofing, gently flip each ball over — I find a bench scraper to be helpful here. Then use both hands to stretch each ball out gently into a rectangular shaped “slipper”. Transfer to a parchment-lined sheet pan. Transfer the pan to the oven and bake for 20 – 25 minutes or until the loaves are golden all around.
- Step 9: For Ciabatta Rolls: Remove the towel, transfer the pan to the oven, and bake for 20 – 25 minutes, or until the loaves are golden all around.
- Step 10: Cool: Remove pan from oven. Transfer ciabatta rolls to a cooling rack. Let cool for 20 to 30 minutes before slicing.
Notes
Try This Recipe and Leave a comment Below, your opinion matters to me!
Nutrition
- Serving Size: 4 serving
- Calories: 400
- Sugar: 5g
- Sodium: 400mg
- Fat: 10g
- Saturated Fat: 3g
- Unsaturated Fat: 7g
- Trans Fat: 0g
- Carbohydrates: 40g
- Fiber: 5g
- Protein: 15g
- Cholesterol: 50mg