
Imagine the sizzling aroma of buttery shrimp and vegetables dancing across a hot skillet, mingling with the savory scent of perfectly fried rice. These Hibachi Shrimp Rice Bowls bring the exciting flavors and techniques of Japanese hibachi restaurants right to your kitchen. This restaurant-quality dish combines succulent shrimp, crispy-tender vegetables, and flavorful fried rice, all topped with a creamy, slightly tangy yum yum sauce that ties everything together beautifully. You’ll learn how to achieve that authentic hibachi taste with simple ingredients and easy cooking methods that make this impressive meal accessible for any weeknight dinner.
Why You’ll Love This Recipe
These Hibachi Shrimp Rice Bowls are bound to become a family favorite for so many reasons. First, they deliver that authentic Japanese steakhouse experience without the hefty price tag or need to leave your home. The contrasting textures make each bite interesting – from the tender, juicy shrimp to the slightly crunchy vegetables and the perfectly cooked rice with its distinct grains.
The beauty of this dish lies in its balanced flavors. The savory soy sauce infuses each component with umami goodness, while the creamy yum yum sauce adds a tangy, slightly sweet counterpoint that brings everything together harmoniously. The cooking process creates those characteristic caramelized edges on the shrimp and vegetables that hibachi lovers crave.
What’s more, despite looking and tasting like restaurant-quality fare, these hibachi bowls come together in under 30 minutes, making them perfect for busy weeknights when you want something special but don’t have hours to spend in the kitchen. The recipe is also incredibly versatile – easily customizable to suit your family’s preferences or whatever ingredients you have on hand.
Ingredients List for the Hibachi Shrimp Rice Bowls
These ingredients combine traditional hibachi elements with easily accessible items from your local grocery store. The balance of proteins, vegetables, and aromatic seasonings creates that authentic Japanese steakhouse experience you crave.
For the Yum Yum Sauce:
- ½ cup mayo
- 2 tbsp. ketchup
- ½ tsp. garlic powder
- ½ tsp. paprika
- Few dashes of hot sauce or to taste (optional)
For the Hibachi Components:
- 3 tbsp. unsalted butter (divided)
- 1 lb. raw shrimp (peeled, deveined, and patted dry)
- 4 tbsp. soy sauce (divided)
- 1 medium zucchini (sliced)
- 1 small-medium onion (chopped)
- 1 egg
- 2 cups frozen peas and carrots (unthawed)
- 4 cups cooked rice (cooled)
- 2 tbsp. soy sauce
Pro Tips
To elevate your Hibachi Shrimp Rice Bowls from good to restaurant-quality, these three critical techniques make all the difference:
Properly prepare your shrimp: Always thoroughly pat your shrimp dry before cooking. Excess moisture prevents proper searing and causes the shrimp to steam rather than caramelize. This simple step ensures you get that distinctive hibachi char and prevents your shrimp from becoming rubbery.
Use day-old or cooled rice: Fresh, hot rice contains too much moisture and will become mushy when stir-fried. Instead, use rice that’s been cooled for at least 2 hours or, ideally, refrigerated overnight. This allows the grains to firm up and separate during cooking, giving you that authentic hibachi rice texture with distinct, flavorful grains.
Cook components separately: The signature hibachi technique is cooking ingredients in stages, not all at once. This prevents overcrowding your pan, which would create steam and soggy food instead of the caramelization you want. By cooking shrimp, vegetables, and rice separately, each component retains its perfect texture and absorbs the maximum flavor from the butter and soy sauce.

Instructions
Step 1: Make yum yum sauce by mixing together the mayo, ketchup, garlic powder, paprika, and hot sauce (if using) in a bowl. Set aside in the fridge until ready to serve.
Step 2: Heat a large skillet over medium-high heat. Add 1 tbsp. of butter. Cook shrimp in butter for about 1 minute on each side. Add 2 tbsp. of soy sauce and cook until the soy sauce is mostly evaporated. Remove shrimp from pan and set aside.
Step 3: Dry out the large skillet with a paper towel if necessary. Heat another 1 tbsp. of butter in the same skillet and add the onion and zucchini. Saute for about 4-5 minutes until the onion is translucent and the zucchini is softened. Add another 2 tbsp. of soy sauce and cook until the sauce is mostly evaporated. Remove from the pan and set aside.
Step 4: Dry out the large skillet if necessary again. Heat another 1 tbsp. of butter in skillet. Add egg, breaking the yolk and scrambling it. Add cooled rice and frozen vegetables. Saute for about 2-3 minutes and add 2 tbsp. soy sauce. Stir fry for additional 2-3 minutes or until warmed throughout.
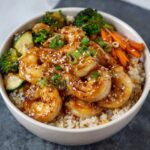
Step 5: Assemble the bowl by layering the fried rice, vegetables, and shrimp and drizzling the yum yum sauce on top.
Variations
Chicken or Steak Hibachi Bowls: If you’re not a seafood fan or want to switch things up, these hibachi rice bowls work beautifully with thinly sliced chicken breast or ribeye steak instead of shrimp. For chicken, cook it for 3-4 minutes per side until no longer pink; for steak, aim for 2-3 minutes per side for medium-rare. Both options deliver that classic hibachi experience with a different protein focus.
Vegetarian Hibachi Bowl: Create a plant-based version by replacing the shrimp with firm tofu (pressed and cubed) or mushrooms (shiitake and portobello work particularly well). Add extra vegetables like bell peppers, broccoli florets, or snap peas for additional texture and nutrients. The same cooking technique creates that characteristic hibachi flavor in these Japanese-inspired vegetable rice bowls.
Spicy Hibachi Bowls: For heat lovers, amplify the spice level by adding sriracha to your yum yum sauce, incorporating a sliced jalapeño with your vegetables, and finishing with a sprinkle of red pepper flakes or a drizzle of chili oil. This variation adds a warming kick to the traditional hibachi shrimp experience without compromising the authentic flavors.
Storage and Serving
These Hibachi Shrimp Rice Bowls store beautifully in airtight containers in the refrigerator for up to 3 days. For best results, store the yum yum sauce separately to prevent it from soaking into the rice and making it soggy. When reheating, sprinkle a few drops of water over the rice before microwaving to restore moisture, or better yet, quickly reheat in a hot skillet to maintain those crispy textures.
For an impressive presentation, serve your hibachi bowls in wide, shallow bowls that showcase each component. Arrange the rice as a base, then position the vegetables and shrimp in separate sections on top. Drizzle with yum yum sauce and finish with a sprinkle of sesame seeds and thinly sliced green onions.
For a complete Japanese-inspired meal, serve these hibachi shrimp and rice bowls alongside miso soup, a simple cucumber salad dressed with rice vinegar, or edamame sprinkled with sea salt. A cold Japanese beer or green tea makes the perfect beverage pairing to complete your at-home hibachi experience.
FAQs
Can I use fresh vegetables instead of frozen?
Absolutely! While the recipe calls for frozen peas and carrots for convenience, fresh vegetables work wonderfully in these Hibachi Shrimp Rice Bowls. Simply dice fresh carrots small enough to cook quickly and add fresh or frozen peas in the last minute of cooking.
What kind of rice works best for hibachi rice bowls?
Medium or long-grain white rice is traditional for hibachi cooking. Jasmine rice works particularly well for these Japanese shrimp rice bowls due to its subtle fragrance and ability to maintain distinct grains when fried. Always use cooled, day-old rice for the best texture.
Can I make the yum yum sauce ahead of time?
Yes! The yum yum sauce actually benefits from being made ahead, as it allows the flavors to meld. It can be stored in an airtight container in the refrigerator for up to one week, making it perfect for meal prep or quick hibachi-style dinners.
What’s the best substitute if I don’t have butter?
While butter provides that authentic hibachi flavor, you can substitute with a neutral oil like canola or vegetable oil with a touch of sesame oil for flavor. This maintains the traditional Japanese steakhouse taste profile.
How can I ensure my shrimp doesn’t become rubbery?
The key to perfectly cooked shrimp in your Hibachi Shrimp Rice Bowls is high heat and brief cooking time. Cook only until they just turn pink and opaque (about 1 minute per side), and remove them immediately from the heat. Remember that shrimp continue cooking slightly even after removed from the pan.
Hibachi Shrimp Rice Bowls
- Prep Time: 15 mins
- Cook Time: 30 mins
- Total Time: 45 mins
- Yield: 4 people 1x
- Category: Dinner
- Method: Cooking
- Cuisine: American
Description
Looking for a delicious dinner idea? Try our flavorful Hibachi Shrimp Rice Bowls recipe for a satisfying meal tonight!
Ingredients
- ½ cup mayo
- 2 tbsp. ketchup
- ½ tsp. garlic powder
- ½ tsp. paprika
- Few dashes of hot sauce or to taste (optional)
- 3 tbsp. unsalted butter (divided)
- 1 lb. raw shrimp (peeled, deveined, and patted dry)
- 4 tbsp. soy sauce (divided)
- 1 medium zucchini (sliced)
- 1 small-medium onion (chopped)
- 1 egg
- 2 cups frozen peas and carrots (unthawed)
- 4 cups cooked rice (cooled)
- 2 tbsp. soy sauce
Instructions
- Step 1: Make yum yum sauce by mixing together the mayo, ketchup, garlic powder, paprika, and hot sauce (if using) in a bowl. Set aside in the fridge until ready to serve.
- Step 2: Heat a large skillet over medium-high heat. Add 1 tbsp. of butter. Cook shrimp in butter for about 1 minute on each side. Add 2 tbsp. of soy sauce and cook until the soy sauce is mostly evaporated. Remove shrimp from pan and set aside.
- Step 3: Dry out the large skillet with a paper towel if necessary. Heat another 1 tbsp. of butter in the same skillet and add the onion and zucchini. Saute for about 4-5 minutes until the onion is translucent and the zucchini is softened. Add another 2 tbsp. of soy sauce and cook until the sauce is mostly evaporated. Remove from the pan and set aside.
- Step 4: Dry out the large skillet if necessary again. Heat another 1 tbsp. of butter in skillet. Add egg, breaking the yolk and scrambling it. Add cooled rice and frozen vegetables. Saute for about 2-3 minutes and add 2 tbsp. soy sauce. Stir fry for additional 2-3 minutes or until warmed throughout.
- Step 5: Assemble the bowl by layering the fried rice, vegetables, and shrimp and drizzling the yum yum sauce on top.
Notes
Try This Recipe and Leave a comment Below, your opinion matters to me!
Nutrition
- Serving Size: 4 serving
- Calories: 400
- Sugar: 5g
- Sodium: 400mg
- Fat: 10g
- Saturated Fat: 3g
- Unsaturated Fat: 7g
- Trans Fat: 0g
- Carbohydrates: 40g
- Fiber: 5g
- Protein: 15g
- Cholesterol: 50mg


