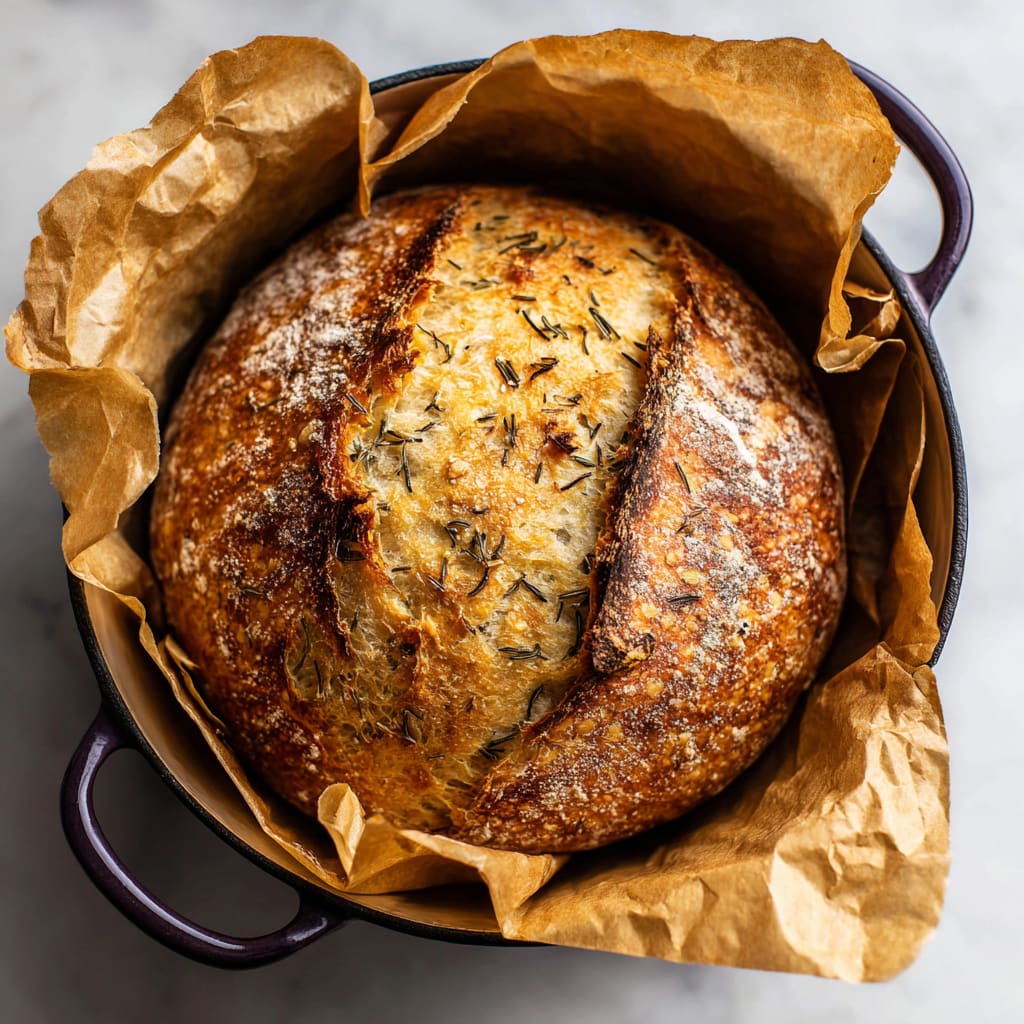
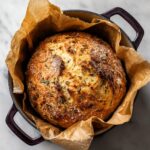
Imagine pulling a golden, crackling loaf of Garlic Rosemary Bread from the oven, filling your kitchen with the warm scent of roasted garlic and fresh herbs. This rustic no-knead loaf is special because it delivers bakery-quality results with minimal effort. The crispy crust, chewy interior, and bold flavor from garlic and rosemary make it impossible to resist. Whether you are a beginner or a seasoned baker, this recipe fits seamlessly into any skill level. You’ll learn the best techniques for shaping, proofing, and baking a perfect loaf every single time.
Why You’ll Love This Recipe
This Garlic Rosemary Bread recipe is everything a home baker dreams of — simple ingredients, spectacular results, and almost no active work required. The no-knead method means you spend just a few minutes combining ingredients before the dough does the rest. Once baked in a Dutch oven, the steam trapped inside creates that iconic shatteringly crisp crust while keeping the inside perfectly soft and chewy. The fragrant rosemary and savory garlic woven throughout every slice elevate this far beyond ordinary homemade bread. It pairs beautifully with soups, pasta, charcuterie boards, or simply a generous spread of salted butter. There is something deeply satisfying about baking your own bread from scratch, and this recipe makes that experience completely approachable. Guests will be amazed, and you will find yourself making this rosemary garlic loaf on repeat every single week.
Ingredients List for the Garlic Rosemary Bread
You only need a handful of pantry staples and fresh aromatics to create this stunning loaf. Gather everything before you begin for a smooth, stress-free baking experience.
• 3 cups All Purpose Flour
• 1 1/2 tsp sugar
• 2 tsps salt
• 2 1/2 tsp quick yeast ((1 package))
• 1 1/3 cups water (warm)
• 2 large rosemary sprigs (taken off stems and diced)
• 3 garlic cloves (diced)
Pro Tips
Master these three techniques to bake the best Garlic Rosemary Bread of your life.
Use warm water at the right temperature. Water that is too hot will kill the yeast, while water that is too cold will slow activation. Aim for water between 100°F and 110°F — warm to the touch but not hot.
Do not skip the second rise. That 20-minute rest after shaping allows the gluten to relax and the dough to puff slightly before hitting the blazing hot Dutch oven. This step directly impacts the final texture of your loaf.
Preheat your Dutch oven thoroughly. Placing dough into a screaming hot Dutch oven is the secret to achieving that dramatic oven spring and professional bakery crust. Never skip this step. Allow the Dutch oven a full 20 to 30 minutes at 450°F before baking.
Instructions
Follow these steps carefully and your Garlic Rosemary Bread will come out perfectly golden and aromatic every time.
Step 1:
Add all of the dough ingredients to a mixing bowl and stir together. The dough will be sticky, shaggy, and messy — this is normal.
Step 2:
Cover the bowl with a towel and let the dough rise for 60 minutes. You can use the proof setting on your oven, a warm oven, or a warm spot near air vents.
Step 3:
Lay out a piece of parchment paper and dust it with flour. Transfer the dough onto the paper and shape it into a ball by stretching and folding the sides. Flip so the smooth side is up. Cover with a towel and let rise for about 20 minutes, until the Dutch oven is preheated.
Step 4:
Place your Dutch oven (without lid) in the oven and preheat to 450°F (232°C). Let it come to temperature while the dough rests.
Step 5:
Using oven mitts, remove the Dutch oven from the oven and place it on the stove. Lift the dough with the parchment paper and transfer it into the Dutch oven. Score the top of the dough with a knife to allow steam to escape.
Step 6:
Cover the Dutch oven with the lid and bake for 30 minutes. Remove the lid and continue baking for another 10 minutes, or until the bread is golden brown to your liking.
Step 7:
Remove the bread from the Dutch oven using the parchment paper and let it cool for at least 30 minutes.
Step 8:
Serve with butter and sea salt, olive oil and balsamic, or enjoy plain.
Variations
This flexible recipe welcomes creative twists to suit your personal taste.
Cheesy Garlic Rosemary Bread: Fold in half a cup of shredded parmesan or gruyère directly into the dough during mixing. The cheese melts into the interior during baking, creating irresistible pockets of savory richness throughout every slice of this herb garlic bread.
Sun-Dried Tomato and Rosemary Loaf: Add a quarter cup of chopped sun-dried tomatoes along with the rosemary and garlic. The tomatoes add a slightly sweet, tangy depth that pairs beautifully with the bold herbs.
Spicy Garlic Herb Bread: For those who enjoy heat, mix in half a teaspoon of red pepper flakes alongside the other dough ingredients. This simple addition transforms the loaf into a bold, spicy rosemary garlic artisan bread that is spectacular alongside a bowl of hearty soup or stew.
Storage and Serving
Storage:
Store your Garlic Rosemary Bread at room temperature wrapped in a clean kitchen towel or placed in a paper bag for up to two days. For longer storage, wrap the fully cooled loaf tightly in plastic wrap, then in aluminum foil, and freeze for up to three months. To refresh a frozen loaf, thaw at room temperature and warm in a 350°F oven for 10 minutes.
Serving Suggestions:
This bread shines as a side dish alongside tomato soup, pasta dishes, or a hearty salad. Slice it thick and serve with whipped butter and flaky sea salt for a simple yet indulgent treat. It also works beautifully on a charcuterie board paired with cured meats, olives, and soft cheeses.
FAQs
Can I use active dry yeast instead of quick yeast?
Yes. If using active dry yeast, proof it first in the warm water with the sugar for 5 to 10 minutes until foamy before adding the remaining ingredients.
Why is my dough so sticky?
Sticky dough is completely normal for this Garlic Rosemary Bread recipe. Resist the urge to add extra flour, as the high hydration level is what creates the chewy interior and open crumb structure.
Can I make this without a Dutch oven?
A Dutch oven delivers the best results, but you can use an oven-safe pot with a lid or even bake on a sheet pan with an inverted metal bowl placed over the dough to trap steam.
How do I know when the bread is fully baked?
The loaf should be deep golden brown and sound hollow when tapped on the bottom. An internal temperature of 200°F to 210°F confirms it is fully baked through.
Can I prepare the dough overnight?
Absolutely. After mixing, cover the dough and refrigerate it overnight for a slow cold rise. Remove it from the refrigerator an hour before shaping to allow it to come to room temperature before proceeding with the recipe.
Garlic Rosemary Bread
- Prep Time: 15 mins
- Cook Time: 30 mins
- Total Time: 45 mins
- Yield: 4 people 1x
- Category: Appetizer
- Method: Cooking
- Cuisine: American
Description
Discover the delicious taste of Garlic Rosemary Bread with this easy recipe. Try it today!
Ingredients
- 3 cups All Purpose Flour
- 1 1/2 tsp sugar
- 2 tsps salt
- 2 1/2 tsp quick yeast ((1 package))
- 1 1/3 cups water (warm)
- 2 large rosemary sprigs (taken off stems an diced)
- 3 garlic cloves (diced)
Instructions
- Step 1- Add all of the dough ingredients to a mixing bowl and stir together. The dough will be sticky, shaggy, and messy—this is normal.
- Step 2- Cover the bowl with a towel and let the dough rise for 60 minutes. You can use the proof setting on your oven, a warm oven, or a warm spot near air vents.
- Step 3- Lay out a piece of parchment paper and dust it with flour. Transfer the dough onto the paper and shape it into a ball by stretching and folding the sides. Flip so the smooth side is up. Cover with a towel and let rise for about 20 minutes, until the Dutch oven is preheated.
- Step 4– Place your Dutch oven (without lid) in the oven and preheat to 450°F (232°C). Let it come to temperature while the dough rests.
- Step 5- Using oven mitts, remove the Dutch oven from the oven and place it on the stove. Lift the dough with the parchment paper and transfer it into the Dutch oven. Score the top of the dough with a knife to allow steam to escape.
- Step 6– Cover the Dutch oven with the lid and bake for 30 minutes. Remove the lid and continue baking for another 10 minutes, or until the bread is golden brown to your liking.
- Step 7– Remove the bread from the Dutch oven using the parchment paper and let it cool for at least 30 minutes.
- Step 8- Serve with butter and sea salt, olive oil and balsamic, or enjoy plain.
Notes
Try This Recipe and Leave a comment Below, your opinion matters to me!
Nutrition
- Serving Size: 4 serving
- Calories: 400
- Sugar: 5g
- Sodium: 400mg
- Fat: 10g
- Saturated Fat: 3g
- Unsaturated Fat: 7g
- Trans Fat: 0g
- Carbohydrates: 40g
- Fiber: 5g
- Protein: 15g
- Cholesterol: 50mg