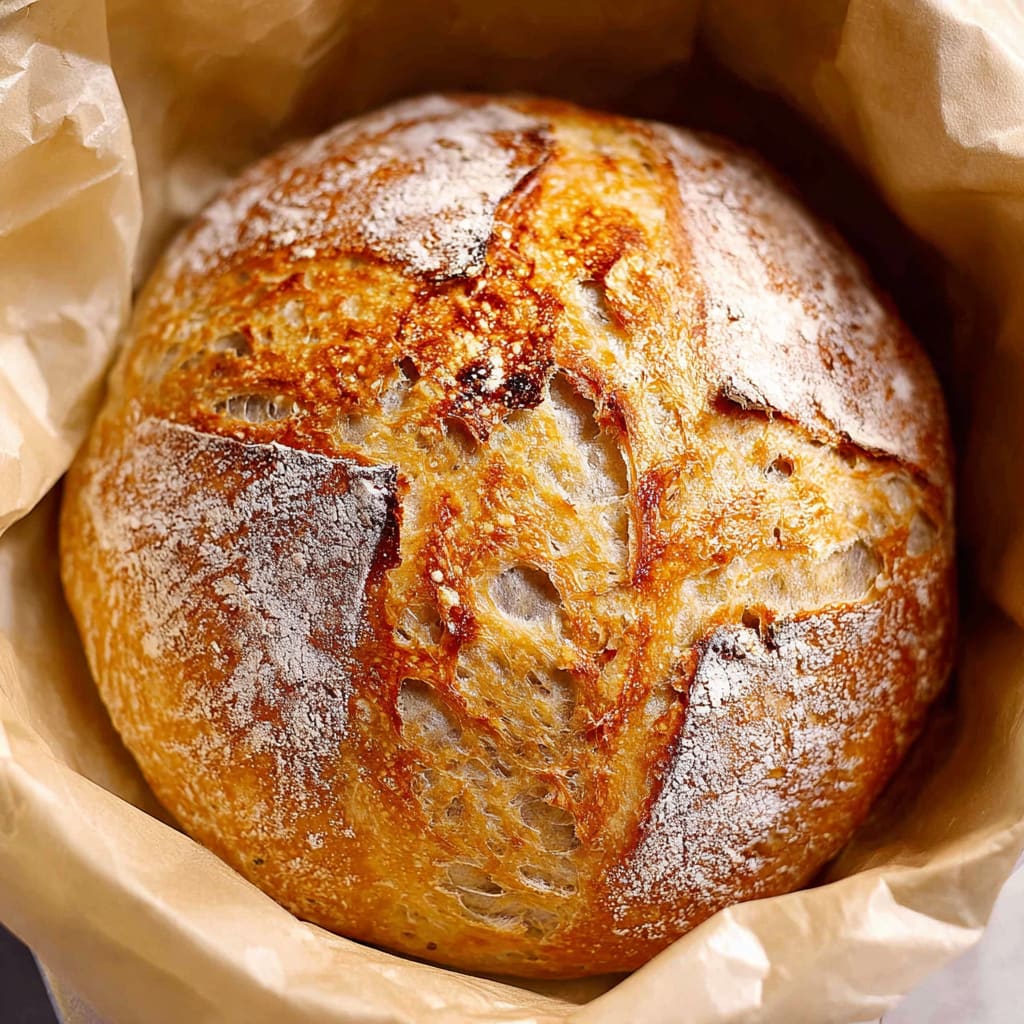
The aroma of freshly baked Dutch Oven No Knead Bread wafting through your home is one of life’s simple yet extraordinary pleasures. This rustic loaf boasts a crackling crust that gives way to a tender, airy interior with that perfect chew that store-bought bread simply can’t match. What makes this Dutch Oven No Knead Bread truly special is its incredible simplicity—with just four basic ingredients and almost no hands-on work, you’ll create bakery-quality bread at home. You’ll learn how time does all the hard work for you, transforming basic ingredients into an artisan-style loaf that looks and tastes like it came from a professional baker’s kitchen.
Why You’ll Love This Recipe
This Dutch Oven No Knead Bread recipe will become your go-to for several compelling reasons. First, the no-knead method eliminates the most labor-intensive part of breadmaking, making this accessible even to complete beginners. The long, slow fermentation develops complex flavors that quick breads simply can’t achieve, giving you that slightly tangy, deeply satisfying taste that makes homemade bread so special.
The texture contrast is truly remarkable—the Dutch oven creates steam that results in a shatteringly crisp crust that audibly crackles when you squeeze it, while the interior remains pillowy soft with beautiful irregular air pockets. This easy no-knead bread requires just minutes of hands-on time, yet delivers professional-quality results.
Perhaps most satisfying is the feeling of accomplishment when you pull that golden-brown loaf from the oven, knowing you’ve created something both beautiful and delicious with minimal effort. This foolproof artisan bread recipe proves that sometimes the simplest recipes yield the most impressive results.
Ingredients List for the Dutch Oven No Knead Bread
These simple ingredients work together through time and fermentation to create a complex, flavorful loaf. The long rise develops gluten naturally without kneading, while the high-heat baking in a Dutch oven creates the perfect environment for a professional-quality crust.
- 1 1/2 cups warm water (about 100°F)
- 1 packet yeast (active dry, instant, or quick rise – 2.25 teaspoons)
- 1 1/2 teaspoons fine grain salt (preferably NOT iodized; you can increase to 2 teaspoons if you like things really salty)
- 3 1/4 cups all-purpose flour or bread flour, more if needed to get correct consistency, plus more for dusting (I use King Arthur AP flour – other flours may yield different results)
Pro Tips
Getting your Dutch Oven No Knead Bread perfect every time comes down to a few critical techniques. First, temperature matters—your water should be warm (about 100°F), not hot, to properly activate the yeast without killing it. You can test this by dropping some on your wrist; it should feel warm but not uncomfortable.
Second, respect the fermentation time. This recipe’s magic happens during those hours of rest when enzymes develop flavor and gluten forms without kneading. Don’t rush this process—the longer, slow rise creates those beautiful air pockets and complex flavor profiles. In cooler kitchens, you may need the full three hours or even longer.
Finally, preheating your Dutch oven thoroughly is non-negotiable. This creates the intense steam environment that gives your bread its professional-quality crust. A properly preheated Dutch oven (at least 20 minutes after the oven reaches temperature) ensures that blast of heat that makes the dough rise dramatically and develop that crackling exterior that defines great artisan bread.
Instructions
Step 1: In a large bowl (or container), mix together the 1 1/2 cups warm water, 1 packet yeast (or 2.25 teaspoons), and 1 ½ teaspoons fine grain salt, until yeast and salt are fully or almost dissolved (I like using a whisk for this).
Step 2: Add the 3 1/4 cups all-purpose flour to the bowl all at once and stir together until a sticky dough forms. Don’t worry about mixing it too much, just make sure everything is uniformly wet. It WILL be messy and sticky. You can scrape what’s left on the spoon with a silicone spatula. (photo below provided for what the texture should look like – if it seems too wet, add 1-2 tablespoons more flour at a time until it is more like the photo. If it seems too dry, do the same thing with more water).
Step 3: Cover the bowl with a kitchen towel (or place the container to the lid on ajar). Leave it for 2-3 hours to rise in a somewhat warm place until it’s doubled in volume, like photo in previous step (If it’s cold out, I like to preheat my oven for a few minutes, then turn it off, then place the bowl in the oven, trapping the heat inside. If your house is warm just leave it out, or if it’s warm outside you can place it there).
Step 4: After the two-three hour rise time when the dough has about doubled, you have two options: bake, or store in the fridge. See notes for how to store.
Step 5: 30 minutes to an hour before you are ready to bake, preheat your oven to 450 degrees F. Place your Dutch oven in the oven, with the lid ON, while the oven is preheating. Once the oven reaches 450, keep it preheating for another 20 minutes, so the Dutch oven gets good and hot.
Step 6: Scrape the dough into the edge of a piece of parchment paper dusted with flour. Make it into as much of a “loaf” shape as you can by folding the edges up on top of it (a silicone spatula works well for this).
Step 7: Then, use the edges of the parchment paper to flip the loaf over so the floured side is on top and the loaf is in the center of the parchment paper. Don’t worry about it looking beautiful or smooth on top. My Dutch oven is an oval, so I made an oval shape. You can do a circle if yours is round.
Step 8: Optional: use a very sharp knife or clean razor blade to cut a few slits across the top of the loaf about 1/2″ deep, across the entire top. I did this in a cross shape for mine.
Step 9: Take out the preheated Dutch oven and take off the lid, carefully! Grab the parchment from the sides and place the loaf in your Dutch oven.
Step 10: Place the cover back on the Dutch oven and place in the preheated oven on the center rack. Bake for 35 minutes at 450 degrees F (40 minutes if dough was cold from the fridge).
Step 11: Remove the lid and bake for another 5-10 minutes, until a golden brown color forms- longer if necessary.
Step 12: Remove the loaf from the dutch oven (grabbing the sides of the parchment paper works well here) and place it on a wire rack or cutting board to cool for at least 10 minutes (preferably 30 minutes – an hour, if you have time) before slicing.
Variations
The beauty of this basic Dutch Oven No Knead Bread recipe is how easily it can be customized. For a hearty rosemary garlic bread, add 2 tablespoons fresh chopped rosemary and 4-5 minced garlic cloves to the initial dough mix. The slow fermentation will infuse these flavors throughout the bread, creating an aromatic loaf perfect for serving with pasta or roast chicken.
For a rustic whole grain version, replace 1 cup of the all-purpose flour with whole wheat flour and add 2 tablespoons of honey or maple syrup to balance the hearty flavor. You may need to add an extra tablespoon or two of water as whole wheat flour absorbs more moisture.
Those seeking a seeded artisan loaf can add 1/4 cup each of sunflower seeds and pumpkin seeds to the dough, plus a tablespoon of sesame seeds sprinkled on top just before baking. This creates a nuttier flavor profile and adds delightful texture to each slice.
Storage and Serving
Your freshly baked Dutch Oven No Knead Bread will maintain its best quality when stored properly. Once completely cooled, store the bread at room temperature in a paper bag or bread box for up to 3 days. Avoid plastic bags, which trap moisture and make the crust soft. For longer storage, slice the entire loaf and freeze it in a freezer bag for up to 3 months—you can toast slices directly from frozen.
This crusty bread shines as part of a rustic cheese board with sharp cheddar, soft brie, and fig jam. For a simple yet satisfying lunch, try thick-cut slices toasted and topped with smashed avocado, red pepper flakes, and a sprinkle of sea salt. It also makes exceptional French toast when sliced thickly and soaked in a vanilla-cinnamon egg mixture before pan-frying to golden perfection. The sturdy texture holds up beautifully to hearty soups and stews, perfect for soaking up every last drop.
FAQs
Can I use whole wheat flour instead of all-purpose?
Yes, but don’t substitute all of it. Replace up to 1 cup of the all-purpose flour with whole wheat for the best results. Using 100% whole wheat will create a denser loaf. You may need to add 1-2 extra tablespoons of water as whole wheat flour absorbs more moisture.
Do I really need a Dutch oven?
For optimal results, yes. The Dutch oven creates a steam environment that produces the crackling crust. However, you can use any oven-safe pot with a tight-fitting lid that can withstand high temperatures. Some bakers have success using a heavy baking sheet with a metal bowl inverted over the dough.
Can I make the dough ahead of time?
Absolutely! After the initial rise, refrigerate the dough for up to 7 days. The flavor actually improves with time as the fermentation continues slowly in the refrigerator. Just add 5 extra minutes to the covered baking time when baking from cold.
My dough seems too wet/sticky—is that normal?
Yes, this is a high-hydration dough, which creates those beautiful air pockets. It should be sticky and somewhat loose. Resist adding too much additional flour, which can make your bread dense. Use flour only when shaping.
Why did my bread not rise much?
This could be due to expired yeast, water that was too hot (killed the yeast) or too cold (didn’t activate it), or insufficient rising time, especially in cooler kitchens. Try the oven-light method mentioned in the pro tips for a warm environment.
Dutch Oven No Knead Bread
- Prep Time: 15 mins
- Cook Time: 30 mins
- Total Time: 45 mins
- Yield: 4 people 1x
- Category: Appetizer
- Method: Cooking
- Cuisine: American
Description
Discover how to make delicious Dutch Oven No Knead Bread at home with our easy recipe. Enjoy fresh bread with this simple method!
Ingredients
- 1 1/2 cups warm water (about 100°F)
- 1 packet yeast (active dry, instant, or quick rise – 2.25 teaspoons)
- 1 1/2 teaspoons fine grain salt (preferably NOT iodized; you can increase to 2 teaspoons if you like things really salty)
- 3 1/4 cups all-purpose flour or bread flour, more if needed to get correct consistency, plus more for dusting (I use King Arthur AP flour – other flours may yield different results)
Instructions
- Step 1– In a large bowl (or container), mix together the 1 1/2 cups warm water, 1 packet yeast (or 2: 25 teaspoons), and 1 ½ teaspoons fine grain salt, until yeast and salt are fully or almost dissolved (I like using a whisk for this).
- Step 2– Add the 3 1/4 cups all-purpose flour to the bowl all at once and stir together until a sticky dough forms. Don’t worry about mixing it too much, just make sure everything is uniformly wet. It WILL be messy and sticky. You can scrape what’s left on the spoon with a silicone spatula. (photo below provided for what the texture should look like – if it seems too wet, add 1-2 tablespoons more flour at a time until it is more like the photo. If it seems too dry, do the same thing with more water).
- Step 3– Cover the bowl with a kitchen towel (or place the container to the lid on ajar). Leave it for 2-3 hours to rise in a somewhat warm place until it’s doubled in volume, like photo in previous step (If it’s cold out, I like to preheat my oven for a few minutes, then turn it off, then place the bowl in the oven, trapping the heat inside. If your house is warm just leave it out, or if it’s warm outside you can place it there).
- Step 4- After the two-three hour rise time when the dough has about doubled, you have two options: bake, or store in the fridge. See notes for how to store.
- Step 5– 30 minutes to an hour before you are ready to bake, preheat your oven to 450 degrees F. Place your Dutch oven in the oven, with the lid ON, while the oven is preheating. Once the oven reaches 450, keep it preheating for another 20 minutes, so the Dutch oven gets good and hot.
- Step 6– Scrape the dough into the edge of a piece of parchment paper dusted with flour. Make it into as much of a “loaf” shape as you can by folding the edges up on top of it (a silicone spatula works well for this).
- Step 7– Then, use the edges of the parchment paper to flip the loaf over so the floured side is on top and the loaf is in the center of the parchment paper. Don’t worry about it looking beautiful or smooth on top. My Dutch oven is an oval, so I made an oval shape. You can do a circle if yours is round.
- Step 8– Optional: use a very sharp knife or clean razor blade to cut a few slits across the top of the loaf about 1/2″ deep, across the entire top. I did this in a cross shape for mine.
- Step 9– Take out the preheated Dutch oven and take off the lid, carefully! Grab the parchment from the sides and place the loaf in your Dutch oven.
- Step 10- Place the cover back on the Dutch oven and place in the preheated oven on the center rack. Bake for 35 minutes at 450 degrees F (40 minutes if dough was cold from the fridge).
- Step 11- Remove the lid and bake for another 5-10 minutes, until a golden brown color forms- longer if necessary.
- Step 12– Remove the loaf from the dutch oven (grabbing the sides of the parchment paper works well here) and place it on a wire rack or cutting board to cool for at least 10 minutes (preferably 30 minutes – an hour, if you have time) before slicing.
Notes
Try This Recipe and Leave a comment Below, your opinion matters to me!
Nutrition
- Serving Size: 4 serving
- Calories: 400
- Sugar: 5g
- Sodium: 400mg
- Fat: 10g
- Saturated Fat: 3g
- Unsaturated Fat: 7g
- Trans Fat: 0g
- Carbohydrates: 40g
- Fiber: 5g
- Protein: 15g
- Cholesterol: 50mg