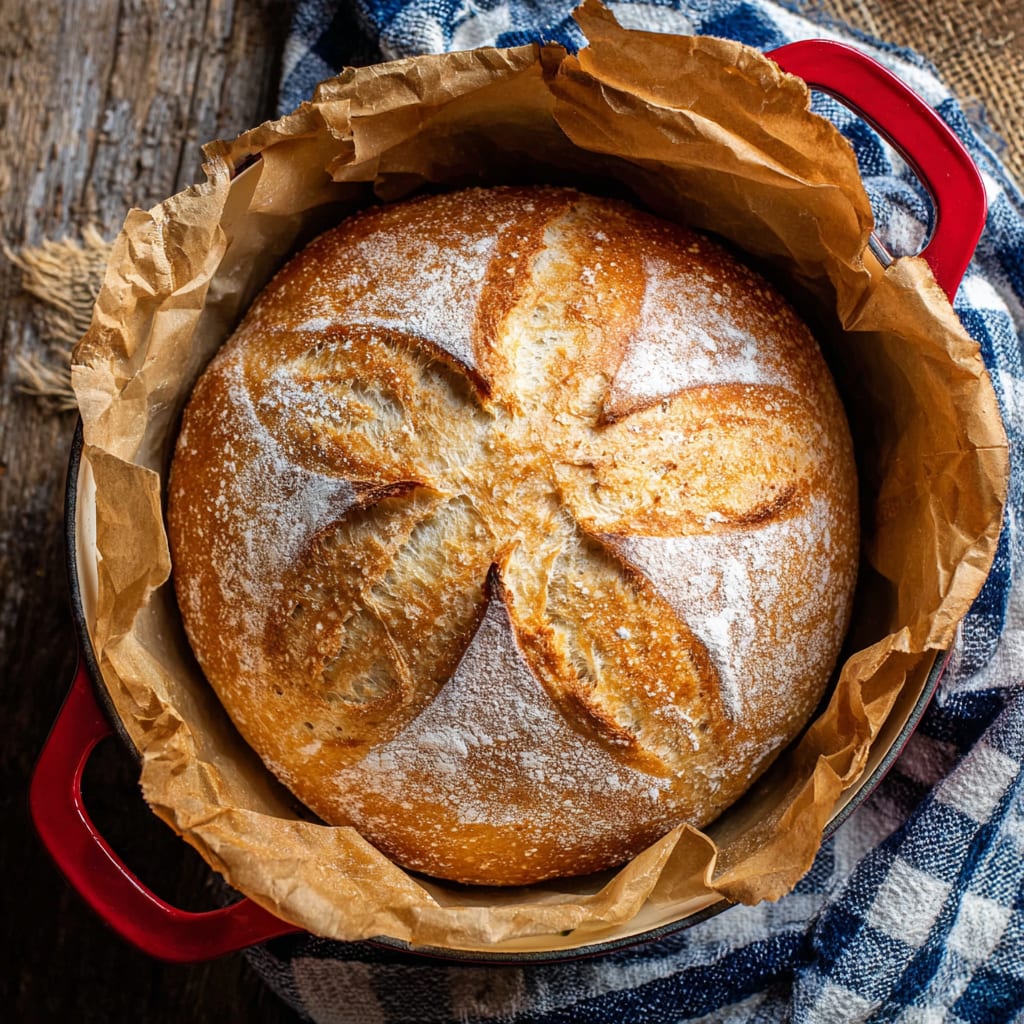
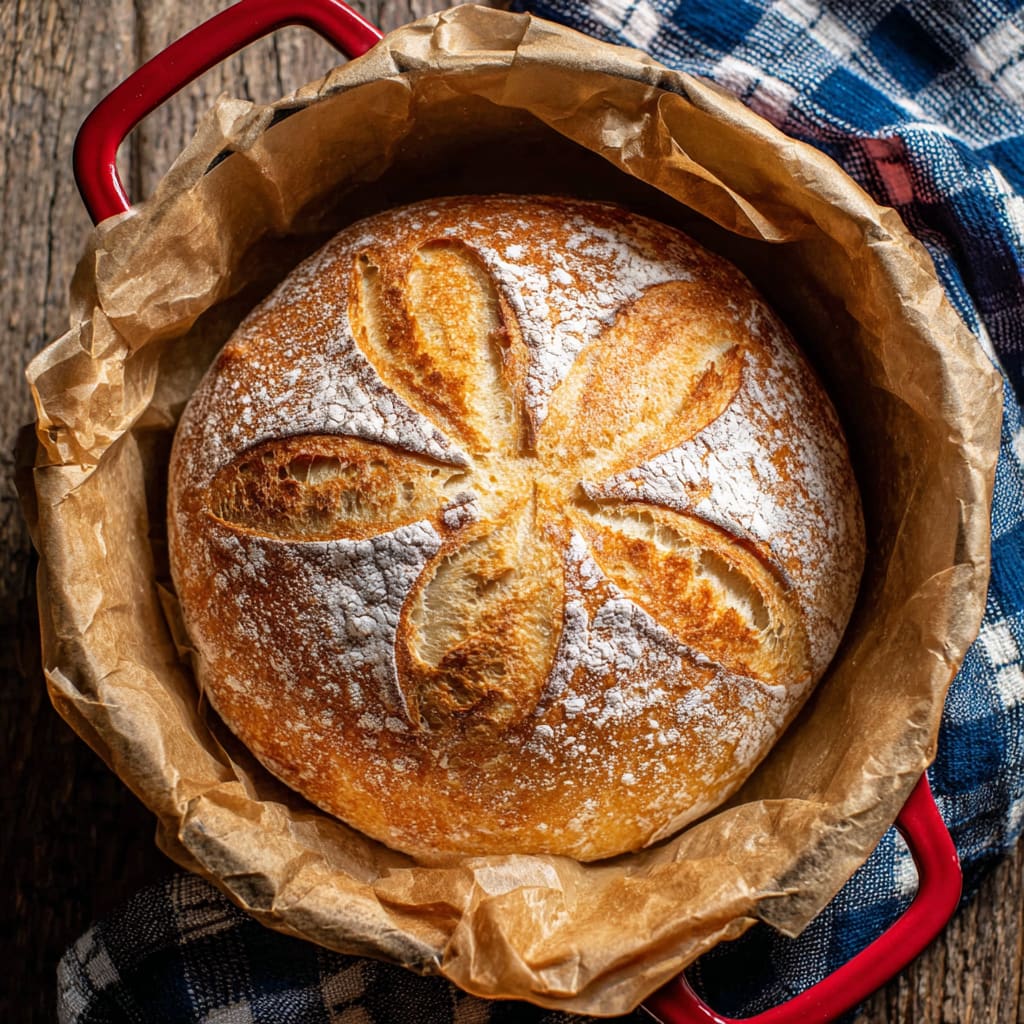
Imagine pulling a golden, crackling loaf from your oven, its crust shattering with the lightest tap while the inside stays pillowy and soft. Dutch Oven French Bread is the kind of bake that fills your kitchen with an irresistible aroma and earns you serious bragging rights. What makes it truly special is how the Dutch oven traps steam during baking, mimicking a professional bread oven right at home. Whether you’re a seasoned baker or just starting out, this method delivers bakery-quality results every single time. You’ll learn the best techniques, tips, and variations to bake a perfect loaf with confidence.
Why You’ll Love This Recipe
This Dutch Oven French Bread recipe stands out for all the right reasons. First, the technique is surprisingly simple. You don’t need a professional oven, a steam injection system, or any fancy equipment. A single Dutch oven does all the heavy lifting. The lidded pot traps moisture released by the dough, creating the steam responsible for that ultra-crispy, shatteringly good crust that defines a great French loaf.
Beyond texture, the flavor is deeply satisfying. A long first rise develops complex, slightly tangy notes that make each slice genuinely memorable. The crumb is airy and open, perfect for sopping up soups or slathering with butter. This recipe also uses just five pantry staples, making it incredibly accessible. Whether you’re baking homemade French bread for a weeknight dinner or impressing guests at a weekend gathering, this loaf delivers every time without stress or guesswork.
Ingredients List for the Dutch Oven French Bread
You only need a handful of simple ingredients to make this stunning loaf. Gather everything before you start for a smooth, enjoyable baking experience.
• 4 cups bread flour
• 2 teaspoons salt
• 2½ teaspoons instant yeast (SAF brand recommended)
• 1½ cups water
• Pinch cornmeal (for sprinkling on the parchment)
Pro Tips for Perfect Dutch Oven French Bread
Use bread flour, not all-purpose. Bread flour has a higher protein content, which builds stronger gluten strands. This gives your Dutch Oven French Bread that satisfying chewy crumb and helps the loaf hold its shape beautifully during both the rise and the bake. All-purpose flour will work in a pinch, but the texture won’t be quite as impressive.
Nail the windowpane test. Don’t rush the kneading stage. Properly developed gluten is the backbone of a great loaf. Stretch a small piece of dough between your fingers. If it stretches thin enough to be translucent without tearing, your dough is ready. Skipping this step often results in a dense, tight crumb that lacks the open, airy texture you’re after.
Preheat your Dutch oven. For an even crispier crust, place your Dutch oven in the oven while it preheats. Carefully lower the parchment and dough into the hot pot just before baking. The immediate blast of heat from the hot surface gives the loaf an extra-powerful oven spring, pushing it to rise dramatically in those first critical minutes.
Instructions
Step 1: Mix the dough.
Combine the flour, salt, yeast, and water in a large mixing bowl or the bowl of a stand mixer. There’s no need to proof instant yeast — toss everything together. Mix until the dough clears the sides of the bowl but remains slightly sticky to the touch. If it’s too dry, add a tablespoon of water at a time. If it’s too wet, sprinkle in a bit of flour.
Step 2: Knead the dough.
Knead by hand (15–20 minutes) or with a stand mixer (5–10 minutes). You’ll know it’s ready when the dough is smooth, elastic, and passes the windowpane test: stretch a small piece thin enough to see the light through it without tearing.
Step 3: First rise.
Place the dough in a lightly oiled bowl and cover with plastic wrap or a clean towel. Let it rise in a warm, draft-free place for 60 minutes or until doubled in size. Tip: An oven warmed briefly (then turned off), or a sunny windowsill works well.
Step 4: Shape the loaf.
Turn the risen dough onto a floured surface. Gently shape it into a round loaf by folding the edges under and pinching the bottom until the top is smooth. Line your Dutch oven with parchment paper and sprinkle a pinch of cornmeal on top. Place the loaf seam-side down on the parchment.
Step 5: Second rise.
Cover the loaf with heavily greased plastic wrap or the lid of your Dutch oven. Let it rise for 45–60 minutes until it significantly puffs up. Preheat your oven to 450°F during the last 15 minutes of rising.
Step 6: Slash and flour.
Dust the top of the dough lightly with flour for a rustic finish. Using a very sharp knife or bread lame, make three or four shallow slashes across the top. This helps the bread expand evenly in the oven.
Step 7: Bake.
Place the Dutch oven in the preheated oven with the lid on. Bake for 35–40 minutes total. For the first 20 minutes, bake with the lid on to trap steam, which creates a crisp crust. For the final 15–20 minutes, remove the lid and bake until the loaf is golden brown and has an internal temperature of at least 190°F.
Step 8: Cool and serve.
Remove the bread from the Dutch oven and cool on a wire rack. Let it cool for at least 20 minutes before slicing — if you can wait that long! Serve warm or at room temperature.
Variations to Try
Herb and Garlic French Bread. Add 1 tablespoon of dried rosemary or thyme along with 2 teaspoons of garlic powder directly to the dough during mixing. The herbs bake into the crust and crumb, creating a savory, aromatic loaf that pairs beautifully with pasta dishes, soups, and roasted meats. This is one of the most popular twists on classic crusty Dutch oven bread.
Whole Wheat Dutch Oven Loaf. Swap up to half of the bread flour for whole wheat flour for a heartier, nuttier flavor profile. Whole wheat adds fiber and a subtle earthy depth that makes each slice feel more substantial. You may need to add a touch more water since whole wheat absorbs liquid differently than white bread flour.
Seeded Crust French Bread. Before baking, brush the top of the loaf lightly with water and press on a mixture of sesame seeds, poppy seeds, or everything bagel seasoning. The seeds toast beautifully in the hot oven and add a wonderful crunch and visual appeal to your finished homemade French bread loaf.
Storage and Serving Suggestions
Storing your Dutch Oven French Bread properly keeps it tasting fresh longer. Once fully cooled, store the loaf at room temperature wrapped in a clean kitchen towel or placed inside a paper bag for up to 2 days. Avoid plastic bags, which trap moisture and soften the crust you worked so hard to achieve. For longer storage, slice the cooled loaf and freeze individual pieces in a zip-lock freezer bag for up to 3 months. Reheat slices directly from frozen in a 350°F oven for 8–10 minutes.
For serving, this bread truly shines warm from the oven. Slice it thick and serve alongside a bowl of French onion soup, a hearty beef stew, or a simple charcuterie board. It also makes exceptional toast and outstanding sandwiches the next day when the crumb firms up slightly.
Frequently Asked Questions
Can I use active dry yeast instead of instant yeast?
Yes, but you’ll need to proof it first. Dissolve the active dry yeast in the warm water with a pinch of sugar and let it sit for 5–10 minutes until foamy before adding it to the flour and salt.
Why did my crust turn soft after cooling?
A soft crust usually means too much moisture is trapped around the loaf. Always cool your Dutch Oven French Bread on a wire rack with airflow on all sides, never on a flat plate or sealed container while still warm.
What size Dutch oven works best?
A 5 to 6-quart Dutch oven is the ideal size. It gives the loaf enough room to expand during baking without spreading too flat. Smaller pots can restrict the rise, while larger ones may cause the dough to spread rather than rise upward.
Can I make the dough ahead of time?
Absolutely. After mixing, cover the dough tightly and refrigerate it overnight for a slow cold rise of up to 18 hours. This actually improves the flavor by developing more complex, tangy notes in the final loaf.
Why is my bread dense instead of airy?
Dense crumb is usually caused by under-kneading, insufficient rising time, or dough that’s too dry. Make sure your dough passes the windowpane test before the first rise, and always allow the full rise time in a warm environment for the best results.
Dutch Oven French Bread
- Prep Time: 15 mins
- Cook Time: 30 mins
- Total Time: 45 mins
- Yield: 4 people 1x
- Category: Dinner
- Method: Cooking
- Cuisine: American
Description
Discover how to make delicious Dutch Oven French Bread at home with this simple recipe. Perfect for bread lovers! Try it now.
Ingredients
- 4 cups bread flour
- 2 teaspoons salt
- 2½ teaspoons instant yeast ((SAF brand recommended))
- 1½ cups water
- Pinch cornmeal ((for sprinkling on the parchment))
Instructions
- Step 1: Mix the dough. Combine the flour, salt, yeast, and water in a large mixing bowl or the bowl of a stand mixer. There’s no need to proof instant yeast—toss everything together. Then, mix until the dough clears the sides of the bowl but remains slightly sticky to the touch. If it’s too dry, add a tablespoon of water at a time. If it’s too wet, sprinkle in a bit of flour.
- Step 2: Knead the dough. Knead by hand (15–20 minutes) or with a stand mixer (5–10 minutes). You’ll know it’s ready when the dough is smooth, elastic, and passes the windowpane test: stretch a small piece thin enough to see the light through it without tearing.
- Step 3: First rise. Place the dough in a lightly oiled bowl and cover with plastic wrap or a clean towel. Let it rise in a warm, draft-free place for 60 minutes or until doubled in size.Tip: An oven warmed briefly (then turned off), or a sunny windowsill works well.
- Step 4: Shape the loaf. Turn the risen dough onto a floured surface. Gently shape it into a round loaf by folding the edges under and pinching the bottom until the top is smooth. Then, line your Dutch oven with parchment paper and sprinkle a pinch of cornmeal on top. Place the loaf seam-side down on the parchment.
- Step 5: Second rise. Cover the loaf with heavily greased plastic wrap or the lid of your Dutch oven. Let it rise for 45–60 minutes until it significantly puffs up. Preheat your oven to 450°F during the last 15 minutes of rising.
- Step 6: Slash and flour. Dust the top of the dough lightly with flour for a rustic finish. Using a very sharp knife or bread lame, make three or four shallow slashes across the top. This helps the bread expand evenly in the oven.
- Step 7: Bake. Place the Dutch oven in the preheated oven (with the lid on). Bake for 35–40 minutes total:First 20 minutes: Bake with the lid on to trap steam, which creates a crisp crust.Final 15–20 minutes: Remove the lid and bake until the loaf is golden brown and has an internal temperature of at least 190°F.
- Step 8: Cool and serve. Remove the bread from the Dutch oven and cool on a wire rack. Let it cool for at least 20 minutes before slicing—if you can wait that long! Serve warm or at room temperature.
Notes
Try This Recipe and Leave a comment Below, your opinion matters to me!
Nutrition
- Serving Size: 4 serving
- Calories: 400
- Sugar: 5g
- Sodium: 400mg
- Fat: 10g
- Saturated Fat: 3g
- Unsaturated Fat: 7g
- Trans Fat: 0g
- Carbohydrates: 40g
- Fiber: 5g
- Protein: 15g
- Cholesterol: 50mg


