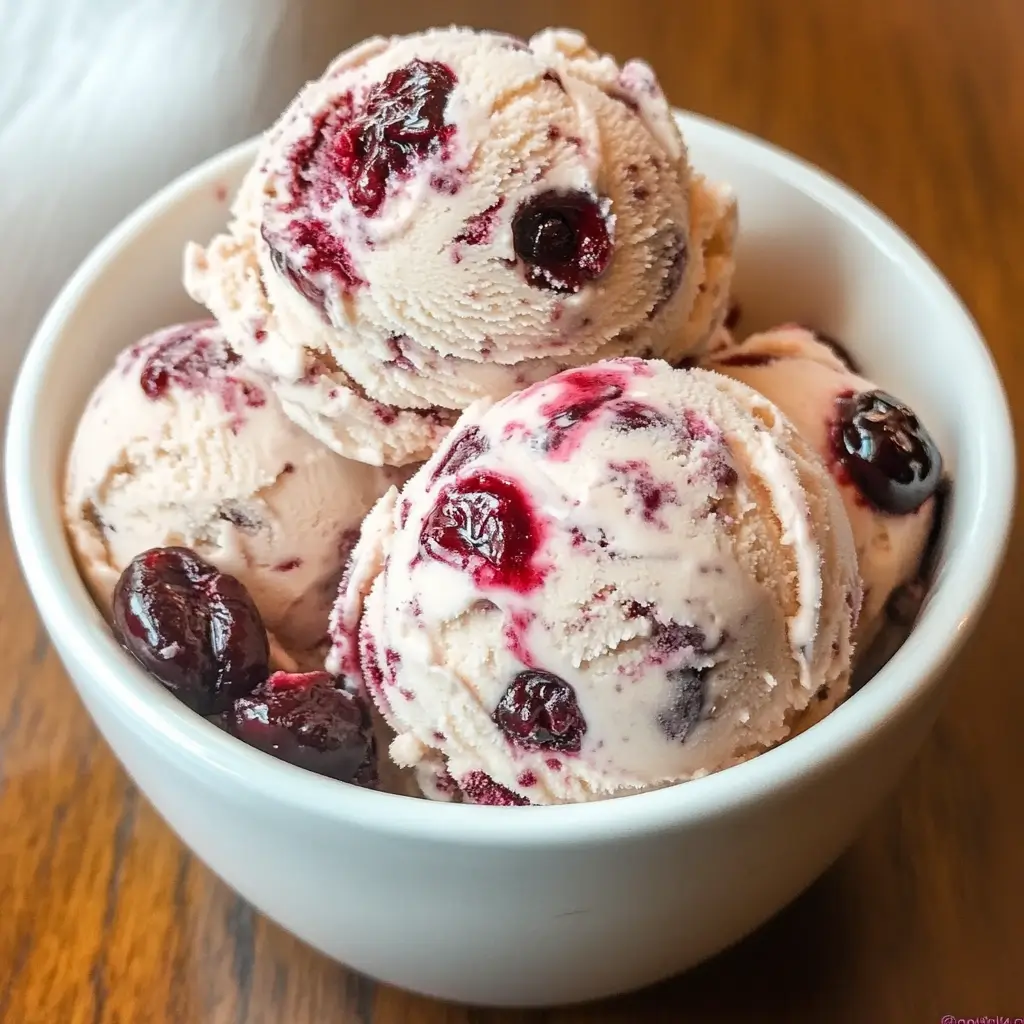
Imagine the first spoonful of creamy, luscious Delicious Cherry Garcia Ice Cream melting on your tongue, releasing bursts of sweet cherries and decadent chocolate flakes. This beloved ice cream flavor, inspired by the legendary Ben & Jerry’s creation, brings together the perfect marriage of tart cherries and rich chocolate in a smooth vanilla base. Whether you’re a longtime fan of this classic combination or trying it for the first time, making Delicious Cherry Garcia Ice Cream at home elevates the experience to new heights. You’ll learn how to create this iconic dessert from scratch, with simple ingredients that deliver maximum flavor in every scoop.
Why You’ll Love This Recipe
This homemade Delicious Cherry Garcia Ice Cream will quickly become your go-to dessert for both everyday treats and special occasions. The velvety smooth texture creates the perfect canvas for the starring ingredients – juicy cherries and chocolate chunks that add delightful pops of flavor and texture in every bite. Unlike store-bought versions, this homemade recipe allows you to control the sweetness and cherry-to-chocolate ratio, making it perfectly tailored to your preferences.
The beautiful contrast between the creamy vanilla base, the slightly tart cherries, and the bittersweet chocolate creates a multidimensional flavor experience that keeps you coming back for “just one more spoonful.” Plus, there’s something deeply satisfying about watching family and friends delight in ice cream you’ve made yourself. Even if you’re new to homemade ice cream, this recipe’s straightforward approach makes the process enjoyable rather than intimidating, and the results are consistently impressive.
Ingredients
For the Delicious Cherry Garcia Ice Cream, you’ll need:
- 2 cups (473ml) heavy cream
- 1 cup (237ml) whole milk
- ¾ cup (150g) granulated sugar
- ¼ teaspoon salt
- 5 large egg yolks
- 1 tablespoon pure vanilla extract
- 1½ cups (225g) fresh cherries, pitted and halved (or frozen cherries, thawed and drained)
- 2 tablespoons cherry liqueur or kirsch (optional)
- 4 ounces (113g) semisweet or bittersweet chocolate, chopped into small chunks
The fresh cherries deliver the most authentic flavor, but frozen work well during off-seasons. Choose deeply colored, firm cherries for the best taste. For the chocolate, select a high-quality bar with 60-70% cocoa content and chop it by hand rather than using chocolate chips – this creates those perfect irregular chunks that melt slightly differently throughout the ice cream. The optional cherry liqueur intensifies the cherry flavor and helps keep the ice cream scoopable even after freezing.
Pro Tips
Use Cold Equipment: One of the secrets to incredibly smooth Cherry Garcia Ice Cream is pre-chilling your ice cream maker’s bowl for at least 24 hours (not just the recommended minimum time). Additionally, chill your mixing bowls and utensils in the freezer for 15 minutes before using them. This prevents premature melting during the churning process and helps create a silkier texture with fewer ice crystals.
Perfect Your Custard Base: The foundation of exceptional ice cream is a properly cooked custard. Heat it slowly and watch for the “nappe” stage – when the mixture coats the back of a spoon and a finger drawn through it leaves a clear line. Never let it boil or you’ll end up with scrambled eggs! Strain the finished custard through a fine-mesh sieve to ensure silky smoothness, even if you don’t think you’ve curdled any egg.
Cherry Preparation Matters: For the best cherry distribution and flavor infusion in your Delicious Cherry Garcia Ice Cream, macerate your cherries. After pitting and halving them, toss with 2 tablespoons of sugar and the optional cherry liqueur, then let them sit for 30 minutes. This draws out juices and intensifies flavor. For a marbled effect, add half the cherries during churning and swirl the remaining cherries in by hand just before freezing.
Instructions
Step 1: Prepare the Custard Base
In a medium saucepan, combine the heavy cream, milk, half of the sugar (about 6 tablespoons), and salt. Warm over medium heat, stirring occasionally, until steam rises and small bubbles form around the edges – do not boil. Meanwhile, in a separate bowl, whisk together the egg yolks and remaining sugar until the mixture becomes pale yellow and slightly thickened, about 2 minutes of vigorous whisking.
Step 2: Temper the Eggs
Once the cream mixture is hot, temper the eggs by slowly pouring about 1 cup of the hot cream into the egg mixture while whisking constantly. This gradually raises the temperature of the eggs without scrambling them. Then, pour the egg-cream mixture back into the saucepan with the remaining cream.
Step 3: Cook the Custard
Return the saucepan to medium-low heat and cook, stirring constantly with a wooden spoon or heatproof spatula, until the mixture thickens enough to coat the back of the spoon (170-175°F on an instant-read thermometer). When you run your finger through the coating, it should leave a clean line. This usually takes 5-7 minutes – patience is key for the perfect Delicious Cherry Garcia Ice Cream base.
Step 4: Chill the Base
Remove from heat and stir in the vanilla extract. Pour the custard through a fine-mesh sieve into a clean bowl to remove any lumps. Press plastic wrap directly onto the surface of the custard (to prevent a skin from forming) and refrigerate until completely chilled, at least 4 hours or preferably overnight.
Step 5: Prepare Cherries and Chocolate
While the base is chilling, prepare your cherries by pitting and halving them. Toss with the optional cherry liqueur and let macerate for 30 minutes, then drain (reserving the liquid). Chop the chocolate into irregular chunks – some small flakes, some larger pieces for textural contrast.
Step 6: Churn the Ice Cream
Pour the chilled custard into your ice cream maker and churn according to the manufacturer’s instructions. When the ice cream reaches a soft-serve consistency (usually 20-25 minutes), add the drained cherries and chocolate chunks. Continue churning just until they’re incorporated, about 1-2 minutes more.
Step 7: Final Freeze
For a marbled effect, layer one-third of the ice cream into a freezer-safe container, drizzle with some of the reserved cherry liquid, and repeat until all ice cream is used. Use a knife to gently swirl the mixtures together. Cover with parchment paper pressed directly onto the surface, seal, and freeze until firm, at least 4 hours.
Variations
White Chocolate Cherry Garcia: For a sweeter, creamier variation of Delicious Cherry Garcia Ice Cream, substitute white chocolate chunks for the dark chocolate. The delicate flavor of white chocolate creates a beautiful canvas that lets the cherry flavor shine even brighter. For visual appeal, add a tablespoon of cherry juice to the base for a subtle pink hue.
Vegan Cherry Garcia: Create a plant-based version by replacing the dairy with 2 cans of full-fat coconut milk and the egg yolks with 2 tablespoons of cornstarch as a thickener. Follow the same cooking method but whisk the cornstarch with a small amount of the coconut milk before adding to the heating mixture. The coconut adds a complementary flavor that works wonderfully with both the cherries and chocolate.
Chocolate Cherry Garcia: For chocolate lovers, incorporate 1/4 cup of unsweetened cocoa powder into the custard base along with the sugar. This creates a chocolate ice cream foundation that makes the Delicious Cherry Garcia Ice Cream reminiscent of Black Forest cake. Consider adding a tablespoon of espresso powder to intensify the chocolate flavor without adding coffee taste.
Storage and Serving
For optimal texture, store your Delicious Cherry Garcia Ice Cream in a shallow, airtight container with parchment paper pressed directly on the surface to prevent ice crystals. Properly stored, it will maintain peak quality for up to two weeks in the freezer. For longer storage, wrap the container in plastic wrap for additional protection against freezer burn.
When serving, remove from the freezer and let it sit at room temperature for 5-10 minutes to soften slightly for the perfect scooping consistency. For an elevated dessert experience, serve your Cherry Garcia Ice Cream in pre-chilled bowls to prevent premature melting. Create an impressive sundae by pairing with warm chocolate sauce, which creates a magical contrast with the cold ice cream and makes the chocolate chunks even more decadent.
For a sophisticated dessert, sandwich a scoop between two chocolate cookies for homemade ice cream sandwiches, or serve alongside a slice of warm cherry pie for the ultimate cherry lover’s dessert.
FAQs
Can I use frozen cherries instead of fresh?
Absolutely! Frozen cherries work wonderfully in Delicious Cherry Garcia Ice Cream. Thaw them completely and drain well before using, as excess moisture can create ice crystals. Reserve the juice for drizzling during assembly for extra cherry flavor.
Why did my ice cream turn out icy instead of creamy?
Iciness usually results from either insufficient fat content or improper storage. Ensure you’re using full-fat dairy products and properly tempering the egg custard. After freezing, always store with parchment paper pressed directly on the surface and in an airtight container to prevent ice crystal formation.
Can I make this without an ice cream maker?
Yes! Pour the chilled custard into a shallow metal baking dish and freeze for 45 minutes. Remove and vigorously whisk to break up ice crystals, then fold in the cherries and chocolate. Freeze again, whisking every 30 minutes for about 2-3 hours until set. The texture won’t be quite as smooth, but still delicious.
How can I intensify the cherry flavor?
For more pronounced cherry flavor in your Cherry Garcia Ice Cream, add 1/4 teaspoon of almond extract alongside the vanilla, as almond enhances cherry flavor. Additionally, reducing 1 cup of cherry juice to 1/4 cup and adding it to your base creates a more concentrated cherry taste.
Why do you recommend chopping chocolate rather than using chips?
Chocolate chips contain stabilizers that prevent them from melting properly in ice cream. Hand-chopped chocolate creates varied sizes that melt differently in your mouth, providing a more authentic texture and better flavor distribution throughout the Delicious Cherry Garcia Ice Cream.
Conclusion
This Delicious Cherry Garcia Ice Cream is comfort food at its finest — a perfect balance of creamy sweetness, tart fruit, and rich chocolate that creates pure joy in every spoonful. It’s the kind of dish that transforms ordinary evenings into special occasions and brings back childhood memories while creating new ones. The satisfaction of crafting this beloved flavor at home goes beyond the exceptional taste; there’s pride in mastering this classic and the delight of watching friends and family savor each bite. Whether it’s a summer treat or a year-round indulgence, this homemade version outshines anything store-bought and reminds us why some flavor combinations become legendary.
Print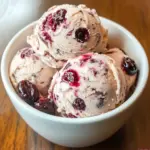
Delicious Cherry Garcia Ice Cream
Description
Scoops of homemade Cherry Garcia that rival the real thing? This recipe nails that perfect balance of creamy vanilla, tart cherries, and chocolate chunks for serious ice cream bliss.
Ingredients
- 2 cups (473ml) heavy cream
- 1 cup (237ml) whole milk
- ¾ cup (150g) granulated sugar
- ¼ teaspoon salt
- 5 large egg yolks
- 1 tablespoon pure vanilla extract
- 1½ cups (225g) fresh cherries, pitted and halved
- 2 tablespoons cherry liqueur or kirsch (optional)
- 4 ounces (113g) semisweet or bittersweet chocolate, chopped
Instructions
- Combine heavy cream, milk, half the sugar, and salt in a saucepan. Heat until steaming but not boiling.
- In a separate bowl, whisk egg yolks with remaining sugar until pale yellow and thickened.
- Slowly pour 1 cup of hot cream mixture into egg mixture while whisking constantly, then pour everything back into the saucepan.
- Cook over medium-low heat, stirring constantly, until mixture thickens enough to coat the back of a spoon (170-175°F).
- Remove from heat, stir in vanilla, then strain through a fine-mesh sieve into a clean bowl.
- Cover with plastic wrap touching the surface and refrigerate at least 4 hours or overnight.
- While base chills, toss pitted cherries with optional liqueur and let macerate for 30 minutes, then drain.
- Chop chocolate into irregular chunks of various sizes.
- Churn chilled custard in ice cream maker according to manufacturer’s instructions.
- When it reaches soft-serve consistency, add cherries and chocolate chunks. Churn 1-2 minutes more to incorporate.
- Transfer to a freezer container, optionally swirling in any reserved cherry liquid for a marbled effect.
- Cover with parchment paper pressed onto surface and freeze until firm, at least 4 hours.


