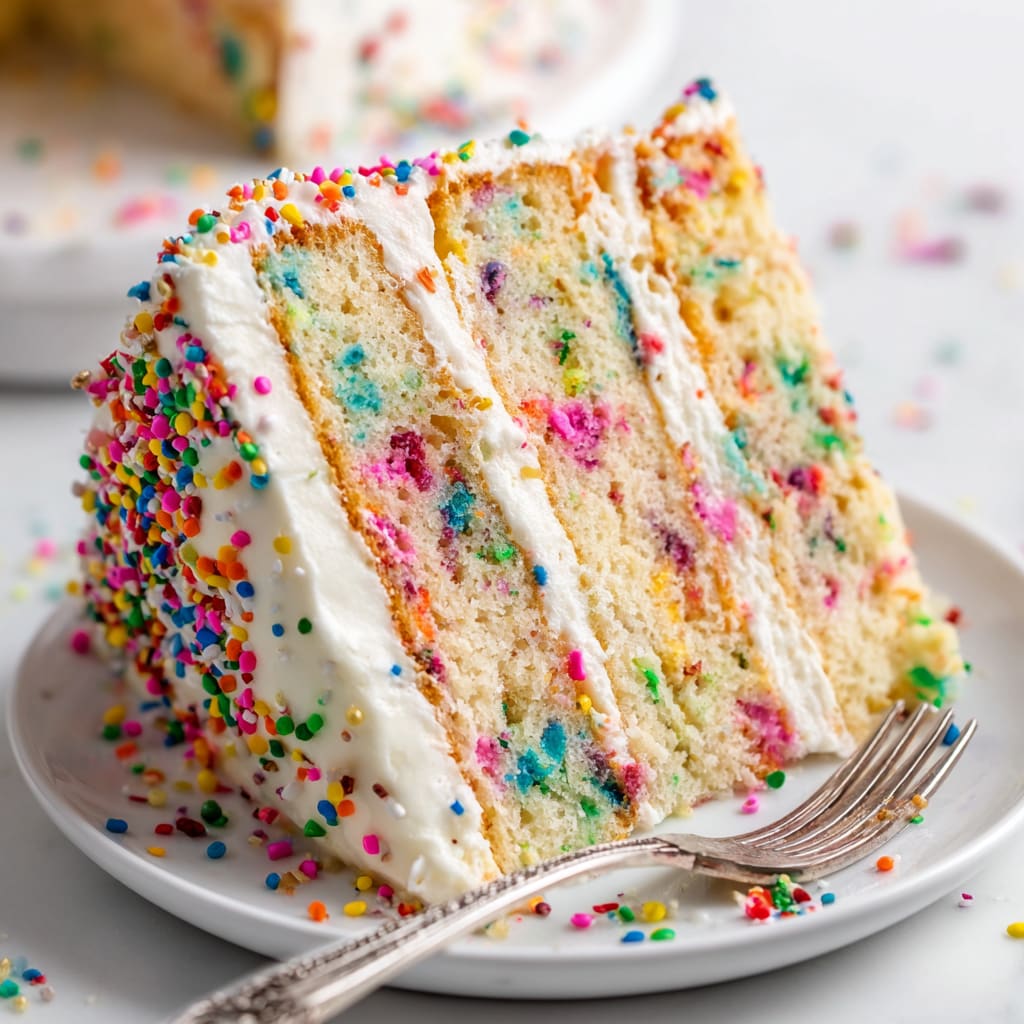
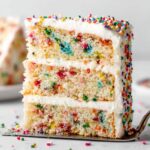
Vibrant, festive, and utterly joyful, this Confetti Layer Cake is a celebration on a plate! Tender vanilla-scented layers studded with colorful rainbow sprinkles create a cake that’s as delightful to look at as it is to eat. The buttery, moist crumb contrasts beautifully with the silky vanilla buttercream frosting, making each bite a perfect balance of textures and sweetness. Whether you’re celebrating a birthday, anniversary, or simply want to brighten someone’s day, this Confetti Layer Cake delivers pure happiness in dessert form. You’ll learn how to create bakery-worthy cake layers, master a smooth buttercream frosting, and assemble a stunning layer cake that will impress everyone at your table.
Why You’ll Love This Recipe
This Confetti Layer Cake isn’t just another dessert—it’s an experience that brings joy to any occasion. The combination of soft, tender cake layers speckled with colorful sprinkles creates an irresistible visual appeal that instantly lifts spirits. Each bite offers the perfect contrast between the moist, vanilla-infused cake and the creamy, smooth buttercream frosting.
What makes this recipe truly special is its accessibility—despite its professional appearance, it’s completely achievable for home bakers. The detailed instructions ensure success, even if you’ve never made a layer cake before. And unlike store-bought funfetti cakes, this homemade version uses real butter, pure vanilla extract, and high-quality sprinkles for authentic flavor without artificial aftertastes.
The versatility of this celebration cake makes it perfect for birthdays, graduations, gender reveals, or anytime you need a dose of happiness. The pure joy on people’s faces when you slice into those colorful layers makes every step of the baking process worthwhile.
Ingredients List for the Confetti Layer Cake
This Confetti Layer Cake uses premium ingredients that elevate it from a simple sprinkle cake to a celebration masterpiece. The cake flour creates an exceptionally tender crumb, while the buttermilk adds moisture and a subtle tangy flavor that balances the sweetness.
For the Cake:
- 3 and 3/4 cups (443g) cake flour (spooned & leveled)
- 1 teaspoon baking powder
- 1 teaspoon baking soda
- 1 teaspoon salt
- 1 and 1/4 cups (282g) unsalted butter, softened to room temperature
- 2 cups (400g) granulated sugar
- 1/3 cup (80ml) vegetable oil
4 large eggs, at room temperature
2 large egg whites, at room temperature
- 3 teaspoons (15ml) pure vanilla extract
1 and 1/2 cups (360ml) buttermilk, at room temperature
3/4 cup (135g) rainbow sprinkles
For the Vanilla Buttercream:
- 1 and 1/2 cups (340g) unsalted butter, softened to room temperature
- 5 and 1/2 cups (650g) confectioners’ sugar
- 1/3 cup (80ml) heavy cream, at room temperature
- 3 teaspoons (15ml) pure vanilla extract (or use clear imitation vanilla extract for stark white frosting)
- 1/8 teaspoon salt
- Optional: additional sprinkles for garnish
Pro Tips
Creating the perfect Confetti Layer Cake requires attention to a few critical techniques that will transform your baking from good to exceptional:
Room Temperature Ingredients Are Non-Negotiable: Ensure all refrigerated ingredients (butter, eggs, buttermilk, and cream) come to room temperature before beginning. This creates a properly emulsified batter that bakes evenly and rises beautifully. Cold ingredients won’t incorporate properly, resulting in a dense, uneven cake.
Sprinkle Selection Matters: Use jimmy-style rainbow sprinkles rather than nonpareils (the tiny ball sprinkles) in your batter. Nonpareils will dissolve and bleed color throughout your batter, while jimmies maintain their shape and create those perfect colorful specks.
Don’t Skip the Crumb Coat: Taking time to apply a thin layer of frosting and chilling it before the final frosting is crucial for a professional finish. This seals in any loose crumbs and creates a smooth canvas for your final layer of buttercream. Your cake will look bakery-worthy with this simple extra step.
Instructions
Step 1: Preheat oven to 350°F (177°C). Grease three 8-inch or 9-inch cake pans, line with parchment paper rounds, then grease the parchment paper. Parchment paper helps the cakes seamlessly release from the pans. (If it’s helpful, see this parchment paper rounds for cakes video & post.)
Step 2: Whisk the cake flour, baking powder, baking soda, and salt together in a large bowl. Set aside.
Step 3: Using a handheld or stand mixer fitted with a paddle attachment, beat the butter and sugar together on high speed for 5 full minutes until completely creamed together and fluffy. Scrape down the sides and up the bottom of the bowl with a silicone spatula as needed. (Here’s a helpful tutorial if you need guidance on how to cream butter and sugar.) Add the oil and beat for 1 minute until combined. Add the eggs, egg whites, and vanilla extract and beat on medium-high speed until combined. Scrape down the sides and up the bottom of the bowl with a silicone spatula as needed.
Step 4: Add dry ingredients and buttermilk in three additions, mixing after each addition just until incorporated. Do not over-mix this batter. The batter will be velvety and thick. Gently fold in the sprinkles. Pour and spread the batter evenly into each cake pan.
Step 5: Bake for around 25–26 minutes or until the cakes are baked through. (8-inch cakes may take about 27–28 minutes.) Tent the cakes with foil after about 15 minutes to prevent the sides and top from over-browning. To test for doneness, insert a toothpick into the center of the cake. If it comes out clean, it’s done.
Step 6: Allow cakes to cool in the pans set on a wire rack for 20 minutes. Run a knife around the edges and then remove cakes from pans. Place cakes directly on wire racks to cool completely. The cakes must be completely cool before frosting and assembling.
Step 7: In a large bowl using a handheld mixer or stand mixer fitted with a whisk or paddle attachment, beat the butter on medium speed until creamy, about 2 minutes. Add confectioners’ sugar, cream, vanilla extract, and salt. Beat on low speed for 30 seconds and then switch to high speed and beat for 2 minutes. Add more confectioners’ sugar if frosting seems too thin; more cream if frosting is too thick; or an extra pinch of salt if frosting is too sweet.
Step 8: First, using a large serrated knife, slice a thin layer off the tops of the cakes to create a flat surface. Discard (or crumble over ice cream!). Place one cake layer on your cake stand, cake turntable, or serving plate. Using a flat icing spatula or small offset spatula, evenly cover the top with about 1 cup (about 250g) of frosting. Repeat with second cake layer, 1 more cup of frosting, and then the top cake layer. Spread a thin layer of frosting on the top and around the sides as a crumb coat. Run a bench scraper around the cake to smooth out crumb coat. Chill uncovered in the refrigerator for at least 30 minutes and up to 3 hours to set the crumb coat.
Step 9: Spread the remaining frosting all over the top and sides. Garnish with extra sprinkles, if desired.
Step 10: Serve cake immediately, or if you need to store it for a few hours, place it in a cake carrier at room temperature for up to 4 hours. For longer storage, refrigerate covered cake for up to 1 day. Cake is best served at room temperature, though, so if it’s been refrigerated, let it sit out at room temperature for 30 minutes before serving.
Step 11: Cover leftover cake tightly and store it in the refrigerator for 5 days. Again, I like using a cake carrier for storing and transporting.
Variations
The classic Confetti Layer Cake is perfect as is, but you can easily customize it to suit different occasions or preferences:
Chocolate Confetti Cake: Replace 1/2 cup of cake flour with unsweetened cocoa powder for a chocolate version that still maintains those colorful sprinkle specks. Pair with chocolate buttercream for an extra indulgent treat, or keep the vanilla frosting for a striking contrast.
Citrus Confetti Cake: Add 2 tablespoons of lemon, orange, or lime zest to the batter for a refreshing citrus twist. For extra flavor, replace 1 teaspoon of the vanilla extract with citrus extract. This bright, tangy variation is perfect for spring and summer celebrations.
Gluten-Free Option: Substitute a high-quality cup-for-cup gluten-free flour blend for the cake flour. The texture may be slightly different, but adding an extra egg white can help maintain moisture. Be sure to use gluten-free sprinkles as well, as some brands contain wheat starch.
Storage and Serving
Your Confetti Layer Cake will stay fresh and delicious with proper storage. For short-term storage (up to 4 hours), keep the frosted cake at room temperature in a cake carrier or loosely covered with a cake dome. For longer storage, refrigerate the cake in an airtight container or wrapped well with plastic wrap for up to 5 days.
When serving after refrigeration, allow the cake to sit at room temperature for 30 minutes before slicing. This brings the buttercream back to its creamy texture and lets the cake’s flavors fully bloom.
For an extra special presentation, serve slices with a scoop of premium vanilla ice cream or a dollop of freshly whipped cream. A light dusting of extra sprinkles just before serving adds a magical touch that will delight guests of all ages. For a birthday celebration, add candles and serve alongside glasses of cold milk or coffee for a classic pairing that never disappoints.
FAQs
Can I make this cake in advance?
Yes! You can bake the cake layers up to 2 days in advance. Wrap each cooled layer tightly in plastic wrap and store at room temperature. The frosting can be made 1 day ahead and stored in the refrigerator; just bring to room temperature and re-whip before using. A fully assembled Confetti Layer Cake can be refrigerated for up to 5 days.
Why did my sprinkles bleed color into the batter?
You likely used nonpareil sprinkles (the tiny round ones) instead of jimmy sprinkles. Always use jimmy-style rainbow sprinkles in the batter, as they hold their shape and color better during baking.
Can I freeze this cake?
Absolutely! Freeze unfrosted cake layers for up to 3 months, or freeze the completely frosted Confetti Layer Cake for up to 2 months. Thaw overnight in the refrigerator, then bring to room temperature before serving.
Why is cake flour recommended?
Cake flour has a lower protein content than all-purpose flour, resulting in a more tender, delicate crumb that’s perfect for this Confetti Layer Cake. If you must substitute, use 3 1/3 cups all-purpose flour mixed with 7 tablespoons cornstarch.
My cake sank in the middle—what went wrong?
This usually happens when the cake is underbaked, the oven door was opened too early in the baking process, or your leavening agents (baking powder/soda) are expired. Always test for doneness with a toothpick and make sure your ingredients are fresh.
Confetti Layer Cake
- Prep Time: 15 mins
- Cook Time: 30 mins
- Total Time: 45 mins
- Yield: 4 people 1x
- Category: Dessert
- Method: Cooking
- Cuisine: American
Description
Looking to bake a show-stopping dessert? Discover our tips for creating a stunning Confetti Layer Cake. Try it today!
Ingredients
- 3 and 3/4 cups (443g) cake flour (spooned & leveled)
- 1 teaspoon baking powder
- 1 teaspoon baking soda
- 1 teaspoon salt
- 1 and 1/4 cups (282g) unsalted butter, softened to room temperature
- 2 cups (400g) granulated sugar
- 1/3 cup (80ml) vegetable oil
- 4 large eggs, at room temperature*
- 2 large egg whites, at room temperature*
- 3 teaspoons (15ml) pure vanilla extract
- 1 and 1/2 cups (360ml) buttermilk, at room temperature*
- 3/4 cup (135g) rainbow sprinkles*
- 1 and 1/2 cups (340g) unsalted butter, softened to room temperature
- 5 and 1/2 cups (650g) confectioners’ sugar
- 1/3 cup (80ml) heavy cream, at room temperature
- 3 teaspoons (15ml) pure vanilla extract (or use clear imitation vanilla extract for stark white frosting)
- 1/8 teaspoon salt
- Optional: additional sprinkles for garnish
Instructions
- Step 1: Preheat oven to 350°F (177°C). Grease three 8-inch or 9-inch cake pans, line with parchment paper rounds, then grease the parchment paper. Parchment paper helps the cakes seamlessly release from the pans. (If it’s helpful, see this parchment paper rounds for cakes video & post.).
- Step 2: Whisk the cake flour, baking powder, baking soda, and salt together in a large bowl. Set aside.
- Step 3: Using a handheld or stand mixer fitted with a paddle attachment, beat the butter and sugar together on high speed for 5 full minutes until completely creamed together and fluffy. Scrape down the sides and up the bottom of the bowl with a silicone spatula as needed. (Here’s a helpful tutorial if you need guidance on how to cream butter and sugar.) Add the oil and beat for 1 minute until combined. Add the eggs, egg whites, and vanilla extract and beat on medium-high speed until combined. Scrape down the sides and up the bottom of the bowl with a silicone spatula as needed.
- Step 4: Add dry ingredients and buttermilk in three additions, mixing after each addition just until incorporated. Do not over-mix this batter. The batter will be velvety and thick. Gently fold in the sprinkles. Pour and spread the batter evenly into each cake pan.
- Step 5: Bake for around 25–26 minutes or until the cakes are baked through. (8-inch cakes may take about 27–28 minutes.) Tent the cakes with foil after about 15 minutes to prevent the sides and top from over-browning. To test for doneness, insert a toothpick into the center of the cake. If it comes out clean, it’s done.
- Step 6: Allow cakes to cool in the pans set on a wire rack for 20 minutes. Run a knife around the edges and then remove cakes from pans. Place cakes directly on wire racks to cool completely. The cakes must be completely cool before frosting and assembling.
- Step 7: In a large bowl using a handheld mixer or stand mixer fitted with a whisk or paddle attachment, beat the butter on medium speed until creamy, about 2 minutes. Add confectioners’ sugar, cream, vanilla extract, and salt. Beat on low speed for 30 seconds and then switch to high speed and beat for 2 minutes. Add more confectioners’ sugar if frosting seems too thin; more cream if frosting is too thick; or an extra pinch of salt if frosting is too sweet.
- Step 8: First, using a large serrated knife, slice a thin layer off the tops of the cakes to create a flat surface. Discard (or crumble over ice cream!). Place one cake layer on your cake stand, cake turntable, or serving plate. Using a flat icing spatula or small offset spatula, evenly cover the top with about 1 cup (about 250g) of frosting. Repeat with second cake layer, 1 more cup of frosting, and then the top cake layer. Spread a thin layer of frosting on the top and around the sides as a crumb coat. Run a bench scraper around the cake to smooth out crumb coat. Chill uncovered in the refrigerator for at least 30 minutes and up to 3 hours to set the crumb coat.
- Step 9: Spread the remaining frosting all over the top and sides. Garnish with extra sprinkles, if desired.
- Step 10: Serve cake immediately, or if you need to store it for a few hours, place it in a cake carrier at room temperature for up to 4 hours. For longer storage, refrigerate covered cake for up to 1 day. Cake is best served at room temperature, though, so if it’s been refrigerated, let it sit out at room temperature for 30 minutes before serving.
- Step 11: Cover leftover cake tightly and store it in the refrigerator for 5 days. Again, I like using a cake carrier for storing and transporting.
Notes
Try This Recipe and Leave a comment Below, your opinion matters to me!
Nutrition
- Serving Size: 4 serving
- Calories: 400
- Sugar: 5g
- Sodium: 400mg
- Fat: 10g
- Saturated Fat: 3g
- Unsaturated Fat: 7g
- Trans Fat: 0g
- Carbohydrates: 40g
- Fiber: 5g
- Protein: 15g
- Cholesterol: 50mg