
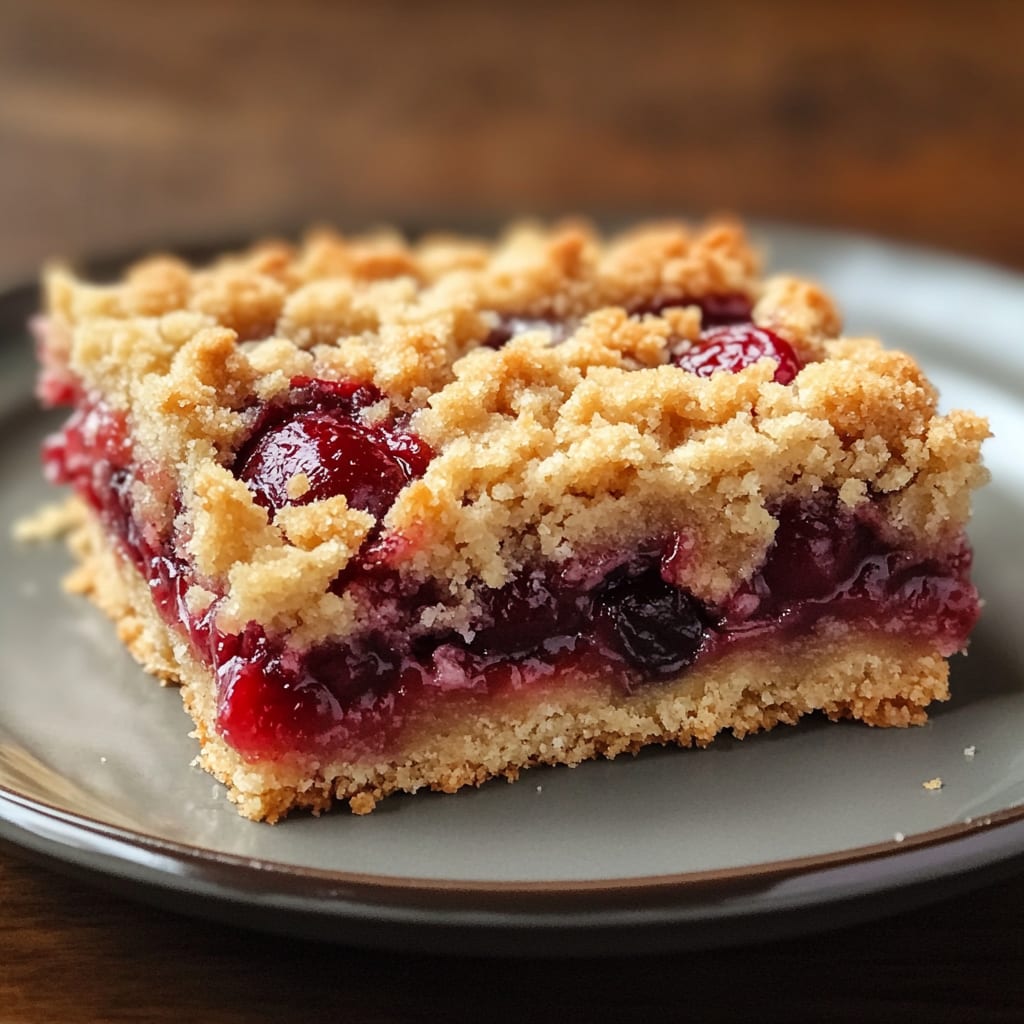
The irresistible aroma of sweet cherries bubbling beneath a golden, buttery crumble will fill your kitchen when you make these Cherry Crumble Bars. Each bite delivers the perfect balance of tart cherries, crunchy oat topping, and a tender shortbread base that melts in your mouth. These stunning ruby-red treats are versatile enough for breakfast with coffee or as an elegant dessert topped with vanilla ice cream. You’ll learn how to create bakery-quality cherry crumble bars with simple ingredients and foolproof techniques that guarantee perfect results every time.
Why You’ll Love This Recipe
These Cherry Crumble Bars will quickly become your go-to dessert for any occasion. The contrasting textures make these bars irresistible – a buttery, tender shortbread base provides the perfect foundation, while the jammy cherry filling offers a bright, fruity middle layer that balances the sweet, crunchy oat crumble topping. Each component complements the others perfectly, creating a harmonious bite every time.
What makes these cherry bars truly special is their versatility. The recipe works beautifully with fresh cherries during summer months, but frozen or canned cherries allow you to enjoy this treat year-round. Plus, these bars come together quickly without specialized equipment – just a few bowls and a baking pan.
Best of all, these cherry crumble bars store exceptionally well, making them perfect for meal prep, potlucks, or when you need a make-ahead dessert that still tastes freshly baked days later.
Ingredients
For the Shortbread Base:
- 1 cup (225g) unsalted butter, softened
- ½ cup (100g) granulated sugar
- 2 cups (250g) all-purpose flour
- ¼ teaspoon salt
- 1 teaspoon vanilla extract
For the Cherry Filling:
- 4 cups (600g) fresh cherries, pitted and halved (or 4 cups frozen cherries, thawed)
- ⅔ cup (135g) granulated sugar
- 3 tablespoons cornstarch
- 2 tablespoons lemon juice
- 1 teaspoon almond extract (optional but recommended)
For the Crumble Topping:
- 1 cup (90g) rolled oats
- ¾ cup (95g) all-purpose flour
- ½ cup (100g) brown sugar, packed
- ½ cup (115g) unsalted butter, cold and cubed
- ¼ teaspoon cinnamon
- Pinch of salt
The star ingredient is unquestionably the cherries. Sweet cherries provide natural sweetness, while tart cherries deliver a wonderful contrast to the buttery crumble. The addition of almond extract enhances the cherry flavor, creating that classic cherry dessert taste everyone loves in homemade cherry dessert bars.
Pro Tips
Perfectly Pitted Cherries: When making cherry crumble bars, proper cherry preparation is crucial. If using fresh cherries, invest in a cherry pitter to save time and reduce mess. No pitter? Use a paperclip opened up into an S-shape or the tip of a pastry bag to push the pits out. To avoid stained fingers, wear food-safe gloves while pitting.
Achieving the Ideal Crumble Texture: For the perfect crumble topping, ensure your butter is very cold. Cut it into small cubes and use your fingertips (not your palms) to work it into the dry ingredients. Stop when the mixture resembles coarse breadcrumbs with some pea-sized butter pieces remaining. This creates those delightful crispy pockets in the finished crumble.
Preventing Soggy Bottoms: To ensure your shortbread base stays crisp beneath the cherry filling, pre-bake it for about 15 minutes before adding the filling. This creates a barrier that prevents the juicy cherry mixture from soaking into the crust. Another trick: dust a tablespoon of flour over the pre-baked base before adding the filling to further protect against sogginess.
Instructions
Step 1: Prepare Your Pan and Oven
Preheat your oven to 350°F (175°C). Line a 9×13-inch baking pan with parchment paper, leaving an overhang on the sides for easy removal. The parchment creates handles that will help you lift the entire slab of cherry crumble bars out cleanly after baking.
Step 2: Make the Shortbread Base
In a large bowl, beat the softened butter and sugar until light and fluffy, about 2-3 minutes. Add the vanilla extract and mix to combine. In a separate bowl, whisk together the flour and salt, then gradually add this to your butter mixture, stirring until it forms a soft dough. Press this mixture evenly into your prepared pan, creating a firm, flat layer. Prick the dough all over with a fork and bake for 15 minutes until just barely golden at the edges.
Step 3: Prepare the Cherry Filling
While the base bakes, combine the cherries, sugar, cornstarch, lemon juice, and almond extract in a saucepan. Cook over medium heat for about 5-7 minutes, stirring frequently until the mixture thickens and begins to bubble. The cornstarch will activate when it boils, creating that perfect jammy consistency that makes these cherry crumble bars so delicious.
Step 4: Make the Crumble Topping
In a medium bowl, mix together the oats, flour, brown sugar, cinnamon, and salt. Add the cold cubed butter and use your fingertips to work it into the dry ingredients until the mixture resembles coarse crumbs with some larger clumps. The varying sizes create wonderful texture in your finished bars.
Step 5: Assemble and Bake
Once the crust has pre-baked, spread the hot cherry filling evenly over the warm shortbread base. Scatter the crumble topping evenly over the cherry layer, making sure to cover the entire surface. Return the pan to the oven and bake for an additional 25-30 minutes, until the topping is golden brown and the filling is bubbling at the edges.
Step 6: Cool Completely
The most difficult part! Allow the cherry crumble bars to cool completely in the pan before lifting out using the parchment paper handles. For the cleanest cuts, refrigerate for 1-2 hours before slicing into bars. This patience will be rewarded with perfectly neat squares that showcase the beautiful layers.
Variations
Mixed Berry Cherry Crumble Bars: Create a delightful mixed berry variation by substituting half the cherries with a mixture of blueberries, raspberries, and blackberries. This creates a wonderful depth of flavor and beautiful color in your fruit bars. The berry medley complements the cherries perfectly while adding new dimensions of flavor and texture.
Chocolate Cherry Crumble Bars: For chocolate lovers, add ½ cup of mini chocolate chips to the cherry filling and replace ¼ cup of the flour in the crumble topping with unsweetened cocoa powder. The combination of chocolate and cherries is classic for good reason – the rich, deep chocolate notes enhance the bright cherry flavor for an irresistible treat that feels more indulgent than traditional cherry crumble bars.
Gluten-Free Cherry Crumble Bars: These bars adapt beautifully to dietary restrictions. Simply substitute the all-purpose flour with your favorite gluten-free flour blend (one that contains xanthan gum works best) in both the base and topping. For the oats, be sure to use certified gluten-free rolled oats. The texture remains remarkably similar to the original version.
Storage and Serving
Your cherry crumble bars will stay fresh in an airtight container at room temperature for 2-3 days. For longer storage, refrigerate for up to a week – the bars will actually firm up nicely in the refrigerator, making them even easier to handle.
For make-ahead convenience, these bars freeze beautifully. Layer them between pieces of parchment paper in an airtight container and freeze for up to 3 months. Thaw overnight in the refrigerator or for about an hour at room temperature.
For a simple yet elegant dessert, warm a cherry crumble bar in the microwave for 15-20 seconds and serve with a scoop of vanilla ice cream or a dollop of whipped cream. The contrast of warm, fruity bar with cold, creamy topping is heavenly.
These bars also make an excellent breakfast paired with Greek yogurt and a drizzle of honey, or as a sweet treat with afternoon tea or coffee.
FAQs
Can I use frozen cherries instead of fresh?
Absolutely! Frozen cherries work wonderfully in these cherry crumble bars. Thaw them first and drain any excess liquid to prevent your filling from becoming too watery. Adjust the sugar slightly if your frozen cherries are pre-sweetened.
Why is my cherry filling too runny?
The filling needs to reach a full boil to activate the cornstarch. Make sure to cook it until it noticeably thickens and bubbles. If your cherries were particularly juicy, you might need an extra tablespoon of cornstarch.
Can I make these bars ahead of time for a party?
Definitely! These bars actually improve after a day as the flavors meld. Make them up to two days ahead and store at room temperature, or freeze for longer storage.
How do I get clean cuts when slicing the bars?
For professional-looking bars, refrigerate them until firm (about 2 hours), then use a sharp knife dipped in hot water and wiped clean between cuts.
Can I double this recipe?
Yes! Double all ingredients and use two 9×13-inch pans, or use a large half-sheet pan (approximately 18×13 inches) and increase the baking time by 5-10 minutes.
Conclusion
These Cherry Crumble Bars are comfort food at its finest — buttery, sweet, and bursting with bright cherry flavor in every perfectly textured bite. They’re the kind of treat that bridges seasons, working just as beautifully with summer’s fresh cherries as they do with preserved fruit in the depths of winter. Whether you’re serving them warm with ice cream for a cozy dessert or packing them in lunchboxes for a sweet surprise, these bars bring that homemade goodness that store-bought treats simply can’t match. Make a batch today and discover your new favorite way to enjoy cherries!
Print
Cherry Crumble Bars Recipe
- Prep Time: 20 minutes
- Cook Time: 45 minutes
- Total Time: 1 hour 5 minutes
- Yield: 12 bars 1x
- Category: Dessert
- Method: Baking
- Cuisine: Americaine
Description
Cherry Crumble Bars Recipe bursting with sweet cherries and buttery crumble, a crowd-pleasing dessert that is quick and comforting.
Ingredients
- 1 cup (225g) unsalted butter, softened
- ½ cup (100g) granulated sugar
- 2 cups (250g) all-purpose flour
- ¼ teaspoon salt
- 1 teaspoon vanilla extract
- 4 cups (600g) fresh cherries, pitted and halved (or 4 cups frozen cherries, thawed)
- ⅔ cup (135g) granulated sugar
- 3 tablespoons cornstarch
- 2 tablespoons lemon juice
- 1 teaspoon almond extract (optional but recommended)
- 1 cup (90g) rolled oats
- ¾ cup (95g) all-purpose flour
- ½ cup (100g) brown sugar, packed
- ½ cup (115g) unsalted butter, cold and cubed
- ¼ teaspoon cinnamon
- Pinch of salt
Instructions
- Step 1: Prepare Your Pan and Oven Preheat your oven to 350°F (175°C). Line a 9×13-inch baking pan with parchment paper, leaving an overhang on the sides for easy removal. The parchment creates handles that will help you lift the entire slab of cherry crumble bars out cleanly after baking.
- Step 2: Make the Shortbread Base In a large bowl, beat the softened butter and sugar until light and fluffy, about 2-3 minutes. Add the vanilla extract and mix to combine. In a separate bowl, whisk together the flour and salt, then gradually add this to your butter mixture, stirring until it forms a soft dough. Press this mixture evenly into your prepared pan, creating a firm, flat layer. Prick the dough all over with a fork and bake for 15 minutes until just barely golden at the edges.
- Step 3: Prepare the Cherry Filling While the base bakes, combine the cherries, sugar, cornstarch, lemon juice, and almond extract in a saucepan. Cook over medium heat for about 5-7 minutes, stirring frequently until the mixture thickens and begins to bubble. The cornstarch will activate when it boils, creating that perfect jammy consistency that makes these cherry crumble bars so delicious.
- Step 4: Make the Crumble Topping In a medium bowl, mix together the oats, flour, brown sugar, cinnamon, and salt. Add the cold cubed butter and use your fingertips to work it into the dry ingredients until the mixture resembles coarse crumbs with some larger clumps. The varying sizes create wonderful texture in your finished bars.
- Step 5: Assemble and Bake Once the crust has pre-baked, spread the hot cherry filling evenly over the warm shortbread base. Scatter the crumble topping evenly over the cherry layer, making sure to cover the entire surface. Return the pan to the oven and bake for an additional 25-30 minutes, until the topping is golden brown and the filling is bubbling at the edges.
- Step 6: Cool Completely The most difficult part! Allow the cherry crumble bars to cool completely in the pan before lifting out using the parchment paper handles. For the cleanest cuts, refrigerate for 1-2 hours before slicing into bars. This patience will be rewarded with perfectly neat squares that showcase the beautiful layers.
Notes
Fresh ingredients will always yield the best flavor results.
Nutrition
- Serving Size: 1 bar
- Calories: 290
- Sugar: 19g
- Sodium: 125mg
- Fat: 15g
- Saturated Fat: 9g
- Unsaturated Fat: 5g
- Trans Fat: 0g
- Carbohydrates: 37g
- Fiber: 2g
- Protein: 3g
- Cholesterol: 40mg


