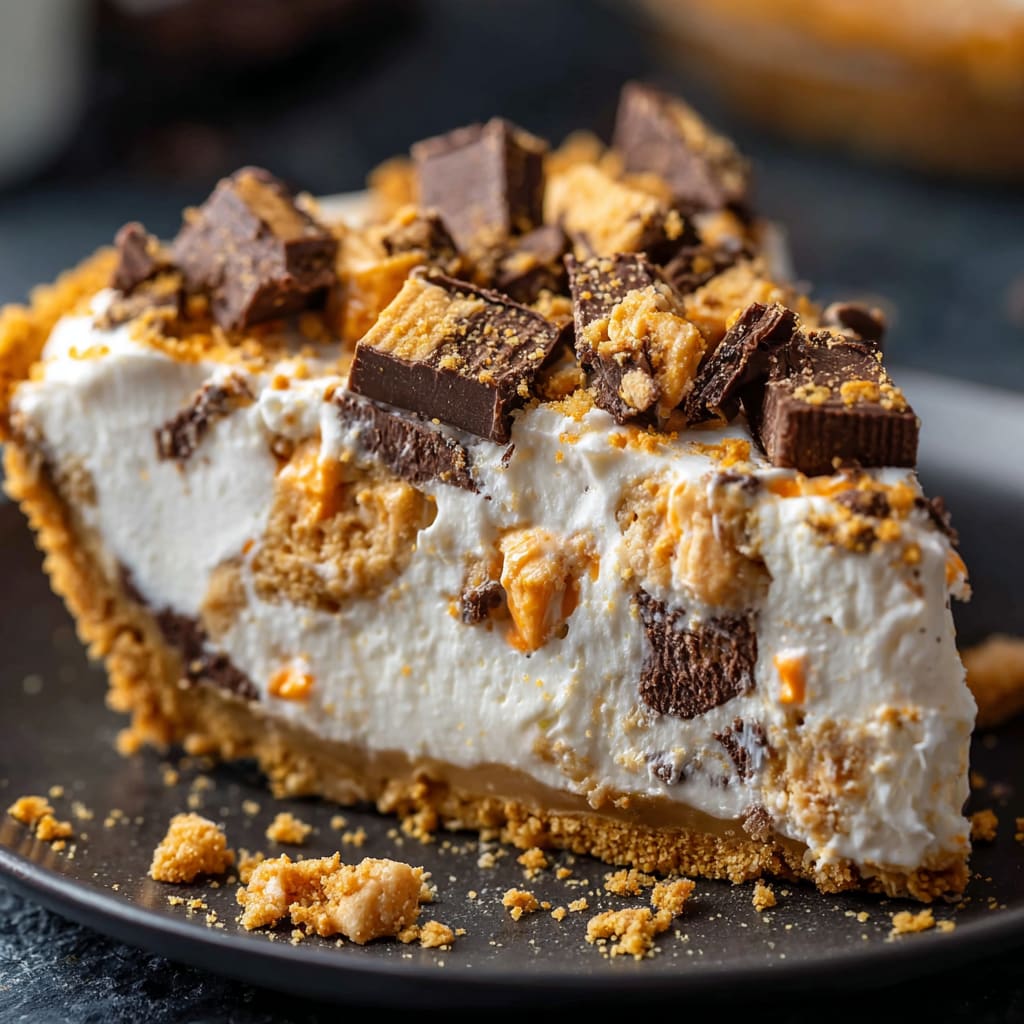
Imagine sinking your fork into a creamy, no-bake dessert layered with crunchy candy pieces and silky peanut butter filling — that’s exactly what Butterfinger Pie with Peanut Butter delivers. This pie brings together bold peanut butter flavor, a buttery graham cracker crust, and those iconic crispy, chocolatey Butterfinger pieces that everyone loves. It’s the kind of dessert that disappears fast at potlucks, holidays, and family gatherings. Whether you’re a seasoned baker or a total beginner, this recipe is surprisingly simple to put together. You’ll learn how to make the perfect crust, build a dreamy no-bake filling, and top it all off for maximum crunch.
Why You’ll Love This Recipe
This Butterfinger Pie with Peanut Butter checks every box for the ultimate crowd-pleasing dessert. First, it requires zero baking — your oven stays off the entire time. That alone makes it a go-to recipe when the weather is warm or when you’re short on time. The filling is luxuriously creamy thanks to the combination of cream cheese and whipped topping, while the crushed Butterfinger candy bars add irresistible crunch and that signature honeycomb toffee flavor. The graham cracker crust holds everything together with a satisfying buttery crispness in every bite. It’s also incredibly easy to make ahead of time, freeing you up to enjoy your gathering instead of spending hours in the kitchen. Kids and adults alike absolutely love this pie, making it one of those recipes you’ll return to again and again for every special occasion.
Ingredients List for the Butterfinger Pie with Peanut Butter
You only need a handful of simple ingredients to pull this stunning pie together. Make sure your cream cheese is fully softened and your whipped topping is completely thawed before you begin.
• 2 cups graham cracker crumbs
• 1/2 cup (1 stick) unsalted butter, melted
• 1 cup creamy peanut butter
• 8 oz cream cheese (softened)
• 1 cup powdered sugar
• 1 tsp vanilla extract
• 8 oz whipped topping (like Cool Whip, thawed)
• 4 Butterfinger candy bars (2.1 oz each), crushed (plus extra for topping)
Pro Tips
Soften the cream cheese completely. Cold cream cheese will leave lumps in your filling no matter how long you beat it. Set it out at room temperature for at least 45 minutes before mixing for a perfectly smooth result.
Crush Butterfingers the right way. Keep the candy bars in their wrappers and use a rolling pin to crush them before opening. This controls the mess and gives you a mix of fine crumbles and larger pieces for better texture throughout the peanut butter Butterfinger pie.
Don’t rush the chill time. This no-bake Butterfinger peanut butter pie needs a minimum of four hours in the refrigerator to set properly. Overnight chilling is even better. Skipping or shortening this step will result in a filling that’s too soft to slice cleanly, no matter how perfect the rest of the process was.
Instructions
Step 1: Prepare the crust
In a medium bowl, mix graham cracker crumbs with melted butter until well combined. Press the mixture firmly into the bottom and up the sides of a 9-inch pie dish. Refrigerate while you make the filling.
Step 2: Make the filling
In a large bowl, beat together peanut butter and softened cream cheese until smooth, about 2 minutes. Add powdered sugar and vanilla, mixing until well combined and creamy, about 1-2 minutes more.
Step 3: Fold in whipped topping
Gently fold the whipped topping into the peanut butter mixture until just combined. Be careful not to overmix.
Step 4: Add Butterfinger pieces
Crush 3 Butterfinger bars (save one for topping) and fold them into the peanut butter mixture.
Step 5: Assemble the pie
Pour the filling into the prepared crust, smoothing the top with a spatula.
Step 6: Add topping
Crush the remaining Butterfinger bar and sprinkle it evenly over the top of the pie.
Step 7: Chill
Refrigerate the pie for at least 4 hours or overnight to set.
Step 8: Serve
When ready to serve, slice the pie and enjoy! For clean slices, dip your knife in hot water and wipe it dry between cuts.
Variations
Chocolate Lover’s Version
Swap the graham cracker crust for an Oreo cookie crust by blending Oreo crumbs with melted butter. The deep chocolate flavor pairs beautifully with the peanut butter filling and makes this Butterfinger Pie with Peanut Butter even more indulgent. Drizzle melted chocolate over the top before chilling for extra flair.
Frozen Butterfinger Pie
Instead of refrigerating, place the assembled pie in the freezer for four to six hours for a frozen treat that eats like ice cream pie. This variation is especially popular in summer and works perfectly as a make-ahead party dessert.
Nutella Swirl Variation
Before folding in the crushed Butterfinger pieces, swirl two to three tablespoons of Nutella through the peanut butter filling using a knife or skewer. This adds a rich hazelnut chocolate layer that makes every bite even more complex and delicious.
Storage and Serving
Storing your pie:
Cover the Butterfinger Pie with Peanut Butter tightly with plastic wrap or store it in an airtight container and keep it refrigerated. It stays fresh for up to five days in the refrigerator. For longer storage, freeze the pie for up to two months. Wrap it well in plastic wrap and then aluminum foil to prevent freezer burn. Thaw frozen pie slices in the refrigerator overnight before serving.
Serving suggestions:
Serve this pie straight from the refrigerator for the cleanest slices and best texture. Add a dollop of extra whipped topping on each slice for presentation. A light drizzle of chocolate or caramel sauce just before serving takes each portion to the next level. This pie pairs wonderfully with a hot cup of coffee or a cold glass of milk.
FAQs
Can I make this pie a day ahead of time?
Absolutely. This Butterfinger Pie with Peanut Butter is actually better when made the day before because the filling firms up beautifully overnight. Simply cover and refrigerate until you’re ready to serve.
Can I use crunchy peanut butter instead of creamy?
Yes, you can. Crunchy peanut butter will add extra texture to the filling. Just keep in mind that the result will be slightly less smooth than when creamy peanut butter is used.
What if I can’t find Butterfinger candy bars?
You can substitute any crispy peanut butter candy or even peanut butter toffee bits available in the baking aisle. The flavor profile will be slightly different but equally delicious.
Can I use homemade whipped cream instead of Cool Whip?
Yes. Whip one cup of heavy cream with two tablespoons of powdered sugar until stiff peaks form and use it as a direct substitute. Note that the pie may be slightly less stable, so keep it well chilled.
How do I prevent the crust from crumbling when I slice it?
Press the graham cracker crust firmly and evenly into the dish using the bottom of a measuring cup. Chilling the crust for at least 30 minutes before adding the filling also helps it hold together cleanly when sliced.

Butterfinger Pie with Peanut Butter
- Prep Time: 15 mins
- Cook Time: 30 mins
- Total Time: 45 mins
- Yield: 4 people 1x
- Category: Dessert
- Method: Cooking
- Cuisine: American
Description
Indulge in a delectable Butterfinger Pie with Peanut Butter recipe. Discover the perfect dessert for peanut butter lovers today!
Ingredients
- 2 cups graham cracker crumbs
- 1/2 cup 1 stick unsalted butter, melted
- 1 cup creamy peanut butter
- 8 oz cream cheese (softened)
- 1 cup powdered sugar
- 1 tsp vanilla extract
- 8 oz whipped topping (like Cool Whip, thawed)
- 4 Butterfinger candy bars (2.1 oz each, crushed (plus extra for topping))
Instructions
- Step 1: Prepare the crust: In a medium bowl, mix graham cracker crumbs with melted butter until well combined. Press the mixture firmly into the bottom and up the sides of a 9-inch pie dish. Refrigerate while you make the filling.
- Step 2: Make the filling: In a large bowl, beat together peanut butter and softened cream cheese until smooth, about 2 minutes. Add powdered sugar and vanilla, mixing until well combined and creamy, about 1-2 minutes more.
- Step 3: Fold in whipped topping: Gently fold the whipped topping into the peanut butter mixture until just combined. Be careful not to overmix.
- Step 4: Add Butterfinger pieces: Crush 3 Butterfinger bars (save one for topping) and fold them into the peanut butter mixture.
- Step 5: Assemble the pie: Pour the filling into the prepared crust, smoothing the top with a spatula.
- Step 6: Add topping: Crush the remaining Butterfinger bar and sprinkle it evenly over the top of the pie.
- Step 7: Chill: Refrigerate the pie for at least 4 hours or overnight to set.
- Step 8: Serve: When ready to serve, slice the pie and enjoy! For clean slices, dip your knife in hot water and wipe it dry between cuts.
Notes
Try This Recipe and Leave a comment Below, your opinion matters to me!
Nutrition
- Serving Size: 4 serving
- Calories: 400
- Sugar: 5g
- Sodium: 400mg
- Fat: 10g
- Saturated Fat: 3g
- Unsaturated Fat: 7g
- Trans Fat: 0g
- Carbohydrates: 40g
- Fiber: 5g
- Protein: 15g
- Cholesterol: 50mg