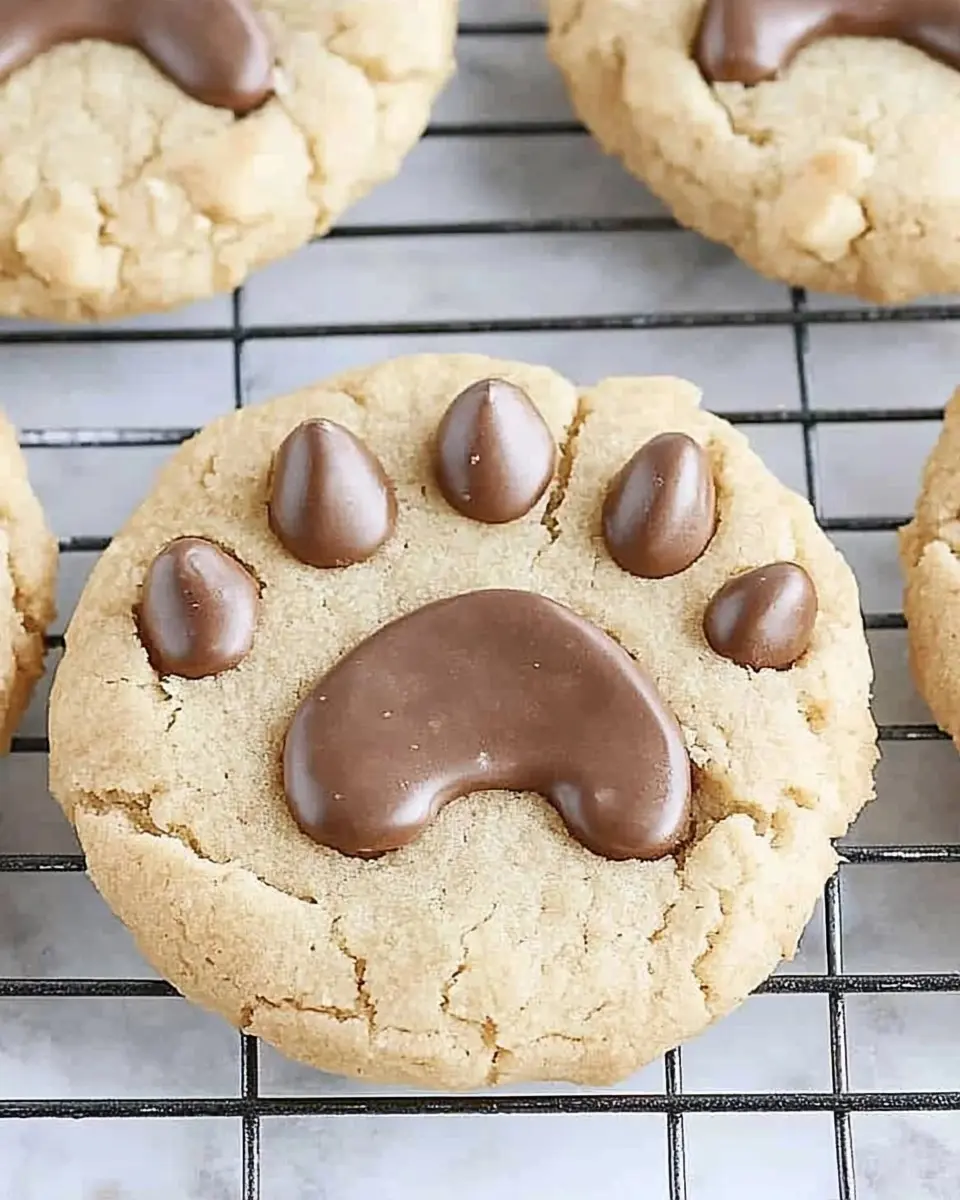
Looking for a fun and delicious cookie to bake? Bear Paw Cookies are the answer! These adorable, paw-shaped treats are not only fun to make, but also irresistibly delicious. The buttery, sweet dough forms the perfect foundation for a creative and charming design that will impress both kids and adults. In this article, you’ll learn how to make Bear Paw Cookies, tips for getting the perfect texture, and creative variations to make them your own.
Why You’ll Love Bear Paw Cookies
Bear Paw Cookies are a delightful combination of flavor, fun, and creativity. Their soft, chewy texture and sweet, buttery taste make them a treat that everyone will enjoy. But what really makes them special is their unique design. The paw print shape is both playful and eye-catching, making these cookies perfect for animal-themed parties, nature lovers, or just to make your baking a little more fun.
The process of making Bear Paw Cookies is simple yet rewarding. The dough is easy to work with, and the paw print design is fun to create. Kids can even get involved in pressing down the dough and shaping the prints, making it a perfect family baking activity. Whether you’re baking for a special occasion or just because, these cookies bring a smile to anyone who sees them—and even more to those who get to eat them.
Beyond their fun appearance, these cookies are incredibly versatile. You can adjust the flavor by adding chocolate chips, nuts, or other mix-ins, or you can opt for a simple, pure version of the cookie that allows the buttery dough to shine. The possibilities are endless, but one thing’s for sure: Bear Paw Cookies are sure to become a family favorite.
Bear Paw Cookie Recipe Details
The recipe for Bear Paw Cookies is simple and uses basic ingredients. At the heart of the dough is butter, which gives the cookies a rich flavor and a tender texture. Granulated sugar provides the sweetness, while eggs bind the ingredients together, creating the perfect cookie dough. The inclusion of all-purpose flour results in a soft, chewy cookie that isn’t too dense, and baking soda helps the dough rise slightly, giving it the perfect texture.
One of the highlights of making Bear Paw Cookies is the easy-to-remember method. Once the dough is prepared, all that’s left is to roll it into small balls, flatten them slightly, and press the paw print design into the dough using a fork or your hands. The design adds a fun touch and makes the cookies stand out—perfect for themed parties or as a fun treat to enjoy with friends and family.
The versatility of Bear Paw Cookies is what makes them so great. You can switch up the ingredients to suit your taste or the season. Add chocolate chips for a rich, sweet treat, or sprinkle some colorful sugar to make them festive. Regardless of how you customize them, these cookies are sure to impress with their fun design and delicious flavor.
Nutritional Information for Bear Paw Cookies
While Bear Paw Cookies are undeniably delicious, they are also quite rich, as they contain butter, sugar, and flour. A typical serving (one cookie) contains approximately 150-200 calories, depending on the size of the cookie and the ingredients used. The butter provides healthy fats, while the sugar contributes to the sweetness and gives the cookies an energy boost. Flour provides carbohydrates, which are necessary for energy.
To make these cookies a little lighter, you can experiment with substitutions. For example, replace half of the butter with unsweetened applesauce for a lower-fat version. Alternatively, you can use whole wheat flour in place of all-purpose flour for added fiber, or swap the sugar for a natural sweetener like honey or maple syrup. These changes can help reduce the calorie content while still maintaining the texture and flavor of the cookies.
If you’re looking for a gluten-free version of Bear Paw Cookies, simply swap out the all-purpose flour for a gluten-free flour blend. You can also experiment with almond flour for a nuttier flavor. Additionally, if you want to make the cookies dairy-free, use a plant-based butter substitute in place of regular butter. These swaps allow you to adjust the recipe to fit various dietary needs without compromising on taste.
Ingredients for Bear Paw Cookies
To make the perfect Bear Paw Cookies, you’ll need the following ingredients:
- 1 cup unsalted butter, softened
- 1 cup granulated sugar
- 2 ½ cups all-purpose flour
- 1 teaspoon baking soda
- ½ teaspoon salt
- 1 egg
- 1 teaspoon vanilla extract
- Optional: ½ cup chocolate chips, nuts, or dried fruit
These ingredients are easy to find and come together to form a cookie dough that’s perfect for creating the iconic paw print shape. The butter adds richness and ensures the cookies are tender, while the sugar provides sweetness. The flour gives the dough structure, and the baking soda helps the cookies rise slightly, giving them a soft and chewy texture.
You can add optional ingredients like chocolate chips or chopped nuts for added flavor and texture. If you prefer a less sweet cookie, you can cut back on the sugar, or use a natural sweetener like coconut sugar. The dough itself is very versatile, and you can adjust the ingredients to suit your preferences or dietary restrictions.
Equipment Needed for Bear Paw Cookies
To make Bear Paw Cookies, you will need the following kitchen tools:
- Mixing bowls: For combining the wet and dry ingredients.
- Electric mixer or hand whisk: To cream the butter and sugar together.
- Measuring cups and spoons: For accurate ingredient measurements.
- Baking sheets: To place your cookies while they bake.
- Parchment paper or silicone baking mat: To line your baking sheets and prevent sticking.
- Fork: To create the paw print design in the dough.
- Cooling rack: To cool your cookies after baking.
These tools are simple yet essential for making perfect Bear Paw Cookies. Using parchment paper or a silicone baking mat ensures that your cookies bake evenly and don’t stick to the baking sheet, making cleanup easier.
Pro Tips for Making Perfect Bear Paw Cookies
To make sure your Bear Paw Cookies turn out perfectly every time, here are some helpful tips:
- Use softened butter: Softened butter helps the dough come together more easily and results in a smoother, more uniform texture. Allow the butter to sit at room temperature for about 30 minutes before using it.
- Don’t overmix the dough: Once the dry ingredients are added to the wet ingredients, mix until just combined. Overmixing can result in dense cookies.
- Chill the dough: If the dough is too soft to handle, refrigerate it for about 30 minutes. Chilled dough is easier to shape and will hold its form better during baking.
- Use a fork to press the paw print: For a simple and effective paw print design, use a fork to press down on the dough. Gently press four prongs to create the toes, then add a round shape in the center for the paw pad.
- Adjust the bake time: Keep a close eye on your cookies as they bake. Bake them until the edges are lightly golden, but the centers remain soft. This ensures a chewy, tender texture.
- Customize with add-ins: If you’d like to make your cookies extra special, add chocolate chips, nuts, or dried fruit to the dough. This adds variety and gives the cookies a unique flavor.
Instructions for Bear Paw Cookies
Follow these simple steps to make Bear Paw Cookies:
- Preheat the oven: Preheat your oven to 350°F (175°C) and line two baking sheets with parchment paper or silicone baking mats.
- Cream the butter and sugar: In a large bowl, use an electric mixer or hand whisk to cream the softened butter and granulated sugar together until light and fluffy.
- Add the egg and vanilla: Beat in the egg and vanilla extract until fully incorporated.
- Mix the dry ingredients: In a separate bowl, whisk together the all-purpose flour, baking soda, and salt. Gradually add the dry ingredients to the wet ingredients, mixing until just combined.
- Shape the dough: Roll the dough into 1-inch balls and place them on the prepared baking sheets. Use a fork to gently press down on the dough, creating the paw print shape. Press the fork gently to form four “toes” on each ball.
- Bake the cookies: Bake the cookies for 8-10 minutes, or until the edges are lightly golden but the centers remain soft. Let the cookies cool on the baking sheets for 5 minutes before transferring them to a cooling rack to cool completely.
- Serve and enjoy: Once the cookies have cooled, enjoy them with a glass of milk or serve them at your next party or gathering.
Recipe Variations for Bear Paw Cookies
Bear Paw Cookies are easily customizable to suit different tastes and preferences. Here are a few variations you can try:
- Chocolate Chip Bear Paw Cookies: Add ½ cup of chocolate chips to the dough for a sweet, melty treat in every bite.
- Nutty Bear Paw Cookies: Mix in chopped nuts such as walnuts, pecans, or almonds for added crunch and flavor.
- Cinnamon Bear Paw Cookies: Add 1 teaspoon of cinnamon to the dough for a warm, spicy kick.
- Gluten-Free Bear Paw Cookies: Swap out the all-purpose flour for a gluten-free flour blend to make these cookies gluten-free. Be sure to check that your baking soda is gluten-free as well.
- Frosted Bear Paw Cookies: Once the cookies are baked and cooled, drizzle them with a simple glaze or frosting for an extra touch of sweetness.
Storage Instructions for Bear Paw Cookies
Bear Paw Cookies can be stored in an airtight container at room temperature for up to 1 week. If you want to keep them fresh for longer, you can freeze the cookies. Simply place the cooled cookies in a freezer-safe container, layering them with parchment paper to prevent sticking. Store in the freezer for up to 3 months. To thaw, simply remove the cookies from the freezer and allow them to come to room temperature.
Serving Suggestions for Bear Paw Cookies
Bear Paw Cookies are perfect for a variety of occasions. Serve them at animal-themed parties, family gatherings, or nature-related events. They also make a great addition to a dessert table or a fun treat for kids. For a delightful snack, pair these cookies with a glass of milk, hot chocolate, or tea.
FAQs
- Can I use margarine instead of butter?
Yes, margarine can be used as a substitute for butter, but the cookies may have a slightly different texture and flavor. - How can I make the cookies more flavorful?
Experiment with different extracts, like almond extract, or add mix-ins like cinnamon, chocolate chips, or dried fruit. - Can I make these cookies gluten-free?
Yes, you can substitute gluten-free flour to make these cookies suitable for a gluten-free diet. - How do I create the paw print design?
Use a fork to press gently on the dough, creating the “toes” and a rounded paw shape. Make sure to press lightly so the cookie doesn’t flatten too much. - Can I make the dough ahead of time?
Yes, you can refrigerate the dough for up to 3 days before baking. This helps the dough firm up and makes it easier to handle.
Conclusion
Bear Paw Cookies are a delightful, fun treat that will bring joy to any occasion. With their soft, chewy texture, buttery flavor, and cute paw print design, these cookies are perfect for parties, family gatherings, or simply as a snack. The easy-to-follow recipe and endless customization options make them a great addition to your baking repertoire. So, get in the kitchen and try making Bear Paw Cookies today—your friends and family will love them!
Print
Bear Paw Cookies Recipe
Description
Make adorable Bear Paw Cookies with a soft, chewy texture. Fun to bake and perfect for any occasion. Try this easy recipe today!
Ingredients
- 1 cup unsalted butter, softened
- 1 cup granulated sugar
- 2 ½ cups all-purpose flour
- 1 teaspoon baking soda
- ½ teaspoon salt
- 1 egg
- 1 teaspoon vanilla extract
- Optional: ½ cup chocolate chips, nuts, or dried fruit
Instructions
- Preheat the oven: Preheat your oven to 350°F (175°C) and line two baking sheets with parchment paper or silicone baking mats.
- Cream the butter and sugar: In a large bowl, use an electric mixer or hand whisk to cream the softened butter and granulated sugar together until light and fluffy.
- Add the egg and vanilla: Beat in the egg and vanilla extract until fully incorporated.
- Mix the dry ingredients: In a separate bowl, whisk together the all-purpose flour, baking soda, and salt. Gradually add the dry ingredients to the wet ingredients, mixing until just combined.
- Shape the dough: Roll the dough into 1-inch balls and place them on the prepared baking sheets. Use a fork to gently press down on the dough, creating the paw print shape. Press the fork gently to form four “toes” on each ball.
- Bake the cookies: Bake the cookies for 8-10 minutes, or until the edges are lightly golden but the centers remain soft. Let the cookies cool on the baking sheets for 5 minutes before transferring them to a cooling rack to cool completely.
- Serve and enjoy: Once the cookies have cooled, enjoy them with a glass of milk or serve them at your next party or gathering.


