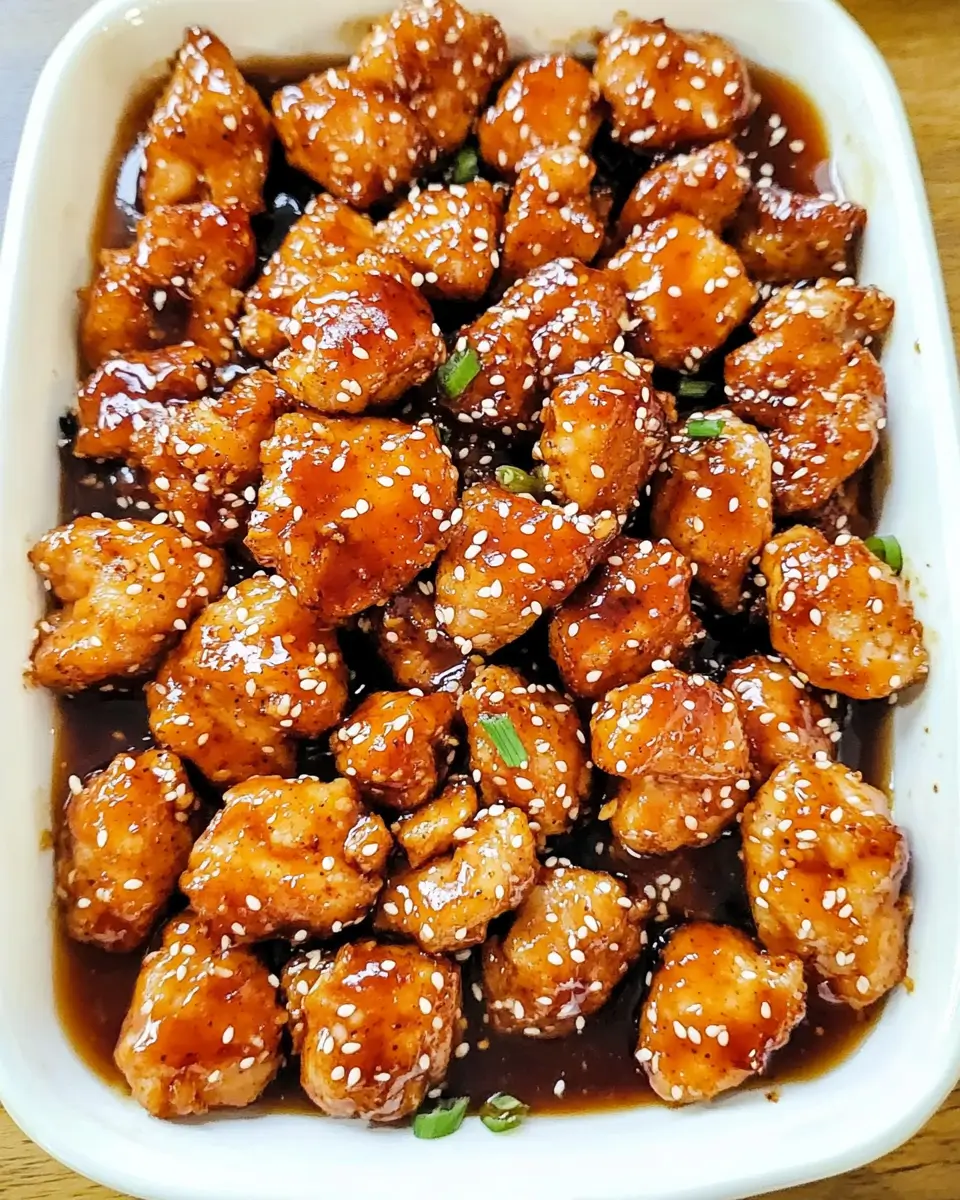
Imagine sinking your teeth into perfectly crispy chicken pieces glazed with a sweet, sticky honey sesame sauce that delivers an irresistible umami punch. This Baked Honey Sesame Chicken transforms the popular takeout classic into a healthier, oven-baked version that doesn’t sacrifice an ounce of flavor. The beautiful balance of sweet honey, nutty sesame, and savory soy creates a dish that will have everyone at your table reaching for seconds. You’ll learn how to achieve that restaurant-quality taste with simple ingredients and straightforward techniques that make this dish perfect for busy weeknights or weekend family dinners.
Why You’ll Love This Recipe
This Baked Honey Sesame Chicken recipe stands out from traditional stir-fried versions for several compelling reasons. First, baking instead of frying significantly reduces the oil content while still delivering that satisfying crispy exterior and tender, juicy interior that makes chicken dishes so craveable. The contrast between the crunchy sesame seed coating and the succulent chicken creates a textural masterpiece in every bite.
The honey sesame sauce is the true star here – thick enough to coat each piece of chicken perfectly without becoming soggy. It strikes the ideal balance between sweet and savory notes, with honey providing natural sweetness rather than refined sugar. The addition of toasted sesame oil adds a nutty depth that elevates the entire dish.
What’s more, this recipe is incredibly versatile. It pairs beautifully with steamed rice, noodles, or even a side of stir-fried vegetables for a complete meal. The make-ahead potential means you can prep components in advance, making this an excellent option for meal planning or entertaining. Unlike takeout versions that often leave you feeling heavy, this lightened-up baked version satisfies your craving without the guilt.
Ingredients
For the Chicken:
- 2 pounds (900g) boneless, skinless chicken thighs, cut into 1-inch pieces
- 2 large eggs, lightly beaten
- 1 cup (125g) all-purpose flour
- 1 cup (100g) panko breadcrumbs
- 1 teaspoon salt
- ½ teaspoon black pepper
- 2 tablespoons sesame seeds, plus more for garnish
- Cooking spray or 2 tablespoons olive oil
For the Honey Sesame Sauce:
- ½ cup (120ml) honey
- 3 tablespoons low-sodium soy sauce
- 2 tablespoons rice vinegar
- 1 tablespoon toasted sesame oil
- 2 cloves garlic, minced
- 1 tablespoon fresh ginger, grated
- 1 tablespoon cornstarch
- 2 tablespoons water
- 1 teaspoon red pepper flakes (optional, for heat)
For Serving:
- 2 green onions, thinly sliced
- Extra sesame seeds
- Steamed rice or noodles
The chicken thighs are preferable for their juiciness and flavor, but you can substitute chicken breasts for a leaner option. Low-sodium soy sauce helps control the saltiness, while toasted sesame oil provides that authentic Asian flavor profile that’s essential for genuine honey sesame chicken.
Pro Tips
Perfect Crispy Coating Without Frying
The secret to achieving a crispy exterior when baking Baked Honey Sesame Chicken lies in the preparation. First, ensure your chicken pieces are thoroughly patted dry before coating them. Any excess moisture will create steam in the oven, preventing that desired crispiness. For maximum crunch, lightly toast your panko breadcrumbs in a dry skillet for 2-3 minutes before using them in the coating mixture. This pre-toasting gives them a head start on browning in the oven. Finally, make sure to space the chicken pieces evenly on the baking sheet – overcrowding causes steaming instead of crisping.
Sauce Consistency Mastery
The perfect honey sesame sauce should be thick enough to coat the back of a spoon but not so thick it becomes gluey. The cornstarch slurry is key here – always mix it separately with cold water before adding it to your simmering sauce. When incorporating the cornstarch mixture, whisk continuously and cook for exactly 1-2 minutes until it reaches the desired thickness. If your sauce becomes too thick, thin it with a tablespoon of water or chicken broth; if too thin, mix a small amount of additional cornstarch with cold water and add gradually.
Flavor Layering Technique
For maximum flavor impact, toast your sesame seeds before adding them to both the chicken coating and sauce. Simply heat them in a dry pan over medium heat, stirring constantly until golden and fragrant (about 2-3 minutes). Additionally, allowing the minced garlic and ginger to “bloom” in the sesame oil for 30 seconds before adding other sauce ingredients releases their aromatic compounds, creating a deeper flavor profile for your honey sesame chicken.
Instructions
Step 1: Prepare the Chicken
Preheat your oven to 425°F (220°C) and line a large baking sheet with parchment paper or aluminum foil. Pat the chicken pieces completely dry with paper towels – this is crucial for achieving a crispy coating. Season the chicken with a pinch of salt and pepper. Set up your coating station with three shallow dishes: place the flour (seasoned with a pinch of salt and pepper) in the first, beaten eggs in the second, and a mixture of panko breadcrumbs and sesame seeds in the third.
Step 2: Coat the Chicken
Working with a few pieces at a time, dredge the chicken in flour, shaking off any excess. Next, dip into the beaten eggs, allowing any extra to drip off. Finally, press firmly into the panko-sesame mixture, ensuring each piece is evenly coated. Place the coated chicken on the prepared baking sheet, leaving some space between each piece. Lightly spray or brush the chicken with olive oil to help it brown properly.
Step 3: Bake the Chicken
Bake the chicken in the preheated oven for 15 minutes, then flip each piece and continue baking for another 10-12 minutes until golden brown and the internal temperature reaches 165°F (74°C). The panko coating should be crispy and the chicken should be cooked through but still juicy inside.
Step 4: Prepare the Honey Sesame Sauce
While the chicken is baking, make your sauce. In a medium saucepan over medium heat, combine honey, soy sauce, rice vinegar, sesame oil, minced garlic, grated ginger, and red pepper flakes (if using). Bring the mixture to a gentle simmer. In a small bowl, stir together cornstarch and water to create a slurry. Slowly pour this into the simmering sauce while whisking constantly. Continue to cook for 1-2 minutes until the sauce thickens enough to coat the back of a spoon. Remove from heat.
Step 5: Combine and Serve
When the chicken is done baking, transfer it to a large bowl. Pour about two-thirds of the warm honey sesame sauce over the chicken and gently toss until each piece is evenly coated. Save the remaining sauce for drizzling. Serve your Baked Honey Sesame Chicken immediately over steamed rice or noodles, garnished with sliced green onions and additional sesame seeds. Drizzle with the reserved sauce for extra flavor.
Variations
Spicy Honey Sesame Chicken
For those who enjoy heat, transform this Baked Honey Sesame Chicken into a spicier version by adding 1-2 tablespoons of sriracha or sambal oelek to the sauce mixture. You can also incorporate ½ teaspoon of crushed red pepper flakes into the panko coating for a more complex heat profile. This spicy variation works particularly well when served with cooling sides like cucumber salad or a simple coleslaw to balance the heat.
Gluten-Free Honey Sesame Chicken
Create a gluten-free version by replacing all-purpose flour with rice flour or cornstarch, and substitute the panko breadcrumbs with gluten-free breadcrumbs or crushed rice cereal. Be sure to use tamari instead of traditional soy sauce. The cooking method remains the same, and you’ll still achieve that wonderful crispy exterior. This adaptation maintains all the flavor of the original honey sesame chicken recipe while making it accessible for those with gluten sensitivities.
Vegetable-Loaded Sesame Chicken
Incorporate vegetables directly into this dish by adding 2 cups of bite-sized broccoli florets, bell pepper strips, or sugar snap peas to the baking sheet during the last 10 minutes of the chicken’s cooking time. Alternatively, stir-fry your favorite vegetables separately and toss them with the chicken and sauce at the end. This creates a complete one-dish meal and adds vibrant color, texture, and nutritional value to your Baked Honey Sesame Chicken.
Storage and Serving
Storage Solutions
This Baked Honey Sesame Chicken keeps beautifully in an airtight container in the refrigerator for up to 3 days. For best results when reheating, use an oven or toaster oven at 350°F (175°C) for about 10 minutes to help restore some crispness to the coating. Avoid microwaving if possible, as this tends to make the chicken soggy. If you need to make ahead, consider keeping the sauce separate from the baked chicken pieces until just before serving.
The sauce can be made up to 5 days in advance and stored separately in the refrigerator. Simply reheat gently on the stovetop and thin with a splash of water if needed before tossing with the chicken. For longer storage, the cooked chicken (without sauce) can be frozen for up to 1 month, though the texture may change slightly upon thawing.
Serving Suggestions
Transform this dish into a complete meal by serving it over fluffy jasmine rice or brown rice for added nutrition. For a lower-carb option, cauliflower rice works beautifully. Create a restaurant-style presentation by arranging the honey sesame chicken over rice with steamed broccoli on the side and a sprinkle of green onions and sesame seeds. For a fun twist, serve it in lettuce cups with matchstick carrots and cucumbers for a light lunch option. For entertaining, present it as part of an Asian-inspired buffet alongside vegetable spring rolls, edamame, and cucumber salad.
FAQs
Can I use chicken breasts instead of thighs?
Yes, you can substitute chicken breasts for thighs in this Baked Honey Sesame Chicken recipe. Cut them into 1-inch pieces and reduce the baking time by about 3-5 minutes, as breast meat cooks faster than thighs and can dry out more easily. Check for an internal temperature of 165°F (74°C) to ensure they’re properly cooked.
How can I make this recipe healthier?
To create a lighter version, use skinless chicken breasts, reduce the honey to 1/3 cup, and increase the proportion of panko to flour in the coating. You can also bake the chicken on a wire rack placed over a baking sheet to allow air circulation on all sides, reducing the need for oil.
Why isn’t my chicken getting crispy in the oven?
Several factors can prevent crispiness: overcrowding the baking sheet, not patting the chicken dry before coating, or an oven that’s not hot enough. Make sure to preheat thoroughly, space the chicken pieces well apart, and consider pre-toasting your panko breadcrumbs for extra crunch.
Can I make this recipe in an air fryer?
Absolutely! Cook the coated chicken in batches at 380°F (193°C) for 10-12 minutes, shaking the basket halfway through. The air fryer creates exceptionally crispy results for this honey sesame chicken.
Is there a substitute for honey in this recipe?
You can replace honey with maple syrup or agave nectar in equal amounts. Brown sugar mixed with a little water also works, though you’ll lose some of the floral notes that honey provides to the authentic flavor profile.
Conclusion
This Baked Honey Sesame Chicken is comfort food at its finest — a perfect blend of crispy, tender chicken coated in a sticky-sweet sauce that’s both familiar and exciting. It’s the kind of dish that transforms an ordinary weeknight into a special occasion, providing that restaurant experience without leaving home. Whether you’re cooking for picky eaters, health-conscious family members, or simply craving something deliciously satisfying, this recipe delivers on all fronts. The balance of textures and flavors creates a meal that feels indulgent while being surprisingly wholesome. Master this dish, and you’ll have a reliable crowd-pleaser in your cooking repertoire for years to come.
Print
Baked Honey Sesame Chicken
Description
This honey sesame chicken is what takeout dreams are made of, but better because you control the ingredients and it’s baked, not fried! Crispy on the outside, tender inside, and that sauce is absolutely addictive.
Ingredients
- 2 pounds (900g) boneless, skinless chicken thighs, cut into 1-inch pieces
- 2 large eggs, lightly beaten
- 1 cup (125g) all-purpose flour
- 1 cup (100g) panko breadcrumbs
- 1 teaspoon salt
- ½ teaspoon black pepper
- 2 tablespoons sesame seeds, plus more for garnish
- Cooking spray or 2 tablespoons olive oil
- ½ cup (120ml) honey
- 3 tablespoons low-sodium soy sauce
- 2 tablespoons rice vinegar
- 1 tablespoon toasted sesame oil
- 2 cloves garlic, minced
- 1 tablespoon fresh ginger, grated
- 1 tablespoon cornstarch
- 2 tablespoons water
- 1 teaspoon red pepper flakes (optional, for heat)
- 2 green onions, thinly sliced
- Steamed rice or noodles for serving
Instructions
- Preheat oven to 425°F (220°C) and line a baking sheet with parchment paper. Pat chicken pieces completely dry with paper towels.
- Set up three shallow dishes: flour seasoned with salt and pepper in the first, beaten eggs in the second, and panko mixed with sesame seeds in the third.
- Dredge chicken pieces in flour, then dip in egg, and finally coat in the panko mixture. Place on baking sheet with space between pieces.
- Lightly spray or brush chicken with oil and bake for 15 minutes. Flip pieces and bake another 10-12 minutes until golden and internal temperature reaches 165°F (74°C).
- While chicken bakes, make the sauce by combining honey, soy sauce, rice vinegar, sesame oil, garlic, ginger, and red pepper flakes in a saucepan over medium heat.
- Mix cornstarch and water in a small bowl, then whisk into simmering sauce. Cook 1-2 minutes until thickened.
- Transfer baked chicken to a large bowl, pour two-thirds of the sauce over it, and gently toss to coat.
- Serve immediately over rice or noodles, garnished with green onions and additional sesame seeds. Drizzle with remaining sauce.


